Electrical safety and old Singer sewing machines – part three!

Standard

I really hadn’t reckoned on doing this post, but on Sunday morning Elsie and I bought a 201 from a nice lady who told us she got it years ago to make some curtains.   But she never got round to making them, or for that matter, anything else.  In fact, she never used the machine.  Never even had a quick go on it when she got it home.

Which is just as well really, because look what we found when we took the mains leads and foot pedal out the case …

Now, in case you’re not familiar with old electric Singers and you haven’t read either of the last two posts on this subject, that’s the plug which plugs into the socket on the machine.  One of those brown leads goes to the foot pedal, and the other one goes to the mains plug.

When you switch the mains on, all should be well providing you’ve got that plug plugged into the machine properly.  If, however, you were to pull this particular plug from the machine without first switching off at the wall socket, and you happened to touch one of those sticky-outy bits, you would at best get a fright.  At worst, if your house electrics were in need of modernisation, you could get a potentially fatal electric shock.

In the picture below, the plug is connected to the mains and the “245” showing on my meter is the voltage at those exposed contacts …

That plug has not just been put back together incorrectly after it was dismantled, it’s been put back together in a way which beggars belief.

That actually takes a lot of doing.  How do you forget which way round those contacts were when you took the plug apart?  Why, when you connect each wire and bend it back like that, don’t you wonder why each of those contacts has a little cutout in it which the wire could sit neatly in, but it’s on the wrong side?  Why has the plug body got those depressions in it which are exactly the right size and shape to accomodate the tubular parts of the contacts which you’ve just put in facing away from them?  But above all, how come it never occurs to you when you put it back together that the plug doesn’t look like it did before you took it apart- and it now has exposed contacts which are obviously going to be live when connected to the mains?

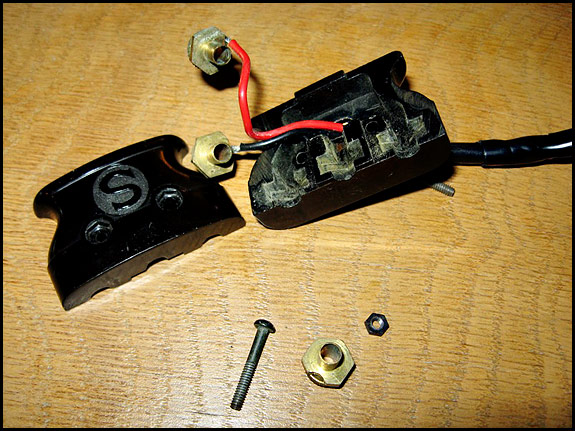
Above, contacts as assembled by our man.  Below, contacts the right way round, fitting snugly in the depressions in the plug, and with the cutouts for the wires now usable.

I’ve seen some very dodgy re-wiring on old sewing machines, but how this one came to pass is way beyond my understanding.

Anyhow, having succeeded in writing this post without using the words “incompetent” or “muppet”, I’ll quit while I’m ahead and save how he re-wired the foot pedal for another time …

Vintage Singer accessories … and oca

Standard

Picture of oca tubers

No, these are not witchetty grubs as eaten by the people who used to be Aboriginies but are now Indiginous Australians, they’re oca tubers as eaten by Elsie.  But before we get to them I have other stuff to tell you.

In case you haven’t noticed, I’ve put a few more bits and bobs on the Accessories for sale page recently including a Ruby Buttonholer Type RB and a Vanguard Buttonholer.  There’s a Singer Hemstitcher and Picot Edging Attachment 120687 (a.k.a the imitation hemstitcher) listed now, and another lovely Singer Automatic Zigzagger 160985 (the black one).

I’ve also listed a Singer Buttonhole Attachment 86662 with a scruffy box at a good price, and we’ve realised that in fact we have available a choice of these, all of which have been sorted by me and tested by Elsie so there’s nothing between them in terms of how well they work.  This, by the way, is the black version of the cream buttonholer with the red knobs that I’m on about, and the price is entirely dependent on cosmetic condition and how good the box is.

There’s more interesting things heading for that page in the next few weeks including a very nice green-box buttonholer 160506 and a Singer Zigzag Attachment 160620.  That’s the small one you don’t see all that often, which from a distance in bad light looks a bit like the Singer Blind Stitch Attachment.  And we’ve got a couple of those coming too!

I’m a bit busy making a built-in cupboard in the batchroom this week, but I’ve started work on blog posts about tension and about oiling your vintage Singer ‘cos we’ve had requests to do something about those two subjects, as well as more on maintenance of vintage Singers generally.  I was actually trying to finish one about oiling so it could come next, but that’s got put back by what we came home with on Sunday.

Would you believe that on the very day I posted part two of the thing on electrical safety, we bought a 201 with what turned out to be the most dangerous DIY rewire I’ve ever seen?  It’s an absolute classic this one is, so it gets a post all to itself and that’s what I’ve got to finish off tomorrow, so I’d better get the oca done and dusted now …

OK, those things are oca tubers, they’re related to the sunflower, they were one of the staples of the Incas, and they’re about the size of your thumb, give or take a bit.  They’re grown and eaten like new potatoes, except after you’ve dug them up you need to let the sun get at them for a few days to improve the taste, which is reckoned to be like new potatoes with a hint of lemon sauce.

Elsie likes them, but I can’t see the point of them (stuck in his ways is my Sid. E).  Mind you, that’s pretty much in line with the usual household division here where vegetables are concerned.  We’re both huge on beans, brassicas and so on, but when it comes to roots, Elsie gets really enthusiastic about things like turnips and parsnips whereas my own feeling about them is that times are not yet hard enough for me to start eating prison camp food.

Actually, yesterday we dug up the last of Elsie’s Jerusalem artichokes – or to be more precise, we dug up maybe 30% of them and left the rest wherever they’d wandered off to so they spring up next spring and I can kill the confounded things off with my hoe.

The very wonderful William Cobbett at one time famously described the Jerusalem artichoke as “a mischievous weed that Frenchmen and pigs eat when they can get nothing else”, but in Cottage Economy (1829) he offered this priceless advice on the cultivation of it – “It is a very poor, insipid vegetable, but if you have a relish for it, pray keep it out of the garden, and dig up the corner of some field or of some worthless meadow, and throw some roots into it”.

Top man, was Mr Cobbett.  He’d probably have thought much the same about oca.

Electrical safety and old Singer sewing machines – part two

Standard

DISCLAIMER – This post it not written by a professional electrician.  It’s written by a retired bloke in England who meddles with old Singers, and what follows is nothing more than personal opinion based on experience and, hopefully, a smattering of common sense.

As we said in part one, if any of the wiring looks dodgy it probably is, and it therefore needs attending to.  The question is, though, who’s going to sort it out for you?  If you trot off to your local sewing machine shop, you’re unlikely to find them keen to re-wire your ancient machine at a sensible price.  If you ask that nice young chap who came and put a couple of new sockets in your kitchen last year and fixed your outside light while he was at it, he’ll probably say he’d love to help but it’s not really his territory.  And after that you may well be struggling for ideas, so the question’s bound to arise sooner or later – is it a DIY job?

I can’t really answer that, but I can give you some idea of what’s involved in re-wiring a typical vintage Singer so you can decide for yourself …

Picture of wiring under vintage Singer motor

I very much wanted to show you some of the real horrors we come across, but because they tend to get binned straight away, I can’t find one to photograph!  Instead, here’s a picture of the sort of thing you find under the later type Singer motors, in this case one off a 1940’s 201K, and that wiring’s definitely in a lot better condition than most you’ll see on a vintage machine.  The mains lead going off to the left goes to the Singerlight, and the black, yellow and red wires disappearing into the metalwork on the right go to the back of the motor socket.

On an earlier machine, you’re likely to find that instead of screw terminals, these connections under the motor are made by three Scruits, and if you’ve never met a Scruit before, you’re in for a treat when you do.  There’s a period ad for Scruits here.  Having got a feel for that, let’s move on now to the motor plug and socket connections …

Picture of Vintage Singer motor plug

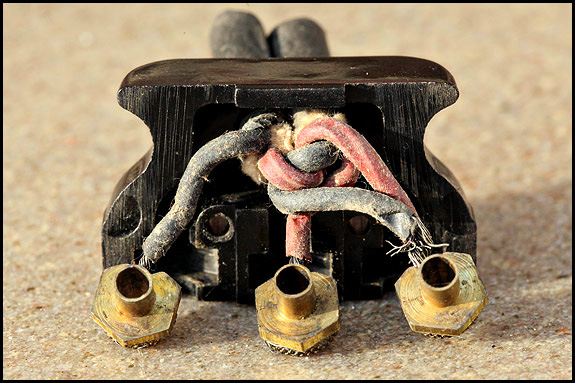
We’re looking here at the mating face of the plug, and on machines with the usual foot-pedal speed control, the mains lead connects across 1 and 3, and the foot pedal connects across 1 and 2.  On knee-lever machines, it’s still mains lead across 1 and 3, and the fact that in this case there’s no connection to the centre contact does not mean you could use it to earth the machine.  You couldn’t.

Picture of vintage Singer sewing machine motor socket

Now we’re looking at the socket, with its three brass pins pointing straight at us.  Yes dear, I know they look like screws with washers under them, but they’re not – they’re sticky-outy pins.  Pins 2 and 3 are the motor connections, and if a Singerlight is fitted, that connects across 1 and 3.

Now you know what those connections are, have another squint at that top picture.  Is it immediately obvious to you which of those three leads going off to the right goes to which pin of the motor socket?  If not, I’d suggest that perhaps you might think twice about rewiring an old sewing machine – particularly if you haven’t got a multimeter.

Whatever, if you do feel confident about tackling a re-wire, be aware that on a normal foot-pedal machine, the worst bits are replacing the two wires from the motor stator (for which you need a good soldering iron, solder and some heatshrink sleeving) and re-wiring the motor plug (for which you mainly need patience and a sense of humour).  Incidentally, the later type of plug with a cable entry on each side of it is a doddle to do compared to the usual “two mains leads coming out of one big hole” version.  Talking of which …
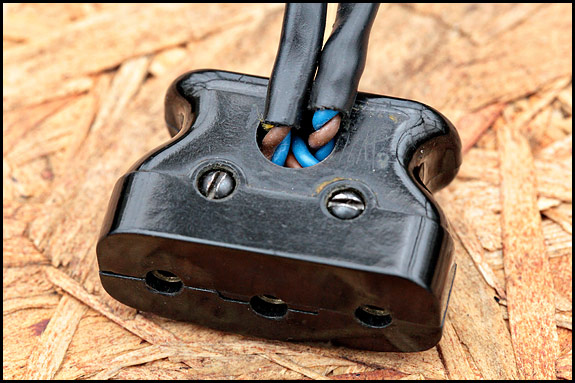
Picture of vintage Singer motor plug

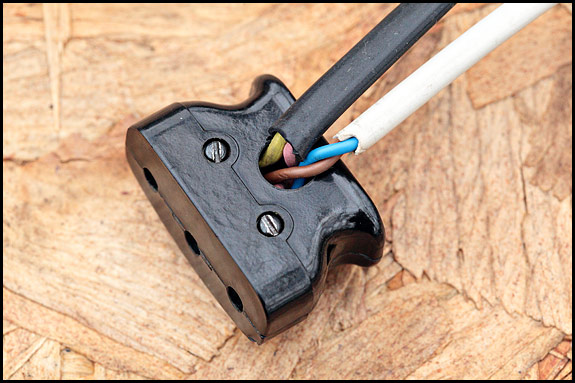
If your motor plug looks something like that, you will obviously want to re-wire it.  And when you take it apart, you will wonder what happened to whatever provision there was for anchoring the leads.  The answer is that nothing happened, because there wasn’t any provision for anchoring the leads.  It’s entirely up to you what you do about that.  You’re also on your own when it comes to deciding how to make two mains leads coming out of one round hole look neat when you don’t have a suitable cable entry sleeve, but it’s all good fun.  Just don’t lose the very small nuts off those screws …

Another point to note is you’ll find that most motors will still have the suppressor fitted (which may be a three-wire unit screwed onto the bottom of the motor or just a capacitor across the back of the socket).  Obviously you can scrap that unless the machine’s likely to be used next door to somebody who still listens to Radio Four on the Long Wave.  If you’re not sure if they do, take the suppressor off and run the motor under load while The Archers is on.  You’ll find out soon enough.

There’s one final point which is actually more routine maintenance than electrical safety, but we don’t care.  You see the pins pointing at you in that snap of the machine socket?  Well, over time, the contant plugging-in and unplugging of the plug tends to close up the slot down the end of those pins until you get to the point where you have to keep thumping the plug to keep sewing.  The cure is to do what everybody did as a matter of course all the time when most mains plug pins were slotted like that – take a small screwdriver, insert the blade into the slot, and gently push it in a bit so as to widen the gap slightly.  Repeat for all three pins, check the plug now plugs in firmly, and that’s it – job done!

Self sufficiency and the semi-industrial sewing machine

Standard

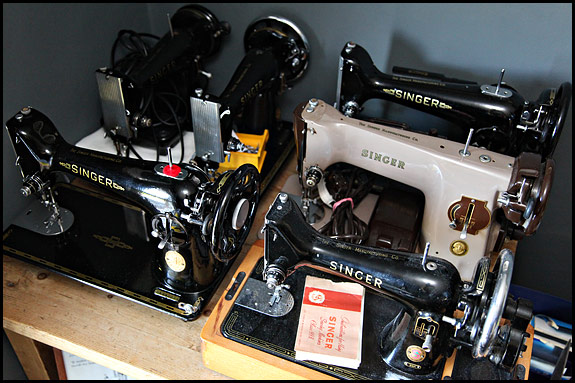
Picture of vintage Singer sewing machinesThe picture isn’t actually relevant to this post, but it shows what’s on the table on the desk behind me as I write this – and no, that’s not a typo.  There is a table on the desk.  With 21 machines already on the floor in a room just 14ft x 10ft, the only way to squeeze in some more was to put them on a cut-down table over the stuff that’s already on that desk.  But anyhow …

As regular readers will know, Elsie and I are into the idea of self-reliance.  That’s a term we much prefer to “self-sufficiency”, which as far as we’re concerned is pie in the sky for most folks nowadays.  I could waffle on about that for ages and bore your socks off but instead, I thought it might just interest some folks to see what can easily be grown by two people working a garden and an allotment without getting too serious about it.  Elsie’s just compiled the figures for this year, showing that we harvested:-

Rhubarb 42kg

Blackcurrants 26kg

Damsons 11kg

Pears 50kg

Apples 84kg

Lettuce x 200 (approx)

Radish x 41

Broad bean x 33kg

Tomato (cherry) 21kg

Cucumber x 33

Onion 21kg

Peppers 204kg

Sweetcorn x 25 cobs (a bad year for sweetcorn!)

Garlic 1.5kg

Cabbage 66kg (three types)

Potatoes 96kg

Plus smaller quantities of Morello cherries, turnip, spinach, beetroot,peas, climbing French bean, pumpkins (for seed and for roasting), Jerusalem artichokes, Brussel sprouts, purple sprouting broccoli and leeks.

The exact cost of producing that little lot’s not easy to work out accurately, but if we include allotment rent and several big trailerloads of the finest farmyard manure, it comes to somewhere between £260 and £320.  Considering that it’s all organic and it’s all really tasty varieties (barring one or two mistakes!) we don’t think that’s too bad at all, although it must be said we have no idea what it would cost to buy in the shops.  Then of course there’s the free stuff legally harvested at the roadside, which totalled 6kg brambles, 2.5kg walnuts, 17kg apples and 16kg damsons!

Now, as Elsie was working the final figures out, I was speaking to a bloke intent upon selling a 201K23.  It seemed a good proposition at first, but asking the right questions produced a couple of wrong answers, so I opted out.  At that point, I learned that he’d paid £140 for it online only a month ago, but soon found out that it was “too small”.

“Don’t tell me” says I. “It was billed as a semi-industrial machine ideal for knocking out leatherwork, sails, tarpaulins and so forth day in, day out …”

“Horse blankets actually” says he.  “And leather”.

“For which you need an industrial machine with a walking foot”

“Exactly.  But I didn’t realise that until after I’d spent another £40 having it serviced in town”

“And you can’t get your money back?”

“Not a hope”.

There’s a moral there somewhere …

Electrical safety and old Singer sewing machines – part one

Standard

DISCLAIMER – This post it not written by a professional electrician.  It’s written by a retired bloke who meddles with old Singers, and what follows is nothing more than personal opinion based on experience and, hopefully, a smattering of common sense.

It might help readers to know that I grew up in a house where, as was still common at the time, all the mains sockets were 2-pin.  In other words, there was no provision for earthing anything electrical.  That didn’t stop Mother sometimes taking the chill off the bathroom in the winter (only on the very coldest of nights, mind – she wasn’t made of money!) with a metal-bodied single-bar electric fire placed on the floor a good 5ft away from me in the bath, its lead snaking under the door and into the 2-pin socket just inside my bedroom.  Mother wan’t daft, so I never have worked out whether she was simply confident that 7 year-old me had enough sense not to splash water onto that electric fire when I got out the bath, or whether some pressing issue might have been resolved by my early demise.

Whatever, I grew up with a healthy respect for mains electricity, and have done perhaps more than my fair share of DIY home electrics.  I’ve also worked for several years in the assembly of electrical and electronic products, but I reckon that’s enough background for you to decide how much notice to take of what follows.

What’s prompted this post is an email I got from one of our readers asking how she should earth her Singer 201K.  Specifically, the question was why, when the original 2-core lead has at some point been replaced by a 3-core one with a 3-pin mains plug on one end of it, is the earth wire not connected at the machine end?  This lady kindly sent a rather good picture of what she found when she undid the Singer connector …

Copy of vintage Singer motor lead connector

Given that there are three contacts in that connector and only the outer two are wired up, it’s entirely reasonable to suppose that the earth wire should go to the middle one.  After all, that’s what you’ll find if you open up the plug on your kettle or whatever.  But this is a Singer sewing machine that’s at least 60 years old.  Not only were things done rather differently back then, but that machine connector’s also a bit out the ordinary in that there’s only one mains cable going to it.  And the reason for that is that this particular plug goes into a 201 with a knee-lever controller.  If it plugged into a machine with the usual foot-pedal controller, the wiring would be more like this …

picture of wiring of vintage Singer connector

See the red wire going to that centre terminal?  That’s a good clue that it’s not an earth connection.  In fact, the centre connection of these old Singer plugs goes to one side of the motor, and connecting an earth wire to that would not be a good idea, because you would in effect be connecting the live pin of your mains plug to the earth pin of it via the sewing machine motor.

So how, you ask, do you then earth an old Singer electric?  The short answer is that you don’t.  You could do, but unless your foot-pedal and mains leads are permanently wired in as on the 185 and the final variant 99’s, the necessary wiring would look a mess and be a PITA if you wanted to unplug the leads from the machine.

OK then – how to avoid death by vintage Singer?  In my opinion, you need to ensure first of all that when you’re using the machine, you’re plugged into house wiring which has been professionally checked within the last 10 years and has a consumer unit fitted with a good RCD.  If that’s meaningless, see here

You also need to inspect both the mains lead to the machine and the lead from the foot pedal for any signs of cuts or wear in the outer covering, and while you’re at it, take a good look at any visible wiring on the machine itself.  If it looks a bit dodgy, it probably is, and you need to get it sorted.  Similarly, if the wiring going into your machine plug looks something like this, that also wants attending to …

Picture of bad wiring to vintage Singer machine connector

And finally, you can perhaps bear in mind that until Singer started flogging machines with three-pin plugs on the end of the mains leads (towards the end of the 1960’s ?) very few domestic electric sewing machines were earthed, but even fewer users of them were electrocuted.

That’s it for this first part, but there’s more to come on this subject …

Top picture © Colette Granville, used by kind permission

PART TWO can be found here and PART THREE here

Singer 201K treadle, Elsie’s birthday present … and augmented reality

Standard

Picture of Singer drawing room cabinet

Hurrah!  Yesterday we finally got a lovely classic Singer 201K ready for sale as a treadle machine, and this morning we realised that we could offer it in a choice of bases!  It’s now listed on the Singers for sale page in both forms, so if  you could fancy a really good treadle machine, do get in touch with us to find out more about this one and the options for it.

Also on the treadle front, here’s a snap of Elsie’s birthday present having an urgent bit of first-aid done to a lifting bit of veneer on its first morning in its new home.  It’s a 1900 Singer Drawing Room Cabinet that’s totally original down to the little patterned carpet on the treadle plate and the 27K which we took out to get it all home safely.  All that’s missing is the knob for the latch which in theory holds the lid closed but in practice serves no purpose we can think of, and the 27K’s belt guard.  And with any luck, an exact replacement for that will soon be on its way from Jay and Sharron in Missouri.

I’ll take some more snaps and do a blog post all about it when we’ve got it a bit more sorted , but for now I’ll just say that Elsie agrees it was well worth the 376 miles drive on her birthday.

Anyhow … every now and then I have to go to Waitrose on account of there’s a few things we use which Tesco doesn’t stock, and when I do, I always pick up a copy of their house newspaper thing.  It amuses us no end, and gives us some idea of what’s currently exciting the chattering classes.

We’ve just now read about “the revolutionary Christmas adverts that open up a magical world of tricks and tips from Delia and Heston” and we’re trying to get our heads round that.  If we understand correctly, you wait for a television commercial, then pause it, show it to your smart phone, then have an “augmented reality experience”.

Gosh.

We don’t have a television set, neither of us understands how you can pause a television program, we both have dumb phones, and although I can’t speak for Elsie, I can say for sure that the last augmented reality experience I had was a good 40 years ago and involved dried mushrooms.

There’s no hope for us.

Have a good weekend, folks.

Singer 66 and Singer 99 maintenance – that weird oil hole on the top

Standard

I was in the greenhouse yesterday afternoon taking some pictures of the underneath of a 99K, as you do, when it occurred to me to do a quick post about that weird oil hole next to the spool pin …

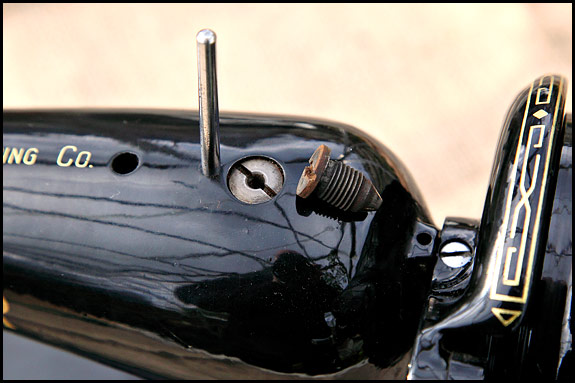
Picture of oil hole on top of Singer 99K

There’s the hole in question, and to its right is a chunky sort of threaded plug with rust on its slotted end.  That’s what that oil hole thing with the slot in looks like if you manage to unscrew it, which in the normal scheme of things is something you’d be ill advised to do.  And in case you’re wondering how come that one on its side is so rusty, it’s because it came from a scrap machine which sat outside the bike shed for a couple of weeks waiting for me to get round to taking it down the dump.  And it rained lots.

Anyhow, why am I rabbitting on about this?  Well, it’s actually quite important that that hole gets its fair share of oil every now and then along with the other oil points indicated in your instruction book.  That’s because there’s a metal shaft runs up to it from the bottom of your machine, and the cup-shaped top end of it mates with the conical bottom of that plug thingy, which acts as a bearing.  Which needs a film of oil on it.   Unfortunately, although that hole is 4mm wide at the top, it’s 13mm deep and only 2mm wide at the bottom – and it’s very often full of crud.  Fluff, bits of matchstick, grot of ages – you name it, we’ve pulled it out of these oil holes.

So what’s to do with it on your machine?  First thing is to realise that although there’s a small hole at the bottom of it, that’s pretty much closed off by the top of the shaft which mates with it.  There’s just enough clearance for oil to seep through, but not enough for the crud to get into the works.  The crud can stop the oil getting where it’s needed though, so the best thing you can do is clear it out, and that calls for some ingenuity on your part.  We use one of our collection of dental probes, but it’s got to be possible with a bent paperclip, hasn’t it?  End straightened out, then about 2mm bent at right-angles?  Or something?  Maybe even poke about a bit to loosen the grot then Dyson it?

Whatever you use, it’s certainly a job worth doing.  So too, come to think of it, is checking with your instruction book while you’re at it that your spool pin is where it should be i.e. that some muppet hasn’t bashed one into an oil hole.  And yes, that really does happen.

There.

I did it.

I got to the end of a post about oil holes and I haven’t said a word about horrible 3-in-1 oil and how it’s evil and despite what they say on the tin it’s anything but ideal for sewing machines and …

The Singer Enclosed Cabinet No.51

Standard

Picture of Singer Enclosed Cabinet #51

I’ve been meaning to mention for ages that thanks to Colette having kindly scanned for us a Singer brochure which her Mum picked up around 1940, we now know for certain that what we thought was Enclosed Cabinet No.46 is in fact Enclosed Cabinet No.51.

It looks like the bloke in the Singer shop who wrote “in New Enclosed Cabinet 46” on the receipt we have for a 201 in one of these was simply having a brainfart, so I’ve edited this post accordingly.

Sorry for the confusion 🙂

A vintage Singer sewing machine – why would you want one?

Standard

Scan of page from 1929 Singer sewing machine brochure

So in 1929 “You cannot afford not to have one”.  Hmmm.  We’d say the same applies today, but then I guess we would.

Anyhow.

When I was pedalling up the lane yesterday, I was greeted by one of the regular doggie-walkers.  Luckily the brain was working well, and I recalled that this lady had once mentioned in passing that she makes curtains.  For which you need a sewing machine.  So I stopped to tell her about the blog.

I was glad I did, because I now know that some modern machines don’t have foot-pedals, and that the reverse facility on some of them is a button you push to make it do one stitch backwards.  Best of all though, I now appreciate what fun and games are involved when you’re sewing big heavy curtains with your friend’s modern lightweight plastic machine, which she’s lent you to do a rush job while your vintage Singer’s at the mender’s and which just won’t stay put on your table while you handle the work because there’s no weight to it.

Only last week, I’d mentioned the blog to the nice lady who does the alterations in the local dry cleaner’s, and it became apparent that not only would she be a lot happier working with the treadle machine she learned her trade on, but also that it would do a far nicer straight stitch than the modern domestic zigzag machine with which she currently spends her days.

And now I’ve just been scanning a 1929 Singer brochure for a blog post which is in the offing and I noticed the above blurb, which set me thinking – if somebody’s minded to buy a sewing machine, how might you persuade them to consider a vintage Singer?  We’ve never thought about this before, but …

[Right, I’m back after the pair of us just spent the best part of an hour playing midwife to Alice and her egg.  In case you’re not up to speed with egg-bound hens, the problem is that something’s gone wonky with the production of the egg so the poor thing can’t actually lay it, and consequently looks very sorry for herself indeed.  The treatment, such as it is, involves suspending the patient over a bucket of boiling water such that her chuff gets nice and warm and moist but she can’t get her feet in the hot water (which, as you may imagine, is much easier said than done), and talking soothingly to her while Nature hopefully takes its course, as it did just now. We think.  And at this point readers of a sensitive nature will no doubt be greatly relieved to find that I’m leaving the matter there and returning to our normal programming.]

Whenever we sell a machine, I always ask the new owner why she bought it, and the answers we’ve got so far range from “I can relate to an old mechanical sewing machine.  I can’t relate to modern electronic ones”  to “I like the idea of using what Mum used and having a machine I can pass on to my daughter” to “Cost-effectiveness” to “I don’t want a sewing machine that’s smarter than me”.

So the questions are

1  If you use a vintage Singer, why not a modern machine?

2 If you don’t use a vintage machine right now but you’re hankering after one, what’s the attraction?

We’d love to see what you think, so why not leave a comment now under this post and tell us?

The Singer Automatic Zigzagger 160985. Also 161102 and 161157 …

Standard

Picture of vintage Singer Automatic Zigzagger 161157

I’ve just put another black zigzagger up for sale on the Accessories page, and that’s reminded me to point out something which can get confusing about these things.

The Big Black Zigzagger can be a 160985, or a 161102, or a 161157, and at first glance they all look the same.  But they’re not – they all work as well, but each one is a later version of the other, with either an improved mechanism or one which was cheaper to produce, depending on your personal cynicism quotient.

Muddying the waters still further, the cams for them are made from either aluminium or a heavier zinc-based alloy, and although they’re different if you compare the undersides, the tops are the same and they are in fact interchangeable.

So there you go – you now know more about the black Singer zigzagger than most folk do.  And in our opinion, the amount of practice you have using one makes far more difference than what the part number on it is …