How to remove a vintage Singer from its base and how to replace it – single-handed

Standard

Before we get stuck in, let me say that there is an alternative way of removing and replacing a head in a wooden base, but you need more of a toolkit to do it that way and you could screw up the finish round the hinge bodies on the base.  Besides, this way’s not complicated, it just seems that way when you explain it.

First off you need to slacken the chromed thumbscrew on the base so you can move the little catch thingy out the way and swing the head back on its hinges.  Do be careful though, because the head is heavy and if it’s loose on the hinges, it might not move quite how you expect it to.  If you’re a bit worried about this, put some kind of padding on the table behind the base such as a folded towel, and at least then if it flicks over onto its back, you’re unlikely to bend anything.  Or dink the table.

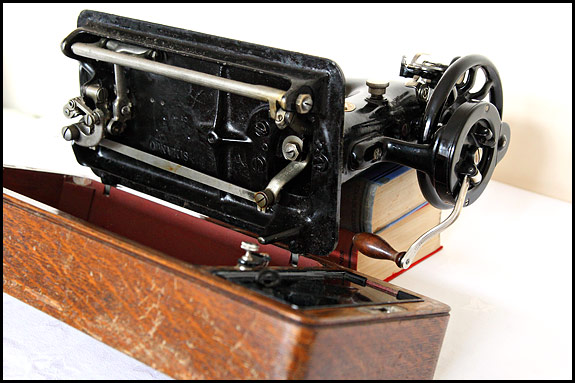
If you’re confident, all you need is something of such a height that you can lay the head down on it and all will be held at a convenient angle for you to furtle about under the bed.  For this lovely 99K which followed us home from Dartford yesterday, a couple of Elsie’s old books was just right (since you asked, the 1931 Womans Own Book of the Home and The Complete Illustrated Household Encyclopaedia) …

Picture of underneath Singer 99K sewing machine

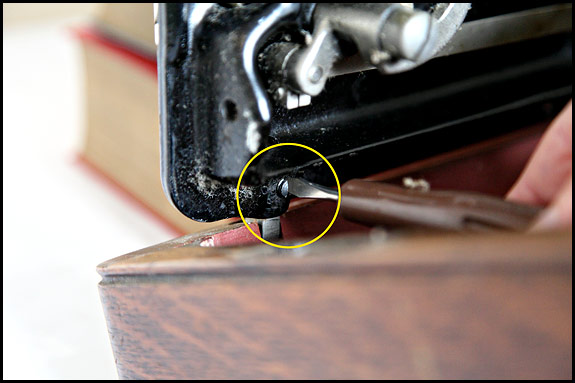
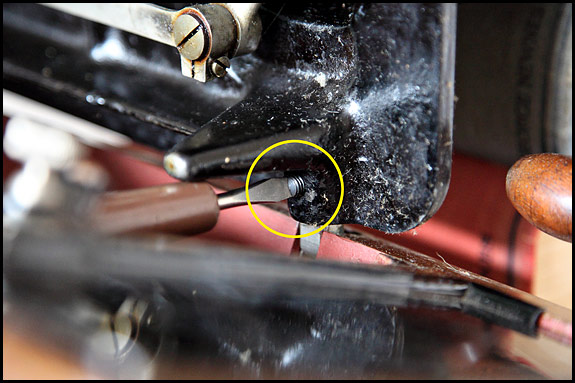
The next step is to locate the two grub screws (for that is what a small bolt without a head like this is called) which lock, or at least should lock, the machine securely to the two hinge pins.  Note for pedants – yes, I do know that a grub screw is actually a set screw and not a bolt.  Not everybody knows what a set screw is though, so just chill, dude.

As I was saying, you need to unscrew the two grub screws, if indeed they are not already unscrewed.  Or missing …

Picture of removal of left grub screw from Singer 99 machine bed

Picture of removal of right grub screw from Singer 99 machine bed

You don’t need to take those screws out, only unscrew them enough so that you can slide the head off two two hinge pins, but if you over-do the unscrewing and they fall out, it’s no biggie because they will (should) just drop into the machine base.  Whatever, you can now try lifting the head off the hinges, remembering that you need to take the weight and lift the thing up and towards you at the same time.  This is the point at which you wish you’d planned ahead and worked out where you were going to put the head down once it’s out the base, but such is life.

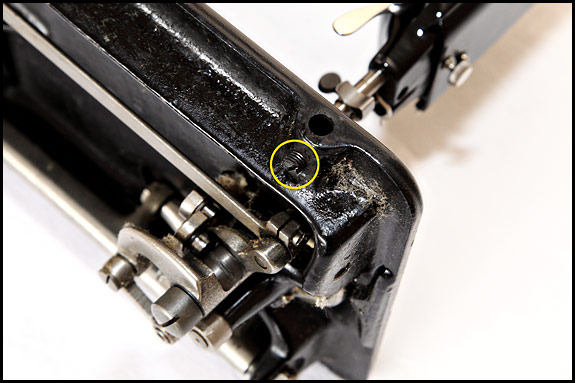
Rear view of Singer 99K mounting point

There’s your grub screw unscrewed almost to the point of falling out, and you can see above it the hole into which the hinge goes.

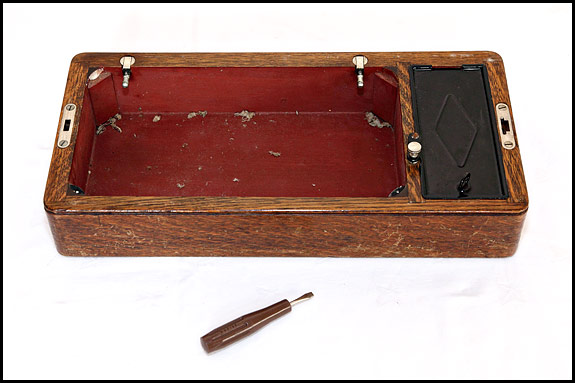
Picture of wooden base of vintage Singer sewing machine

That screwdriver, by the way, is the Singer one which was supplied with some machines, and if you have one of those, you have the ideal thing to do with your grub screws.  The blade’s the right size, it’s just the right length, and you can get a good grip on it.  Anyhow, having put the head down somewhere sensible, you can now fully appreciate all the little fluff bunnies in the bottom of the base and also ponder on quite how all those pins ended up there.

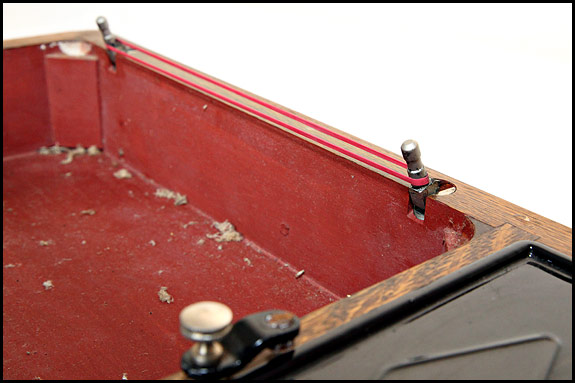
Now, if you lift those two hinge parts up, you’ll almost certainly find that they fall down again.  They won’t often stand up on their own, which could make it really awkward to replace the head in the base without some obliging soul helping you out, because you need to slide both pins into the holes at much the same time.  It can be done single-handed, but there’s a definite knack to it.  There is though a sneaky way round the problem, for which you need one of those nice red rubber bands which kindly post persons sometimes drop outside your front door on those occasions when they do actually favour you with a delivery …

Picture of vintage Singer wooden base

OK, it doesn’t have to be red, but if it is, it goes nicely with that cheap paint they used inside the bases. Whatever the colour, now your hinges will stay like that while you carefully line them up with the holes in the back of the base, then let the head down all the way on the pins.  And if you forgot to do so, it’s at this point that you wish you’d remembered to check whether the two grub screws are in place, screwed in just a turn or two …

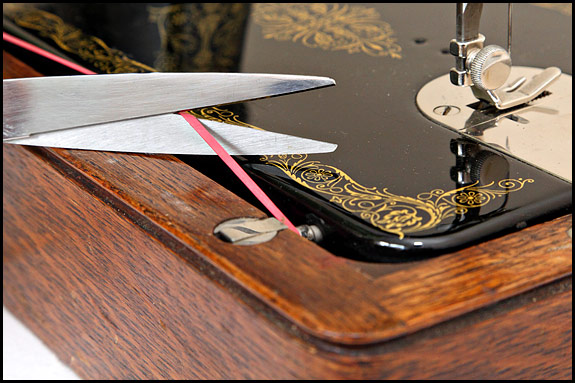
All you have to do now is lower the head down carefully until the front of it’s just above the top of the wooden base, then pull it towards you a bit (like 1/4 inch or so) so it rests there rather than dropping down into its final position.  You can then cut the rubber band and swing the head up and back again, letting it drop down all the way onto the hinges, then hold it there while you tighten up the two grub screws.

Picture of Singer sewing machine head and base reassembly

And that’s it!  It can be a bit nerve-racking the first time you do it single-handed, particularly if the machine’s a heavy old cast iron 201, but hopefully now you know what’s involved, you can at least see that it’s possible.  Having said that though, I’m the first to admit that another pair of hands makes things so much easier …
The knot in the plug

Standard

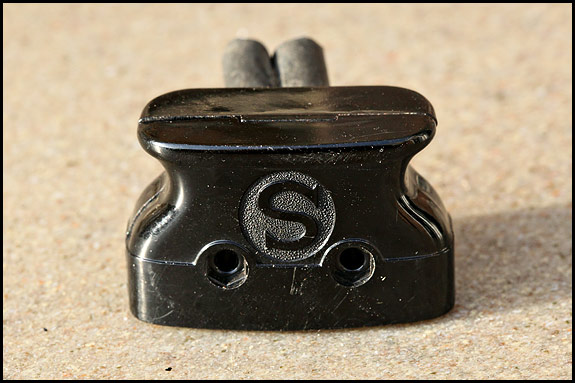
Picture of Vintage Singer motor plug

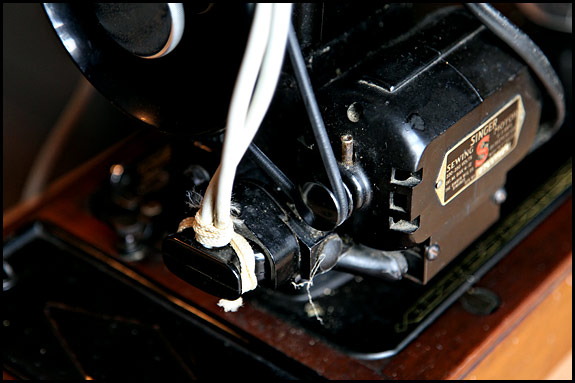
In case you don’t recognise it, that’s a vintage Singer motor plug of the most common type, shown here without the two screws which hold it together.  In most installations there are two leads connected to one of these – one to the mains plug and one to the foot pedal, and it’s those cut-off leads you see sticking out the back here.

When you consider that all of these plugs are well over 60 years old and many of them are still on the end of the original cables, it’s hardly surprising that most are in a bit of a state inside.  Actually, some of them are downright scary, but that’s something for another blog post.

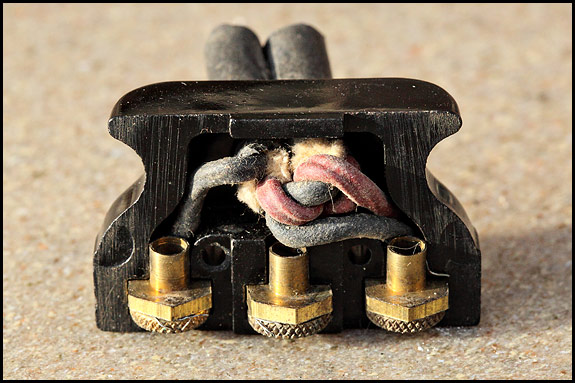
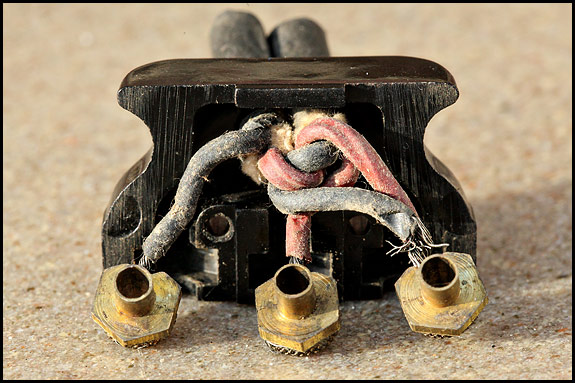
This one wasn’t too bad as these things go, but I’m in awe of whoever had the patience to knit this little lot with the old rubber-covered wires in such a confined space …

Photo of inside of vintage Singer sewing machine motor plug

Picture of wiring in vintage Singer motor plug

It’s bad enough rewiring one of these plugs with modern cable which is both thinner and more flexible, but to do it with two fat old rubber-covered cables that needed forcing through the hole in the plug body to start with must have been a real PITA.  And in case you’re wondering, the purpose of the knot is to act as strain-relief i.e. to stop the leads pulling out when No 1 child runs past the end of your table at high speed and trips over the mains lead that you’d just told him for the third time to be careful of.

While I’m having an explain here, if you’ve never used a vintage Singer electric, you might be bemused to know that the motor socket lives more or less under the handwheel, and that plug goes into it in such a way that the two leads come out the top of it, not, as you might reasonably expect, out the bottom.  Yes, that does mean that the leads can rub against the handwheel as it rotates at a fair old rate of knots, particularly if the motor bracket’s at the top limit of its adjustment (ie the motor’s as high up as you can get it).  I too think that’s very silly, but apparently the reason they did it like that is so the leads didn’t get in the way of you removing the lid of the storage compartment.

Or so they say.  I’m more inclined to thinking they just screwed up, simple as that, and took far too long to replace that plug with the one which has a cable going in each side rather than two on the top.  It’s a big improvement is that, and it’s actually a bit easier to rewire, for which people like me are truly thankful.

Singer 201K Mk2 for sale

Standard

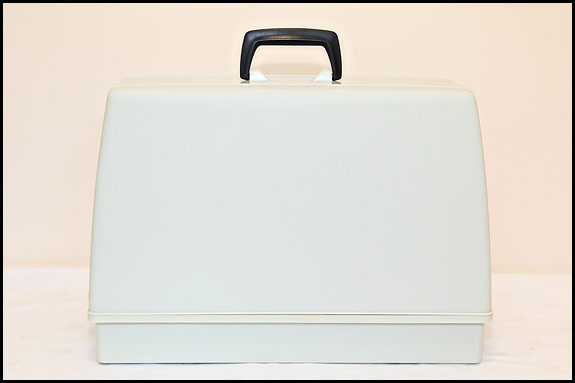
I listed a nice 201 on the Singers for sale page yesterday, and here’s a few more snaps of it.  This one’s a 1957 201K23, and it’s in a plastic base and case which really doesn’t do it justice …

picture of plastic case for sewing machine

Picture of Singer 201K23 with plastic case and base

Picture of Singer 201K23 sewing machine

Picture of Singer 201K Mk2 sewing machine

The reason for the plastic base and case is that this machine came to us in a cabinet which was fit only for scrapping, we simply don’t have a spare wooden base and case we can put it in, and even if we did, we’d have to put the price up more than we’d want to cover that.  So it’s in a useable base, and the lid’s OK for keeping the dust off even though the catches on it aren’t up to much.  It will however fit straight into the wooden base and case of a 15 or a 66 if you have one you can swap, or alternatively it’ll fit into a treadle base or cabinet.  Come to think of it, we’d be delighted to sell it already installed in one!

As to the machine itself, this one’s a good ‘un, and and as far as I can see all that’s stopping me rating the cosmetic condition as exceptional is a couple of very small dinks in the finish of the bed and a little bit of staining at the very bottom of the column, behind the bobbin spool pin and winding tensioner.  Mechanically it’s in very fine shape indeed, and it sews a lovely straight stitch both forwards and backwards.

The motor’s a really good one as is the foot pedal, it’s got a working Singerlight of the correct type, and the mains leads are new.  We’d like them to be the proper shiny brown oval-section cable but that’s only available from a repro wiring place in the States at a truly outrageous price, so the mains leads on this are round and semi-matt black like we use on black machines.  The motor plug’s brown though!

If you’re in the market for a 201, you won’t need me to tell you how good these things are, and you’ll also know that underneath that aluminium body, a Mk2 is exactly the same mechanically as its classic-shaped cast-iron predecessor.

How to open a Singer sewing machine case lid without the key – and how not to

Standard

Some people call them domed lids, and on the internets you’ll sometimes see them called doomed lids, but what we’re on about here are properly called bentwood case lids.  Specifically, Singer bentwood lids and how to open one without the key.  And if you’re thinking that surely any fule kno how, I can assure you that they don’t.

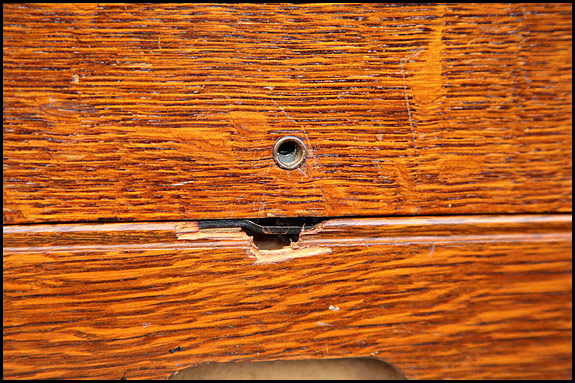
So, somebody’s inherited that old sewing machine of Grannie’s, and quite naturally they want to have a look at it now they’ve got it home.  But oh dear there is no key, so how will they get in it?  Enter the Man About The House, who takes stock of the situation, and in entirely typical fashion says “Leave it to me” as he reaches for his toolbox.  Naturally he can’t find in it the small chisel he had in mind for the job, but a Stanley knife and a screwdriver will do the business no problem …

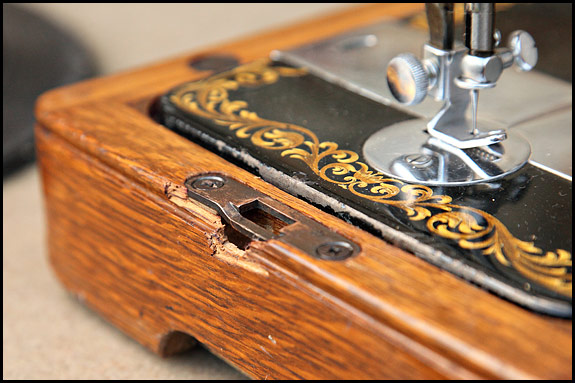
damage - wrong way to open locked singer bentwood case

Having hacked away enough 70-year old polished oak to reveal what’s what, it’s immediately apparent to our hero how it all works and what’s called for, which is a small hacksaw blade with which to saw through the tongue of the lock, et voilà!  With a bit of jiggling, the lid lifts off …

picture of damaged lock on singer bentwood case

Of course the lock is now useless and the base of the machine is damaged in such a way that it would take a skilled cabinetmaker to restore it, but hey, you can’t win ’em all.   The idea was to get the lid off, and the lid is now off.  Sorted!

picture of damaged base of singer sewing machine

What a shame our hero didn’t try the obvious …

photo showing how to open a singer sewing machine case lid

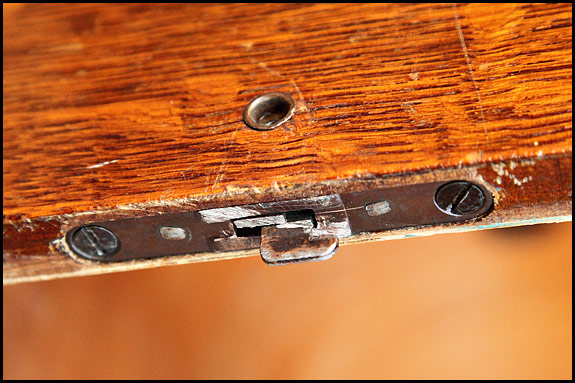
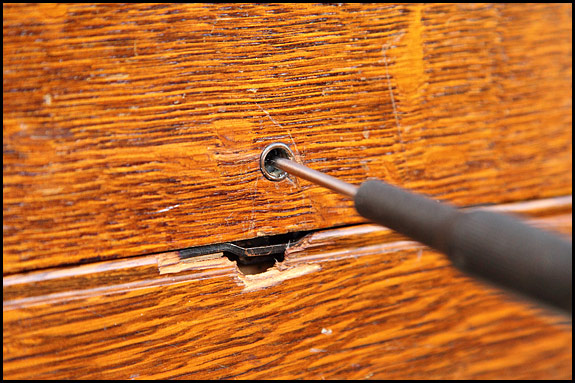
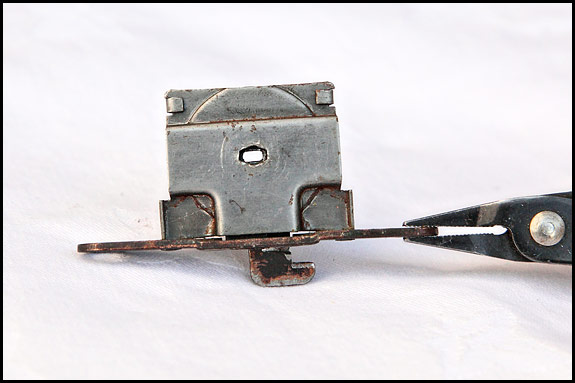
OK, what you need to know is that the locks on most Singer bentwood case lids are much of a muchness.  The keyhole in the lids we’re on about is round as shown above as opposed to keyhole-shaped, and if you take the lock out by undoing those two screws seen in the second picture, it looks something like this …

picture of lock from singer bentwood lid

That oblong hole that you can see through in the middle of the lock is the hole into which the end of the key fits, and it’s actually in a part which is sandwiched inside the lock casing.  On some of these locks the hole in that outer casing will be a bit smaller than this one, on some a bit bigger and on others it’ll be chewed up, but it makes no difference as far as we’re concerned here.  Also, the (rusty) sticky-outy bit at the bottom shown above is only one of the two that should be there, because matey sawed the other one off this particular lock.

There should be one of those danglers facing each way.   When the lock’s locked, they hook under the ends of the slot in the metal plate in the end of the base, and that’s what locks your case lid.  When you unlock it, the two sticky-outy bits move back towards each other, so the hooks clear the end of the slot and you can lift the lid up.  It’s about as simple as it could get, but it works extremely well.

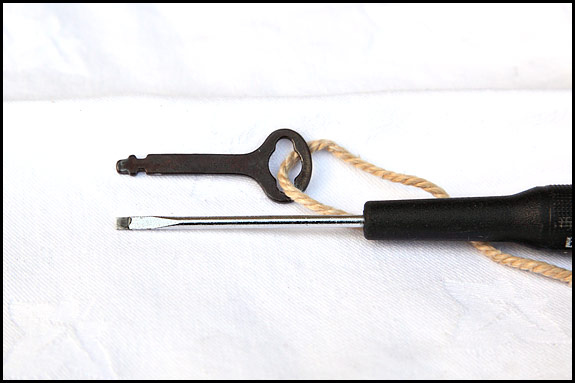
picture of key for singer bentwood case lid

Now, there’s no prizes for spotting the similarity here between the proper Singer key and the small screwdriver which most owners of Singers in bentwood cases use instead.  Yes indeed, all you need to open one is a flat-bladed screwdriver like that with a tip that’s about 3mm wide, and having armed yourself with one of those, the correct procedure is as follows:-

Look into the keyhole (using a  torch if necessary) to get an idea of the size of the slot and see which way it’s aligned.

Poke your screwdriver into it.  If there’s no way you can feel it locating in that slot, try a screwdriver that’s a bit narrower.

Once you’re fairly sure your screwdriver’s in the slot, turn it clockwise.  It will probably be harder to turn than you were expecting it to be.

If you’re sure your screwdriver’s engaged properly but the lock won’t turn clockwise, try turning it the other way.

If still no luck, show somebody else this blog post and let them have a go.

If all else fails, apply a few drops of thin oil (or better still penetrating oil) and try turning one way then the other several times as the oil soaks in.

If you’re still stuck, come back and add a comment under this post and we’ll see what we can do to help!

The Other Side

Standard

No, nothing to do with séances and spirits, but rather my old hat.  Back in August, I mentioned that Elsie had found my old festival hat and I posted a snap of Stoner wearing it.  In response to numerous requests since then (hi Carol), here’s a picture of the other side.


Since you ask, the one in the middle’s the badge from Led Zeppelin’s gig at Knebworth on 4th August 1979, on the left is a Morris Federation badge, and on the right it’s Morris Dancers Against The Bomb.  Which presents me with the ideal opportunity to tell you the ultimate Morris dancing joke, as told to me years ago by a very righteous Morris dancer indeed

Q  Why do Morris dancers wear bells?

A  So they can annoy the blind the as well.

Moving rapidly on, it’s been a bit busy here recently with one thing and another.  We had a major panic last week when I was told that because we have stuff for sale on here, I needed to shift the blog to another web host.  The more I looked into doing that the less I understood of what I’d be getting into, so it was a huge relief when a nice chap from WordPress eventually emailed back to say we could relax because we’re totally kosher as we are!

We’ve been busy taking advantage of the good weather to get the main allotment ready for winter.  Now the sweetcorn’s demolished, the pumpkin patch is cleared and seeded to green manure, and the dried beans are in (Elsie’s in the kitchen podding the last lot as I type this), so all we have left to do there is take the bean poles down.  They were forecasting a proper frost last night (as opposed to a grass frost, which until very recently was a ground frost), so yesterday afternoon we put cloches over the four short rows of lettuce in the garden which we hope will see us through into November.

We’ve had the woodburner in the kitchen lit in the evening for about a week now, and I guess it won’t be long before my first job of the day is to light it before Elsie descends for her breakfast.  Last year we scrounged vast quantities of timber from the building site down the lane and spent ages cutting it all up, so we’re really looking forward to sprawling on the sofa in the kitchen watching the scrummy spelt scones baking on the griddle on top of a woodburner burning free wood while the apple rings dry above it.  And in case you’re wondering, yes we do have gas central heating, but it’s expensive to run and it’s no fun.

On the sewing machine front, today I’m sorting out a good motor to put on a lovely 201K which we’ve just sold (and which will be the second machine we’ve sent down to Cornwall this month!), and once Elsie gets back from the dentist, she’ll be finishing the final clean of a beige/brown 201K2 which used to live in a horrible treadle cabinet but will very soon be a nice portable electric.  I can’t move in here for machines patiently waiting their turn, so for the time being we’re ignoring the pile of attachments on Cleo’s coffin-top that are waiting for us to tickle their tappets.

Finally for now, two things.  One is that if there’s anything you’d like to see covered in a blog post, all you have to do is leave a comment on here and we’ll see what we can do.  The other is there’s a free sewing machine in the offing before much longer.  No, honestly.  It’s not a Singer but it’s a full-size all-metal hand-crank, it’s hardly been used and if nothing else it’d be a great Christmas present for a youngster who just might appreciate it.  If there’s a catch to this, it’s only that you’ll have to collect it from the Tunbridge Wells area because we’re not going to be up for packing it for courier pickup.

More details later, but we’ll be giving it away to celebrate when we hit our target average number of visitors here per week.  Right now the number’s increasing a lot faster than we thought it would, but if you want to speed up the process, why not spread the word for us on Facebook, web forums and such?

The Singer Swiss Zigzagger 160990 and 160991

Standard

Seeing as how Elsie was faffing with her Swiss zigzagger yesterday afternoon, we did this little video of it being used as a basic zizgzagger …

Sorry that’s not up to much and it finishes a bit quick, but I haven’t quite perfected the art of shooting video with a professional stills camera which I have to focus manually.  It’s also a bit awkward for Elsie to treadle properly when she has to budge over ‘cos I’m in her way with the camera, but enough of the excuses already.

What is this Swiss Zigzagger thing and why is it a Big Deal?

Picture of vintage Singer Swiss Zigzagger 160990

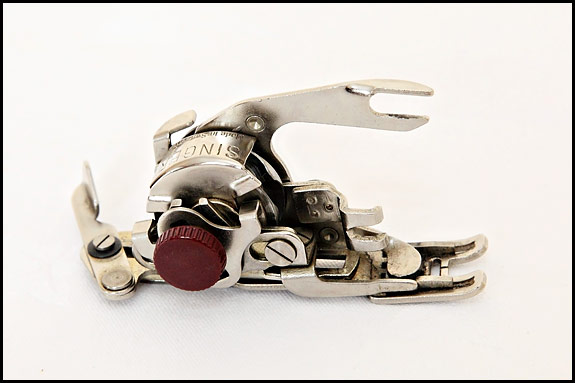
That’s a Swiss Zigzagger.  To be precise, it’s a Singer Automatic Zig-Zag Attachment 160990, although you can’t tell that from the picture because it could just as well be a 160991 without its snail shell.  And I do realise that sentence makes no sense at all to most folks, but stick with us dear reader and it soon will.

So called simply because they were made for Singer in Switzerland, Swiss Zigzaggers are a bit special for several reasons.  They’re compact, they’re beautifully made, they work really well – and they can sell for silly prices.  I’m pretty sure the last one I noticed on Ebay UK sold for £96, and in the States there’s currently a choice of three with Buy It Now’s of $205, $355 and $405.  What price those will actually sell at is anybody’s guess.

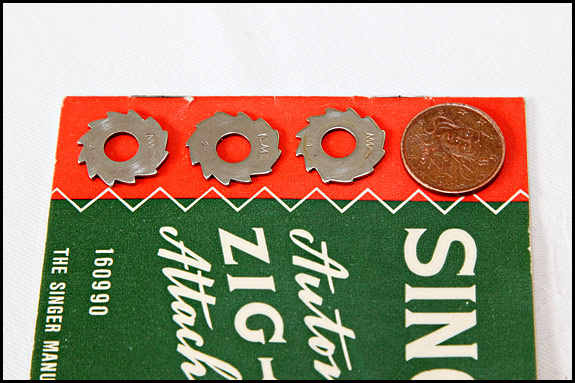
Back in the real world, if the thing looks like the one in that picture, it’s most likely to have 160990 stamped on its bottom.  I was going to say that’s the common one, but Swiss Zigzaggers of either flavour aren’t exactly common, so let’s just say it’s the usual one.  It should come in a neat pale cream plastic box with a Singer badge on top, and be accompanied by a T-shaped cover plate for your feed dogs and the attachment screw for that, the book of words, and five small flat metal cams.  Here’s a picture of three of those cams, with a 5 Euro cent coin for comparison …

Picture of cams for Singer Swiss Zigzagger 160990

Incidentally, that’s not a 5 Euro cent coin because one wishes to give the impression that one is just back from ones villa in Escroquer-les-Nouveaux-Riches, rather that the self-service checkout in Morrisons gave it straight back to me this morning when I put it in thinking it was a penny.   But at least The Voice of the Checkout just said “Please insert more cash” and not “Please do not try to swindle the store”.  Anyhow, it was the only coin in my pocket when I took the snap.

Now, if you’re after a Swiss Zigzagger and you see one offered at a good price because there’s no cams with it, bear in mind that those cams are only required for doing fancy stitches.  Not everybody who has one to sell realises that!  A Swiss Zigzagger without any loose cams is still a beautifully-made attachment that does a very nice plain zigzag stitch using the built-in one, and that stitch is adjustable for both bight and stitch length.   That’s how Elsie’s using hers in that video.

So that’s the 160990 – it looks like the one in the picture, it says 160990 on its bottom, and it left the Singer shop with a set of 5 cams.  The 160991 usually looks like the one in that picture too, and you can guess what it says on its bottom.  It was sold with a set of 10 cams though, and when new it had an off-white plastic snail shell on it which I’d love to show you a picture of, but our own 160991 is shell-less so I can’t.  If you’re really curious about what it looks like, there’s a bad picture of one on the cover of the 160991 instruction book, which you can download as a PDF from here

Whether those snail shells tended to break easily or just fall off and get lost I have no idea, but nowadays it’s rare to see a good 160991 for sale complete with its shell.  That’s why when you do, it’ll usually be expensive.  Very expensive if it’s in really good condition in a nice box complete with all its bits and bobs, because you’re in Serious Collector territory there for sure.

To recap, it’s a beautifully-made attachment that’s easy to use and it works very well indeed.  It should come with either 5 cams if it’s a 160990 or 10 if it’s a 160991, but those cams are only needed for the fancy stitches (I’m including blind stitching in that, by the way).  Without cams it works as a plain and simple zigzagger with adjustable bight and stitch length.  And I nearly forgot a really useful trick it does – you can lift up a lever at the back of it and disengage the zigzag if you need to revert to straight stitch for a bit!

Edited October 2012 to add that we have a mint set of all 10 cams available, also a couple of 160990 zigzaggers – maybe even some spares.  Please email us with your wants – it’s sidandelsie at btinternet dot com

Singer 185K for sale

Standard

I haven’t the faintest idea why Singer decided in 1958 that it would be a good idea to start sending machines out with a light-coloured textured fabric stuck to the sides of the wooden base, but I do wish they hadn’t.  50 years on I can honestly say that I’ve never seen a 185K with a base that looks good .  Most of them look pretty dreadful nowadays, and that’s a shame really, because it’s a sweet little machine …

Photo of Singer 185K sewing machine, front view

Picture of Singer 185K sewing machine, rear view

So nice is it, in fact, that we’re happy to offer a good 185K for sale if the base is better than most.  This particular machine is a good one, and the base, though somewhat scruffy, is better than most, so I’ve just listed it on the Singers for sale page!

Despite looking like the kid sister of a 201 Mk2 (or if you want to be specific, of a 201K23), the 185 is actually just a 99 that’s had a make-over.  Mechanically it’s still a 99, it’s still got a cast-iron body, and there’s still no plastic in it anywhere apart from the spool pin on some of them.  In other words it’s still a “proper” Singer, and any attachment that works with a 99 will work with a 185.

It’s got the reverse facility like the later 99’s, and it shares with the very late 99’s the plug-and-socketless electrics i.e. the foot pedal and the mains lead on a 185K are permanently wired into the motor.  Depending on your viewpoint, that’s either a retrograde step taken to save Singer the cost of fitting the special motor plug and socket, or it’s a big improvement over having two components which were perhaps liable to accidental damage.

One thing you can’t argue with though is the fact that when properly set up, a good 185 like this one does sew a lovely straight stitch.  And given just ordinary care and a drop of oil every now and then, it’ll go on doing that for at least another lifetime.

Finally, though, a warning.  Don’t confuse the 185 with the 275 which replaced it and which looks at first glance very much like it.  It’s not.  The oscillating hook of a 275’s driven by a horrible rack-and-pinion type mechanism, which from the engineering point of view is naff to say the least, and from the user’s point of view is both noisy and liable to cause vibration. (There was also the 285, which you don’t want either because it’s the same dog with different spots.  A 285 is just a 275 with a plug and socket on the motor.)

If you want the authentic modern small portable electric with which to make that smart knee-length sheath dress with the “oh-so-neat” three-quarter sleeves while listening to early Cliff Richard records, the one you want is definitely the 185K.

The joy of Ebay #2

Standard

Having bought perhaps more than our fair share of expensive mistakes on Ebay, Elsie and I did finally perfect the art of looking at a listing for a sewing machine and predicting what it’ll probably be like in the flesh, so to speak.  That’s why nowadays it’s very rare indeed for us to bid more than a machine’s worth to us for spares.

Here’s a classic example.  Check out this snap of the motor plug on our latest acquisition, a machine which was listed as “working perfectly and in very good condition” …

Photo of modification to Singer sewing machine motor plug

At one time we’d have been dismayed to find half the motor socket missing and the plug going into it held together with string because that’s broken too, but now we just marvel at the ingenuity of that awesome bodge-up.  It’s really clever, that is, because not only does it hold the two halves of the plug together, it also ensures that the two cables enter it at the right angle to minimise the strain on the individual wires.  And it’s so neat, too!

So why aren’t we miffed about that?  Because judging by the angles that this machine was not photographed from when the seller listed it, it was highly likely that something in this area was a bit iffy.  And if there’s a foot pedal included with an electric machine but it’s not in any of the pictures, it’s a fair bet that something asscociated with it isn’t kosher.  Besides, broken sockets on Singer motors and motor plugs with missing screws are par for the course.

That’s why when we bid on a machine on Ebay nowadays, we only bid up to what it’s worth to us for spares – in this case, the base, case and compartment lid we needed for one of Elsie’s machines, plus a fiver in the reasonable expectation of being able to add a few bits and bobs to The Spares Cupboard.  Which reminds me.  If you’ll excuse me, I have a cupboard to tidy up before Elsie gets back from town on her bike …

The Singer 160847 Multiple Slotted Binder

Standard

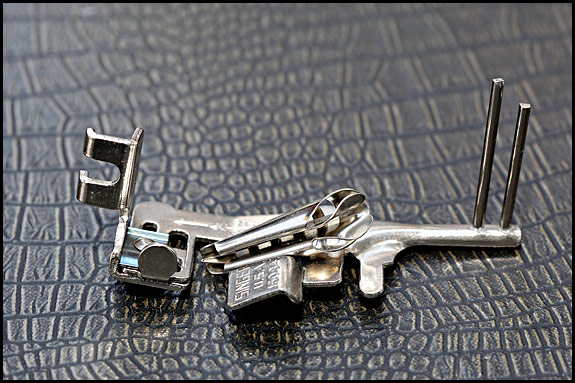
Picture of Singer 160847 Mulitple Slotted Binder

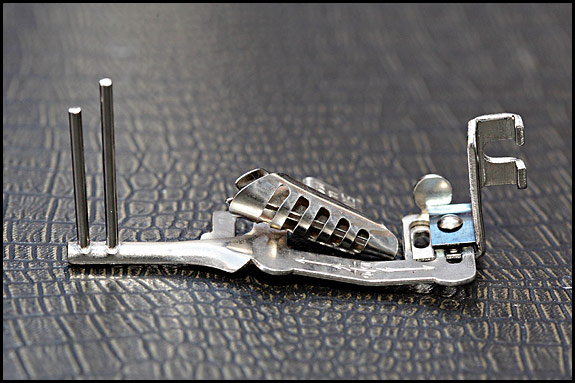
Alternate view of Singer USA Multiple Slotted Binder 160847

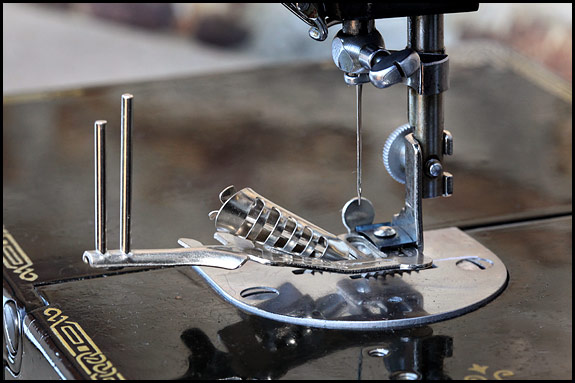
This is the Singer 160847 Multiple Slotted Binder, which is one of those attachments which seem to be fairly common in the US, where it was made and where Featherweight fans seem to be particularly drawn to it.  Over here it’s not exactly rare in the sense that the Penguin is, but it’s certainly not a common attachment.  That’s why we were chuffed to get hold of this rather nice one, also shown here posing for a picture on Elsie’s 221K …

Singer USA Multiple Slotted Binder 160847 photographed on Featherweight

Truth is though, that’s likely to be the only time it gets fitted to a presser bar in this house, because if and when Elsie uses bias binding, it’s ready-made and it’s one width, for which she uses the plain vanilla binder feet.  So, interesting though this attachment undoubtedly is, it’s just not going to get used here for the clever stuff it’ll do like applying two different bindings at once, so we’ve decided that it deserves to go to somebody who will do amazing things with it.  That’s why I’ve just listed it on the ever-changing Accessories for sale page …

Hooray, hooray, it’s Sauerkraut Day

Standard

picture of four Filderkraut cabbages

As well as the allotment which Elsie’s been cultivating for the best part of 20 years, we also have a small plot at the local council’s new site.  There’s well over 100 plots there, with a posh deer-proof boundary fence, lots of nice water tanks to fill your cans from, and a big communal compost heap.  It’s even got a composting loo in its own little shed.

Unfortunately the site’s on a North-facing slope which seems to have its own weather system, the chief characteristic of which is either a strong wind or a very strong wind blowing up the hill or down it on 360 or more days of the year.  Add to that clay soil with the consistency of well-cured concrete and its amazing that anything grows there.

When we took the plot over in April and discovered just how solid the ground is,  Elsie immediately prescribed a full trailer-load of good farmyard manure, so that’s what it had.  She didn’t think much of my suggestion that one stick of dynamite per square yard might just loosen things up a bit quicker, so we just planted a few things in the muck by way of a trial then pretty much left them to get on with it.

Now, the other thing from which the new allotments suffer is a number of scarily enthusiastic tenants who turn up in their BMW X3’s with all manner of stuff they’ve just bought from B&Q with which to play on their plot while young Gabriel and Willow make a confounded nuisance of themselves around everybody else’s.  It’s something I can get very grumpy about very quickly, so we never go near the place at weekends or during school holidays.

That explains why the first task yesterday morning was to put on the winter jacket and the woolly hat and head up to the new plot to harvest the first of the Filderkraut, of which we had ten.  We brought five of them home, and that’s a snap of four of them posing on the big water tank outside the back door after I’d trimmed ’em (and bust the top off one)   The biggest two are 21 inches high, and the chap second from the right weighed in at just over 14lbs, which is a fair weight for a trimmed cabbage.  Filderkraut is without doubt the cabbage for making sauerkraut.

17.5lb of it, thinly siced and mixed together thoroughly with coarse salt, is now rammed into a 10-litre sauerkraut crock which is sitting under the kitchen table.  It looks quite harmless, but you can’t trust a sauerkraut crock.   One day soon we’ll both be in the kitchen and Elsie will look at me suspiciously, I’ll look at Elsie, then we’ll realise that the crock has just farted. That’s because the lid of the crock sits in a groove containing water so as to form an air-lock, and as the cabbage ferments, every now and then the gas escapes as the pressure builds up enough to lift the lid on one side and blow off.  And oh dear, does it ever pong!

So, we’ll be eating some of the remainder of those cabbages for dinner for the next day or two, and we probably won’t be able to resist having a taste of the sauerkraut in a couple of weeks just to see how it’s going, even though it’ll be nowhere near its best.

In case you’re wondering, the ratio of coarse salt to shredded cabbage is 3 tablespoons to 5lb, and the exact method we use is down to both Steffi in the farm shop and a book called “Wild Fermentation” by the wonderfully-named Sandor Ellix Katz.