Category Archives: Singer 66 and Singer 99

Singer 1933 Catalogue and Price List (UK)

Standard

Thanks to Syd McDonald who kindly allowed me to scan his copies of them, I can now present for your delight both the Singer Illustrated Catalogue for 1933 and its accompanying Price List.  There’s links to PDFs of the scans at the bottom of this post, but while you’re here, let’s just take a quick look at some of the contents.

Before we do though, here’s a few comparisons between then and now to help put prices into perspective.  In 1933, the UK average wage was £3 12s 0d (£3.60) a week and a pint of beer cost 6d (2.5p).  Today, the corresponding figures are £504 a week and around £2.90, so wages have risen faster over the last 79 years than the price of beer has. What I find quite remarkable though is that in 1933, a typical 3-bedroom house sold for £360, which was just less than two years’ average earnings.  Now the average 3-bedroom house costs £243,000, which is over nine years’ average earnings.  How come?

Whatever, it seems that life expectancy for women in this country has gone up from 60 in 1933 to 81 now and for men from 53 to 78, so it’s not all bad …

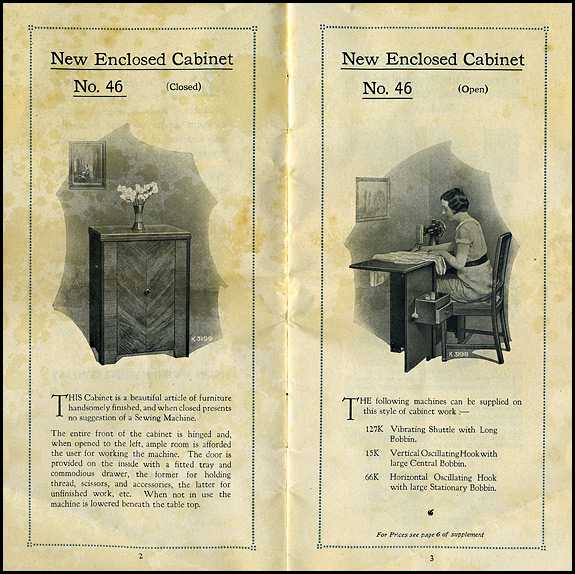
We start with the New Enclosed Cabinet No.46, which should be of particular interest to those who can never remember which cabinet is the 46 and which is the 51.  As you can see here, the 46 is the one with the one-piece door with the rectangular drawer on the back of it.  The later cabinet which is the same size and shape but has the two doors and the D-shaped swing-out drawer thingies on the back of the left-hand one is the 51, which Elsie and I much prefer.  In our opinion, a nice 51 cabinet with modern castors under it and a properly set-up treadle mechanism driving a 201 on top of is a very fine thing to have in the house.

In 1933 you couldn’t yet buy a 201, but a shiny new 66K in a No.46 cabinet could be delivered to your door for a list price of £23 10s 0d (£23.50), which was more than 6 weeks’ average wages before tax.

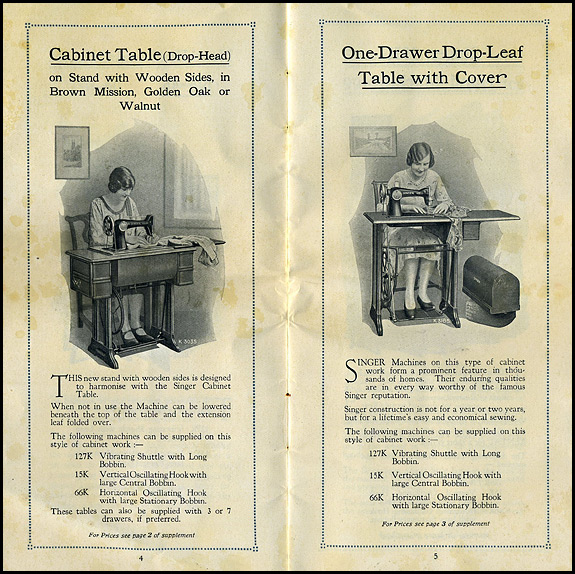
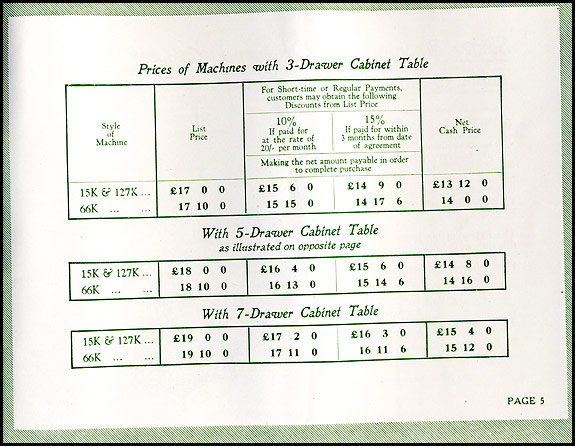
On page 4, we see that by now the old cast-iron legs of the Cabinet Tables have given way to the new wooden sides.  A 66K in a 5-drawer base like the one on page 4 was £18 5s 9d (£18.29) if paid for at the rate of 10/- (50p) per month, but could be had for just £15 8s 0d (£15.40) cash if you’d come into money.

Those Cabinet Tables are still quite common in England, but the One-Drawer Drop-Leaf Table on page 5 certainly isn’t.  Does anybody know for sure if that’s the one in which the machine sat in the table in the wooden base which has the slot between the two belt holes so you could just lift the whole thing out and use it as a portable?

There’s no mention of either of these Cabinet Tables (or indeed of the 46 Cabinet) being convertible for use with an electric machine by means of the motor controller 194386 on its associated bracket, so I’m still no wiser as to when that was introduced in the UK.

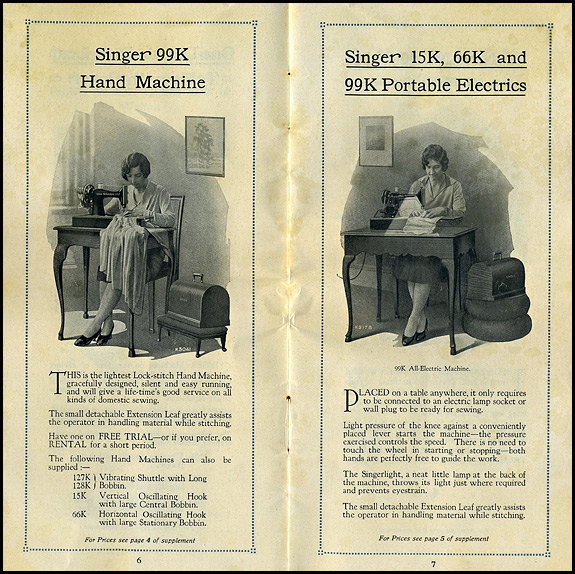
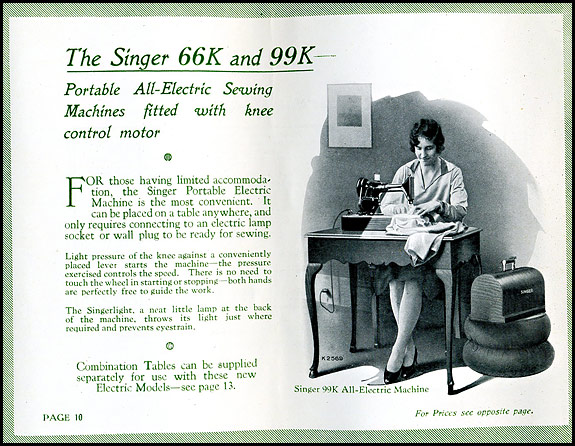
I do love these illustrations of the portables.  It seems that Singer could never come up with a convincing way of including the lid in a picture, so here we have it on a footstool of just the right size and shape on page 6, and on what I’m convinced is a pair of wheelbarrow tyres on page 7.

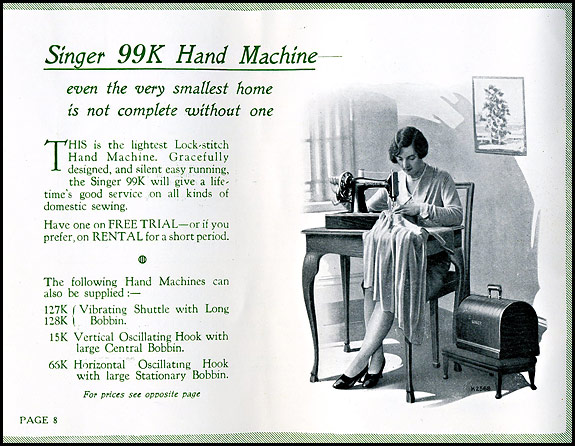
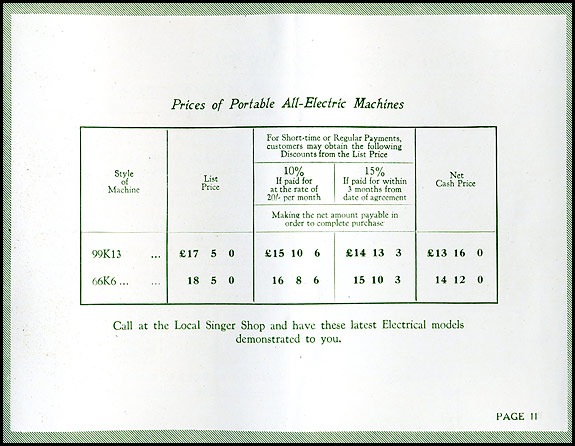
A nice hand-cranked 128 portable would have set you back £9 17s 6d (£9.87) in 1933, although for just thirty bob (£1.50) more you could have had its full-size sister the 127.  A knee-lever 99K electric, on the other hand, was £14 if paying cash.  That price included a Singerlight, but not a footstool or the tyres to put the lid on.

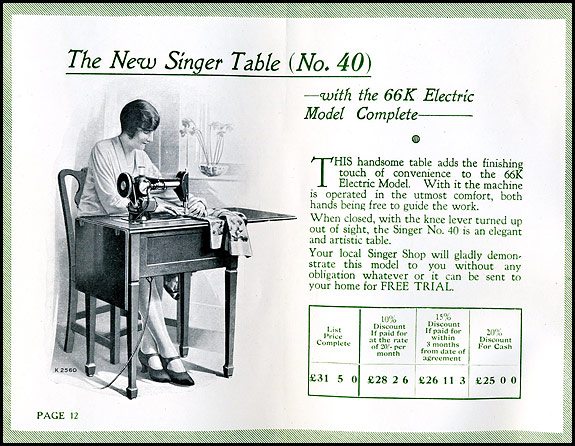
And now we have a knee-lever 66K electric in The New Model 40 Table which, it says here, is an “elegant article of furniture”.  Be that as it may, have you noticed how the word “article” in this sense seems to be obsolescent nowadays in much the same way that “apparatus” does?  It’s a shame.  They’re both fine words.

Model 40 tables are decidedly uncommon nowadays, and I have to admit that as far as I’m concerned that’s not a bad thing.  £31 12s 6d (£31.62) on Easy Terms, or £25 6s 0d (£25.30) cash to you, Madam.  That was getting on for two months’ average wages …

The all-steel foot controller shown here on page 10 is a rare bird now too, which if you ask me is just as well because they’re a bit on the primitive side – and they do tend to stink when they start getting warm.  Note how the mains lead is supplied with a bayonet connector on the end so that when you’d fitted the motor to your machine, you could plug it into any convenient light fitting once you’d taken the bulb out of it.

Any reader raising an eyebrow at that last observation might care to note that plugging a sewing machine (or a hairdryer come to that) into a table lamp or other light fitting was common practice at one time.  When many rooms had only one mains socket in them (or at best a pair of them side-by-side on the skirting board), table and standard lamps often served as extension leads, and most households were possessed of an assortment of plug adaptors by means of which many light and power problems could be solved.

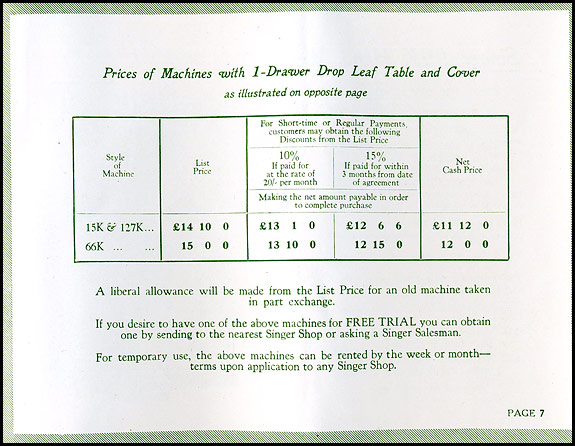
On page 11 we note that in 1933 the 15K was the “Dressmaker’s Machine”, and that the base shown is the “artisan” one with the bigger-diameter treadle wheel to facilitate higher stitching speeds.

And finally a couple of industrials.  Note the cast-iron legs, which were by now obsolete as far as domestic customers were concerned.  Note also the convention whereby women sew at home on domestic machines and men sew at work on industrials.

I don’t know anything about the 31K15 apart from the fact it’s got a knee-lifter, but that back leaf of the table certainly does look handy!  The 29K53 is a fascinating machine that’s often referred to as The Patcher, and its variants always seem to sell for a decent price on Ebay nowadays.  I love the way you can sew in any direction with it, and alternate between treadle and hand drive.  It’s a very clever bit of engineering.

For scans of both publications as PDFs, click on the links below.  I did them as two separate files so you can, should you wish, have the catalogue and the price list open at the same time for ease of cross-reference …

1933 Singer UK Illustrated Catalogue

1933 Singer UK pricelist

By the way, lest any of our overseas readers be confused by the bayonet connector, I should perhaps point out that not only are we on 220 volt here, but our light bulbs don’t screw into light fittings like yours probably do.  Ours have a bayonet cap, about which everything you could ever wish to know is, as usual, on Wikipedia – see here

You can’t buy those bayonet connectors nowadays, unless of course you turn to this guy on Ebay.  Those things were often used in conjunction with the Y-shaped two-way adaptor (a picture of which I couldn’t find), which plugged into a lampholder so that two bayonet connectors could be plugged into it.  I suppose the theory was that they allowed you to use two light bulbs in one lampholder, but I never saw one used like that.

While I’m on this subject, I should perhaps explain that in England nowadays, you can’t even walk into a shop and buy an ordinary 100 watt incandescent light bulb, the manufacture of which has been banned by the EU in order to save the planet.  We’re therefore hoping the 20 that I bought online last week will see us out, as we only need them for 3 lights in the house which are used intermittently and for which energy-saving fluorescents are neither use nor ornament.

And if making incandescent light bulbs obsolete as a token gesture in the direction of planet-saving seems daft to you, how about the singularly crazy legislation requiring a proportion of the light fittings in all new homes to be 3-pin bayonet lampholders into which neither traditional bulbs nor energy-saving fluorescents can be fitted?  See here

Have a good weekend, folks!
The back-clamp Singer 66 mystery …

Standard

One of the things which often confuses folks about vintage Singers is this whole back-clamping business, so last week when Elsie was faffing about and deciding which Lotus to keep, we realised that a photo opportunity had presented itself and a blog post was called for…

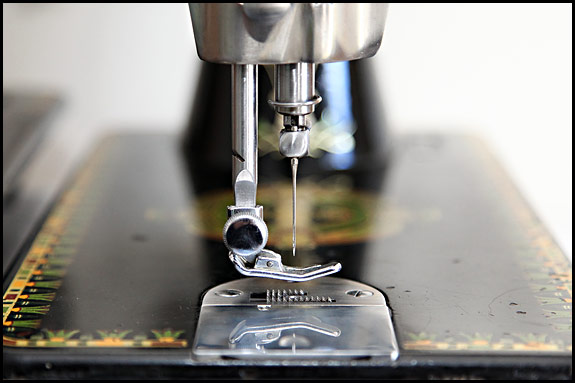
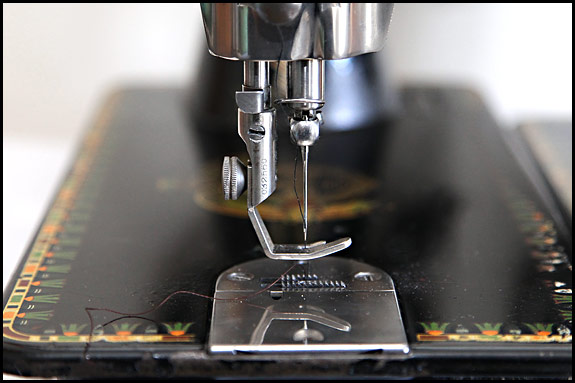
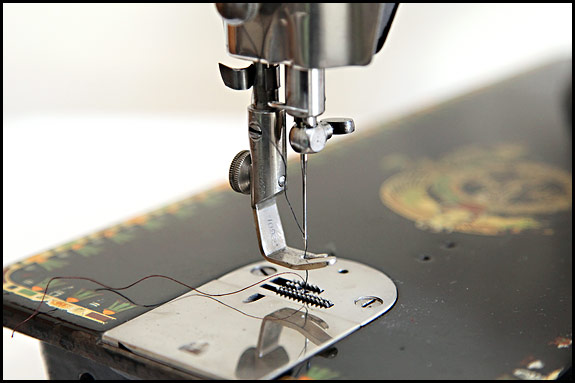
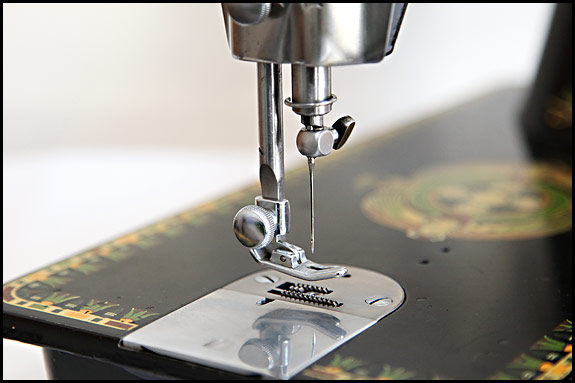
In the top picture we have your usual, common-or-garden, bog-standard vintage Singer presser foot*, which is of the side-clamping type.  And below that we have the vintage Singer back-clamp presser foot, about which the only thing that might not be immediately obvious is that in the normal course of events, you don’t go messing with that slotted screw head.   The part with the serial number on it and the slanted end stays on the machine.  When you want to change the presser foot on a back-clamper, you use the thumbscrew – just like you do on a side-clamper, except it’s in a different place.

Here’s another comparison …

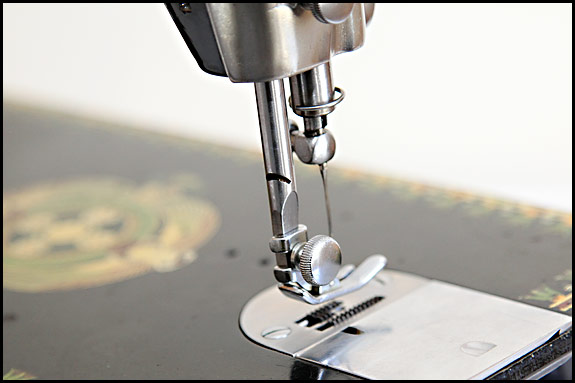
and one more for luck …

Now you see why none of the usual low-shank vertical needle attachments like buttonholers fit a back-clamping 66, which explains why the back-clamper has its own set of standard attachments like the ruffler, hemmers and whatnot.

Every back-clamping 66 we’ve ever seen has been graced with Lotus decals, which fact is no doubt down to us being in England.  If we were in the States, I’m guessing they’d all have had what are called the “Red Eye” decals, which we’ve never actually seen on a real live machine.  That’s because as far as I know, all the Lotus decal 66s were made in Scotland and all the Red Eye ones in New Jersey, but as with most things relating to Singer production, I’m by no means certain of that.

Be that as it may, in due course the penny dropped and Singer realised that making just one model of machine with a totally different presser foot clamping system made no sense at all, so they did the obvious and standardised.  Exactly when that happened I have no idea, but it’s a fact that all early 66s are back-clampers and all later ones are normal side-clampers.

So how then do we explain the fact that Elsie’s back-clamper 66K is dated 1910 and her side-clamper 66K with the Lotus decals is dated 1909?  Easy – her 1909 one’s had its back-clamp presser bar swapped for the side-clamp one from a later 66K!  I’ve never done that myself because I don’t see what the problem is with back-clampers, but providing you have a donor side-clamping 66 to hand, I can’t see it being a major undertaking.  There’s probably instructions for the conversion on the interweb somewhere, but before you search for those, see if you can find the adaptor which is apparently available by means of which side-clamp attachments can be fitted to a back-clamp Singer.  It’s made by somebody in the US.

* Note for those of a pedantic disposition – I do realise that that presser foot’s hinged, therefore it’s not actually your usual, common-or-garden, bog-standard vintage Singer presser foot.  But its means of attachment is, so there.


Vintage Singer Treadle for sale – plus losing your good looks due to the ironing

Standard

Sorry about this rather naff snap of it, but here you see the 1930/31 Singer 66K in a three-drawer Cabinet Base which was up for grabs on our “Machines” page at a bargain price, provided you can collect it.

But why, pray, is it such a bargain?  Because somebody has at some point stripped the top and re-finished it, so that’s now paler than it was originally, and there’s an area of the top above the left-hand drawer which needs some magic doing to it – unless of course you cheerfully accept that as part of the machine’s character, and you’re not bothered much anyhow because it’s covered up when the machine’s in use.

OK, and if the truth be known we need the space rather urgently too, because the house keeps getting smaller, seemingly irrespective of how much stuff we chuck out.  If we can find a new home for this 66 treadle, we can move stuff about in the kitchen so we can then move into it the stuff which should be in there anyway but is currently in the bathroom because there’s nowhere else for it.

The space problem’s been exacerbated this week by the arrival of Elsie’s new 60-year old Acme wringer, for which I spent a happy hour or so this afternoon fashioning a new grip for the handle out of a piece of the blue plastic water pipe which I scrounged from a building site a couple of years ago to make hoops from for the bird netting on the allotments.

I was suddenly struck with a thought about this wringer, so I checked with Wikipedia to see if a wringer is still a wringer if you’re American, and apparently it is.  However, as most Brits over 50 will know, in this country a wringer is also a mangle, as opposed to a mangel, which is of course simply the short form of mangelwurzel, a bulbous root vegetable which all cows are apparently programmed to like when it’s chopped up with a root-cutter or a spade, even if they’ve never seen one before.

Now, I seem to remember reading somewhere once that in America, a mangel is a field beet, but what I didn’t know until today is that a mangle is what we over here call a rotary iron!  And thanks to the miracle of the internets, I now know that in 1946, the ladies of America were in danger of losing their good looks due to the ironing they were doing.  Fortunately though, their salvation was at hand … thanks to the folks at Ironrite 

Incidentally, Elsie wasn’t impressed by that commercial.  She says that if the ironing was making the women of America lose their looks and spoiling their disposition, all they needed to do was get their husbands to do it in future.  And in case you were wondering, the Singer in that film is a 201 …

The Singer 66K and the Singer 99K – how to tell them apart

Standard

The Singer 99K is the baby sister of the Singer 66K.  Or to put it another way, the 66K is the full-size machine, and as such it fits into any vintage Singer domestic treadle base.  A 99K doesn’t, and that’s why if you ever see a treadle 99, it’s a DIY job.

The bed of a 66K is just over 14.5 inches long.  The bed of a 99K is a couple of inches shorter, and getting on for half and inch less front -to-back.  So a 66 will fit into any ordinary “full-size” base and case, even those horrible all plastic ones sold in the late 70’s/early 80’s to “up-date” the classic portables.  A 99 will only fit in either the base it was sold in, or that 99-specific Singer table called the Cadet Cabinet.

Most of the mechanicals are the same on both machines, and in practice when you switch from a 66 to a 99 there’s only two differences.  You lose maybe 2 inches throat space (or what some Americans bizarrely call “harp”), and you save about 6lb in weight, which is definitely noticeable when you cart one about.

Pictured there is a 99K in front of a 66K less its needle plate and slide plate, and as you can see, the difference isn’t exactly obvious.  This of course makes it interesting when a machine’s listed on Ebay, say, by somebody who doesn’t know, or professes not to know, what model it is, and all you have to go on is the usual side-on view of the machine.

OK then, can you tell which is which?

The answer is that the top one’s the 66K, and if you don’t have a picture to compare it with, the easiest way to tell is to look at the gold Singer badge.  On a 66K, the top of the badge is level with what is properly called the stitch regulating thumb screw.  On a 99K, the badge is well below it.

And you’d be surprised how many people don’t know that …

A little history

Standard

That’s a snap of a 1939 Singer 99K which we bought in Beckenham last year.  When I got that machine home, we found that in the base of it was a receipt made out to a lady who bought it secondhand in Sheffield in 1975.   When we’d finished work on it, we put the receipt inside the original instruction book, and you might just be able to see it sticking out the top in this picture, which is the one I used on the blog when I listed this machine for sale.

Before long we sold it to Linda in East Anglia, who named it Vera, and in due course Linda sent us an email, which I quote here by her kind permission …

Hope this finds you both well. I just wanted to say I am still  walking around with a smile on my face, and still  just love looking at Vera!

In the instruction book was a receipt,  for  a  Mrs Marshall  of Sheffield, well we  googled the address, and would you believe, it was a  Mrs Marshall still living there.  There was a phone no….. So I phoned her, and yes she bought Vera in 1975 in Sheffield. She said she had loved  her Singer, and had handed it on to her Daughter, and this is where I thought I  just might  be in trouble, because she said, she did not know her daughter had got rid of it!  Whoops!  Anyway, she took my phone no…..
She has just phoned me to say, she has spoken to her Daughter, and daughter said,  they  did not have the room for it,  so her Husband took it and  DUMPED IT, in a Tip in  Newcastle 20 years ago!   Amazing, I just hoped I have not caused a Family row!   Lovely to know a little of her history.

Isn’t it just?  Of course the question now is how on earth it found its way from a tip in Newcastle to a house clearance place in Beckenham …


Buttonholers, zigaggers, foot controllers and a Lotus treadle

Standard

Just in case you rarely venture onto the Bits ‘n’ Bobs page, here’s a quick update so you know what you’re missing.

Seeing as how in the last week we’ve sent a Singer USA 160985 zigzagger (that’s the big black one with the four red cams) to Birmingham, one of the big Ruby buttonholers to Canada and a Singer 160506 buttonholer to Germany, we’ve been toiling by night even as by day to replace them with more goodies for your consideration.

I’ve just listed a good Singer 161157 zigzagger, which is the third and final version of the one which started out as the 160985, another big Ruby in very fine condition, and another one of Elsie’s favourite buttonholer, the 160506.

There’s also a nice Singer 485910 buttonholer which is perhaps more common in the US than it is over here, a particularly good example of a Precision Built Button Holer B-3 in a nice tin (and unusually, this one’s complete with all its bits), as well as a bit of a rarity called the Zick Zack Kuli Rändelapparat.

Rounding off the new listings is the standard vintage Singer button-type foot controller.  Hoorah! I finally remembered to mention that we can usually do you a nice one of these at a sensible price, and maybe even offer a choice of black or brown.  Actually, now I come to think of it, maybe I ought to do a post about them on the home page  before long?

On the Singers for Sale page we’ve added this gorgeous 1920 Lotus 66K treadle, which Elsie was all for keeping because it’s a lot prettier than the 1909 one in her harmonium (or, if you prefer, her later drawing room cabinet) …

Picture of 1920 Singer Lotus decal 66K treadle

In the end though, and unusually for us, common sense has prevailed.  The Lotus which is in Elsie’s harmonium’s been in it for 102 years now so it really ought to stay here, and there’s no way that Elsie’s going to part with her favourite cabinet.  Besides, as far as we can tell, this Lotus has always been in this base, so they ought to stay together too.  And besides again, Elsie finally admitted the other night that perhaps (just perhaps) I was right after all, and we really do not have the space for her to add yet another machine to her collection.

I did intend to update you with the latest developments on the bicycle front but that needs pictures, which will have to wait until the snow and ice has gone from the lane.  So more on our bikes anon …

Which way round does the bobbin go in a vintage Singer?

Standard

If it’s a long bobbin for a Vibrating Shuttle machine, it’s easy – you hold the shuttle with the pointed end down, and the bobbin drops into the top of it with the thread coming off from left to right across the front.   If the thread’s coming off from the back of the bobbin, that’s wrong.  It needs to be left to right, on your side.

Yes, I know a picture would have been a great help there, but I forgot to take one.  At this time of year I have to wait for a bit of sunshine in which to take a halfway-decent snap, and more often than not as soon as we get the slightest hint of a blue sky, Elsie drags me into the garden to be her assistant/labourer and by the time I get back inside, put the kettle on and remember there’s a picture I need to take, the sun’s gone in.

Anyhow …

If it’s a round bobbin machine, it depends on what model it is, and if you’re thinking to yourself “does it matter which way round I put the bobbin in?”, the answer is oh yes it does.

Now obviously this isn’t a problem if you only ever use one type of vintage Singer, because you’ll have read the book of words for it and know perfectly well which way round the bobbin goes in it.  But what if you’ve just scrounged the lovely old 66K that Mrs Thing next door but one was about to take to the dump along with her weekly accumulation of empty gin bottles and copies of the Daily Mail and you can’t wait to see if it works?  Or your friend Sally of the School Gate Gang’s got an old Singer which won’t sew properly and she’s asked if you’ll have a look at it for her if there’s coffee and cupcakes involved?  Maybe you have a 99 and a 201 and every now and then you have a brainfart about the bobbins?  Whatever, here’s how you tell which way round the bobbin goes in a pre-mid-1960’s Singer (and for all I know about the later machines, in one of them too).

Check out the bobbin case, which is the proper name for that bit of your machine into which you drop your bobbin.  If you look round the sides of the hole into which your bobbin goes, you will see a diagonal slot in it, like this …

Detail photo of Singer 99 bobbin case

That’s a 66/99 bobbin case (they’re identical), and as you can see, the slot exits the case to the left, or to put it another way, anti-clockwise.

Picture of bobbin in Singer 99 bobbin carrier

And there’s that same bobbin case photographed from the same angle, now with a bobbin in it the right way round i.e. with the thread coming off it anti-clockwise.  Yep, the thread comes off the bobbin the same way that the slot exits the case.

Having got the bobbin in, your next step of course is to pull the thread to the right so it runs under the tension spring and into the notch, then pull it across the top of the bobbin and close your slide plate.

When you do that, you’re actually making sure that the thread leaves the bobbin through the hole at the bottom of the slot, then under the tension spring in exactly the right way for the spring to apply constant tension.  Pulling on the thread pulls it down the slope of the slot, and ensures that it stays in the hole as it feeds off the bobbin.

If your bobbin is in the wrong way round, pulling on the thread doesn’t necessarily slide it down the slot into the hole, so you may well get inconsistent bottom tension.

Detail of Singer 201 bobbin carrier

Now here we have the bobbin case out of a 201, and as you can see, the slot faces the other way i.e. it exits the case to the right, or clockwise.  So which way does the thread need to leave the bobbin on a 201?

Detail photo of thread leaving Singer 201 bobbin

Yep, that’s right.   Clockwise.  OK, I completely forgot to photograph a 15 bobbin case, but you can take it from me that it has a slot in it which provides exactly the same clue as to which way round the bobbin goes.

And that’s it.  All you need to do is take a look at the slot in the side wall of the bobbin case, and that tells you which way your thread needs to leave the bobbin …

Picture of Singer 66/99 and 201 bobbin carriers

66/99 on the left, slot exits anti-clockwise therefore thread comes off the bobbin anti-clock.  201 on the right, slot exits clockwise, so your thread comes off clockwise too, like this …

Picture of Singer 66/99 and 201 bobbin carriers and bobbins

Finally, just in case it hasn’t occurred to you, if you take this information together with what I’ve rabbitted on about in earlier posts, you now know how to put both the needle and the bobbin in any vintage Singer the right way round, as well as which way to thread the needle – and all this without an instruction book.

And by the way, if you’re still tut-tutting about these grotty old bobbin carriers, you should have seen the state of them before Elsie insisted on getting the thick of the muck off …

Oiling your vintage Singer – part 2

Standard

OK … we’re going to assume here that you’ve de-fluffed your machine above and below decks to the best of your ability, and that nothing of any importance ended up in your Dyson while you were doing that.  You’ve thrown out that tin of horrible 3-in-1 oil that you would have used if you hadn’t had the error of your ways pointed out to you, and you’ve got some loo roll or whatever handy to mop up the drips.  And if you haven’t got the real instruction book made from dead trees, you’ve got a PDF off the interweb so as soon as you’ve taken the bobbin out and unthreaded your needle, you are, as people keep saying, good to go.

Now if it hasn’t already occurred to you that the diagrams in old Singer books are not always clear about where exactly you’re supposed to be poking the spout of your bottle of oil, it soon will.  Don’t worry though, because on a vintage Singer, if it looks like an oil hole, it probably is – especially if it’s on the top of the machine.  And if it isn’t an oil hole, you won’t have done any harm by applying a couple of drops of oil there by mistake.

Ideally you do the top oil holes first with the needle at the top of its travel so the works are best aligned for having oil dropped on them, but how much oil to apply?  The textbook answer is “a drop or two every 8 hours sewing” but that’s a counsel of perfection, so my advice would be to use your common sense and if in doubt, apply too much rather than too little.  You won’t jigger anything up, and the excess will just drain out in the fullness of time.

Incidentally, while you’re concerning yourself with the oil holes on the top of your machine, it might be an idea to check that nobody’s whacked a spool pin into one of them.  The book might not be clear about your oil holes, but it will be clear about where your spool pin(s) should be.

Turning now to the front of the column, if there’s an oil hole on the bobbin winder, it’ll be just to the right of where your bobbin fits on, and one drop in there will do it.  Much more than that risks oil getting on the rubber tyre, which is Not Good.  When you’ve done that, give it a bit of a twirl to start the oil soaking in.  While you’re in the area, if you have the screw in – screw out type of stitch length adjustment, wind that out as far as it’ll go and put one drop on the top of the threaded bit before winding it back in to spread the oil.

If your machine has a cover plate on the back of the column which is held on by a thumbscrew, swing the plate out the way and take a look inside.  Now rotate the handwheel and see what moves and what doesn’t in there.  You might need a torch.  Ideally you want to get some oil wherever two parts move against or rotate in each other, and also on any gears you can see, so give the handwheel a few turns when you’ve done your thing in there to work the oil around a bit.  Don’t forget to put the cover plate back.

Slide your slide plate (aka your bobbin cover) open, and see if you can see a bit of red felt.  Or a bit of felt that might once have been red.  If so, that needs a couple of drops of oil on it, and if your book of words says to oil anywhere else in the bobbin area, that’s what you do while you’re there.  By the way, note that if there’s a hole in your needle plate (the chromed plate on the bed through which your needle pokes), that hole is NOT an oil hole, and neither is/are the threaded hole(s) in the bed a couple of inches to the right of the needle.

And before we move on to furtling behind your faceplate, a couple of notes for 201 owners.  Don’t squirt oil down that oil-hole that’s on the column itself until after you’ve done the underneath (that’s the hole labelled “OIL” I’m on about – the one that’s more or less behind your bottom spool pin).  And strange though it seems, that felt pad inside the chromed thing on top that you twiddle to alter your presser foot pressure is actually meant to be kept oiled.  The theory is that it soaks down and stops the rod seizing up that your presser foot’s on the end of, but personally I wouldn’t bank on that.

Now you need to take off the faceplate (if it’s not obvious, your book will tell you how), and once again see how everything does its thing when you turn the handwheel.  The routine here’s the same – a drop or two on anything that’s moving against anything else, plus a drop on both the presser foot bar and the needle bar.  That’s the rod that goes up and down when you lift and release the presser foot, and the one that your needle’s on the end of.

OK, having put the faceplate back on and checked you’ve done everything on the topside of the machine, all that’s left to oil is the workings down below.  This is a lot easier if you take the machine head out of the base and lay it on its back on several thicknesses of newspaper, but if you don’t fancy doing that, don’t worry.  Just do the best you can with it hinged up as far as it’ll go and propped there by whatever does the job, and take comfort from the fact that most old Singers keep running for donkey’s years despite not having been oiled properly since the Coronation.

If you can turn the handwheel with the head on its back or propped up as far as it’ll go, do that and marvel at the way things go in all directions under the bed when you do.  Once again, the idea is to get oil wherever anything moves against something else, and most of those places are obvious.  Note though that there are rods running left to right which at first glance seem not to move much if at all when the handwheel’s turned.  They actually just twist a bit backwards and forwards all the time, and the way you oil those is to try and get a drop or two right at each end, where the rod stops and a threaded thingy goes into it.

If you’re oiling a 66 or a 99, there’s one particular area where the diagrams are not much help at all.  There’s a couple of steel rollers about 8mm diameter hiding in the works under the bobbin area, and they are not easy to see if your machine’s hinged open in a case or a treadle base.  They’re not easy to photograph in situ either …

So I had to cheat with these two and remove the feed dog and the connection to it so you can see what’s what, and then take the snaps from the back of the machine.  As you can probably appreciate now, those two rollers are not obvious, particularly if you can only see this area from under the front of the machine.

Try and get some oil on them if you can, but don’t worry too much if you’re not sure whether you did.  Truth is most people never go anywhere near them with a bottle of oil.

One last point for owners of 201’s.  You know I said don’t squirt oil into that hole at the base of the column until after you’ve done the underneath?  If you do, the surplus oil will drain down into the cylindrical metal housing round the gears at the bottom of the column, and drain straight out of it when you tip the machine back to get at the underneath.  So for 201 owners, the last job underneath is to get some oil into the corresponding gear housing that’s under the bobbin area, drop the machine down onto its base and then squirt a goodly dose into that oil hole marked “OIL”.

Finally, don’t forget that you’ll need some kitchen roll or whatever under the machine for a day or so until all the excess oil’s drained away.  We also fold a few sheets of loo paper and put them under the presser foot overnight to soak up any drips, then wipe carefully round the needle clamp and presser foot before sewing with some scrap fabric to make sure we’ve got rid of any excess.

Vintage Singer cabinets, treadle bases – and 1929 UK prices

Standard

Hurrah!  I finally got the scanner working properly again and Elsie’s just found the 1929 Singer Illustrated Price List after I put it back in the wrong place in The Sewing Room, so here we go with a look at some of it.  By the way, when Singer said “List Price” they meant the total price when bought on “Singer Easy Terms”, and “Net Cash Price” is what it cost when paying with folding money.

That’s the later and final version of the 1900 Drawing Room Cabinet (the one that Elsie got for her birthday which I posted a snap of the other week).  We’ve also just got one of these from 1920, but more of that anon.  All we need now is some artistic furniture for it to harmonise with.

Just to give you some idea of how expensive these things were in 1929, if we take for example the 66K in a 5-drawer priced at £18/10/0 on HP or £14/16/0 for cash and base the calculation on average earnings, according to measuringworth.com the equivalent cost today is £3530 on HP and £2820 for cash!  In other words, something like twice the cost of a really good bicycle, which actually sounds about right to us.

Picture of Singer 201K in 7-drawer cabinet table (treadle base)

While we’re on the subject of cabinet tables, here’s a snap of Elsie’s 7-drawer, which currently lives in a corner of the front room with her 1940 201K in it.  I’m not sure what the original machine was, on account of the lady who sold us the treadle base had sold the head for a fiver to “a woman who advertised a couple of years back wanting old sewing machines to go in shop window displays”.  A pox on All Saints!

In case you’re wondering, the wire that’s plugged into that socket goes to a Singerlight which you can’t see on the back of the machine, that recess is exactly 48 inches wide, and yes the belt is a bit loud but that’s ‘cos it’s a brand new one I put on last week.  It’ll soon quieten down.

That’s the 1929 incarnation of the Victorian treadle machine i.e. the coffin-top one.  Until we acquired this price list, I always thought that when they introduced the fold-down treadle machines they discontinued the “put the lid on it” ones, but obviously not.  OK, it was a cheaper alternative to a 3-drawer cabinet table, but surely it must have seemed a bit old-fashioned?

Love the way you could get a free home trial or rent one by the week, but most of all I just love that footstool carefully placed to show off the lid …

Ahah!  So if you’ve got an electric portable, you put the lid on a pouffé!  Either that or it’s a couple of spare wheelbarrow tyres.  Whatever, note that these are electrics with knee-lever control (as opposed to foot pedal).

I don’t know if these tables were popular at the time, but I do know that you don’t see many of them nowadays.

This is a new one on me, and I wonder why there’s no model number?  Anyhow, as I understand it, you drop your portable electric still in its base into a big recess on the top of the table, and presumably the knee-lever attaches via a hole in the front of the table.  Seems a bit pointless to me, because surely the only advantage over just plonking your portable on the kitchen table is that the bed of the machine is now flush with the table top?  And against that you’ve got a table which can’t be used for anything else because when you’re not using the machine, you put the lid over it.

It seems a poor thing compared to that cabinet table which used to be available with the recess into which you dropped your hand-crank portable (still in its base) to turn it into a treadle machine.  And if you’re wondering how on earth that worked, the answer is that at the time, some of the portable bases had two big holes in them under the handwheel, with a slot between.  Drop your machine into the cabinet table, run a treadle belt down through one hole, round the treadle wheel, back up through the other hole and over the pulley, trim and join belt in the usual way and flick the “finger” of the hand crank out from between the handwheel spokes.  Bingo – your hand crank portable is now a treadle machine. (And having faffed with the belt like that to get it in place and the right length , it’s all set up so you don’t need to repeat the performance.)

To revert to hand-crank portable, you just slip the belt off treadle wheel then lift it clear of handwheel.  Lift the machine out of the recess, the belt slips through the slot between the two holes, and off you go, pausing only to grab the lid from off that matching footstool,  When it’s treadle time again, you just reverse the process.

Anyhow, that’s the main part of the 1929 price list, and I’ll do the 1940’s one before much longer, courtesy of Colette …

Singer 66 and Singer 99 maintenance – that weird oil hole on the top

Standard

I was in the greenhouse yesterday afternoon taking some pictures of the underneath of a 99K, as you do, when it occurred to me to do a quick post about that weird oil hole next to the spool pin …

Picture of oil hole on top of Singer 99K

There’s the hole in question, and to its right is a chunky sort of threaded plug with rust on its slotted end.  That’s what that oil hole thing with the slot in looks like if you manage to unscrew it, which in the normal scheme of things is something you’d be ill advised to do.  And in case you’re wondering how come that one on its side is so rusty, it’s because it came from a scrap machine which sat outside the bike shed for a couple of weeks waiting for me to get round to taking it down the dump.  And it rained lots.

Anyhow, why am I rabbitting on about this?  Well, it’s actually quite important that that hole gets its fair share of oil every now and then along with the other oil points indicated in your instruction book.  That’s because there’s a metal shaft runs up to it from the bottom of your machine, and the cup-shaped top end of it mates with the conical bottom of that plug thingy, which acts as a bearing.  Which needs a film of oil on it.   Unfortunately, although that hole is 4mm wide at the top, it’s 13mm deep and only 2mm wide at the bottom – and it’s very often full of crud.  Fluff, bits of matchstick, grot of ages – you name it, we’ve pulled it out of these oil holes.

So what’s to do with it on your machine?  First thing is to realise that although there’s a small hole at the bottom of it, that’s pretty much closed off by the top of the shaft which mates with it.  There’s just enough clearance for oil to seep through, but not enough for the crud to get into the works.  The crud can stop the oil getting where it’s needed though, so the best thing you can do is clear it out, and that calls for some ingenuity on your part.  We use one of our collection of dental probes, but it’s got to be possible with a bent paperclip, hasn’t it?  End straightened out, then about 2mm bent at right-angles?  Or something?  Maybe even poke about a bit to loosen the grot then Dyson it?

Whatever you use, it’s certainly a job worth doing.  So too, come to think of it, is checking with your instruction book while you’re at it that your spool pin is where it should be i.e. that some muppet hasn’t bashed one into an oil hole.  And yes, that really does happen.

There.

I did it.

I got to the end of a post about oil holes and I haven’t said a word about horrible 3-in-1 oil and how it’s evil and despite what they say on the tin it’s anything but ideal for sewing machines and …