Category Archives: Portable sewing machines

A little history

Standard

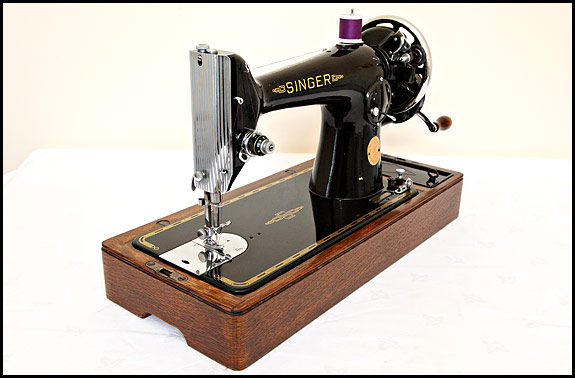
That’s a snap of a 1939 Singer 99K which we bought in Beckenham last year.  When I got that machine home, we found that in the base of it was a receipt made out to a lady who bought it secondhand in Sheffield in 1975.   When we’d finished work on it, we put the receipt inside the original instruction book, and you might just be able to see it sticking out the top in this picture, which is the one I used on the blog when I listed this machine for sale.

Before long we sold it to Linda in East Anglia, who named it Vera, and in due course Linda sent us an email, which I quote here by her kind permission …

Hope this finds you both well. I just wanted to say I am still  walking around with a smile on my face, and still  just love looking at Vera!

In the instruction book was a receipt,  for  a  Mrs Marshall  of Sheffield, well we  googled the address, and would you believe, it was a  Mrs Marshall still living there.  There was a phone no….. So I phoned her, and yes she bought Vera in 1975 in Sheffield. She said she had loved  her Singer, and had handed it on to her Daughter, and this is where I thought I  just might  be in trouble, because she said, she did not know her daughter had got rid of it!  Whoops!  Anyway, she took my phone no…..

She has just phoned me to say, she has spoken to her Daughter, and daughter said,  they  did not have the room for it,  so her Husband took it and  DUMPED IT, in a Tip in  Newcastle 20 years ago!   Amazing, I just hoped I have not caused a Family row!   Lovely to know a little of her history.

Isn’t it just?  Of course the question now is how on earth it found its way from a tip in Newcastle to a house clearance place in Beckenham …


The Singer 285

Standard

Now here’s a funny thing.  As in peculiar, that is.

A couple of weeks ago, I spotted on Ebay another of those completely OTT hyped-up listings for a bulletproof, semi-industrial, heavy duty and the rest of it machine which was ideal for making tents, tarpaulins, suits of armour yadda yadda yadda and which had a start price of well over £100.  I don’t know if the seller was having a larf or what, but the machine in question was a … Singer 285K.

The very next day, I got an email from a gentleman asking if I could help identify the machine which he’d just bought for £15.  He attached a couple of very nice snaps of a rather run-down looking … Singer 285K.

Having answered that email and breathed a sigh of relief that he hadn’t asked me how I rated the 285 (since you ask, not really heavy enough for a boat anchor and not pretty enough for a door stop), I had a rush of blood to the head and decided to Google it.  And lo, look what comes up at the top of the page.  Yep, the good Mr Remlinger (he of the red vest) has shared his thoughts upon the matter.

Don’t forget this is a “heavy-duty, semi-industrial” machine he’s talking about, with an Ebay start price of over £100  … 😉

Another Singer 201K for sale

Standard

I’ve put another classic 201K on the Singers for sale page, and this one’s a little bit different …

Picture of Singer 201K sewing machine with accessories

This is the 201K3 which until now has been in Elsie’s own collection of portables.  It’s the one I’ve been under orders not to mention when people asked if we have a nice 201 electric for sale.

However, we’ve only got a small house, and with 6 different treadle machines in it which I can’t see Elsie ever parting with, it’s finally been decided that the time has come for some of her portables to go to somebody who’ll put them to better use.  So this one is now for sale.

It’s a little bit different in that we know its history.   The lady I bought from it had recently inherited it from her Mum, who bought it new in 1948.  Apparently it was Mum’s pride and joy, and it was taken into the local Singer shop for a service every two years without fail.    She made her daughter’s Christening gown on it, and in due course her wedding dress too.

After Mum died, it was passed to her daughter.  It was only brought out once, to make a pair of curtains on, then put back in the cupboard.  And there it stayed until it followed me home.

It’s been checked over very carefully indeed and oiled, and I’ve stripped and rebuilt the motor, as well as replaced the mains leads.  This machine is a really sweet runner, and it has one of the quietest motors we’ve ever come across.  Sure it’s got a few superficial bits of pin rash and the odd tiny dink or two, but nothing that stopped Elsie claiming it for her collection as soon as she saw it.

Its “snakeskin” suitcase-type case is a really good one, and we’re including with it all the bits and bobs which came with it when we bought it – original instruction books for the machine and for the motor, oilcan (empty!), a working Singer buttonhole attachment 86662, and a full set of attachments in their card box complete with the list of contents!

Also included is the Singer rubber mat, but I forgot to include that in the pictures …

Picture of 1948 Singer 201K3

Electrical safety and old Singer sewing machines – part three!

Standard

I really hadn’t reckoned on doing this post, but on Sunday morning Elsie and I bought a 201 from a nice lady who told us she got it years ago to make some curtains.   But she never got round to making them, or for that matter, anything else.  In fact, she never used the machine.  Never even had a quick go on it when she got it home.

Which is just as well really, because look what we found when we took the mains leads and foot pedal out the case …

Now, in case you’re not familiar with old electric Singers and you haven’t read either of the last two posts on this subject, that’s the plug which plugs into the socket on the machine.  One of those brown leads goes to the foot pedal, and the other one goes to the mains plug.

When you switch the mains on, all should be well providing you’ve got that plug plugged into the machine properly.  If, however, you were to pull this particular plug from the machine without first switching off at the wall socket, and you happened to touch one of those sticky-outy bits, you would at best get a fright.  At worst, if your house electrics were in need of modernisation, you could get a potentially fatal electric shock.

In the picture below, the plug is connected to the mains and the “245” showing on my meter is the voltage at those exposed contacts …

That plug has not just been put back together incorrectly after it was dismantled, it’s been put back together in a way which beggars belief.

That actually takes a lot of doing.  How do you forget which way round those contacts were when you took the plug apart?  Why, when you connect each wire and bend it back like that, don’t you wonder why each of those contacts has a little cutout in it which the wire could sit neatly in, but it’s on the wrong side?  Why has the plug body got those depressions in it which are exactly the right size and shape to accomodate the tubular parts of the contacts which you’ve just put in facing away from them?  But above all, how come it never occurs to you when you put it back together that the plug doesn’t look like it did before you took it apart- and it now has exposed contacts which are obviously going to be live when connected to the mains?

Above, contacts as assembled by our man.  Below, contacts the right way round, fitting snugly in the depressions in the plug, and with the cutouts for the wires now usable.

I’ve seen some very dodgy re-wiring on old sewing machines, but how this one came to pass is way beyond my understanding.

Anyhow, having succeeded in writing this post without using the words “incompetent” or “muppet”, I’ll quit while I’m ahead and save how he re-wired the foot pedal for another time …

Electrical safety and old Singer sewing machines – part one

Standard

DISCLAIMER – This post it not written by a professional electrician.  It’s written by a retired bloke who meddles with old Singers, and what follows is nothing more than personal opinion based on experience and, hopefully, a smattering of common sense.

It might help readers to know that I grew up in a house where, as was still common at the time, all the mains sockets were 2-pin.  In other words, there was no provision for earthing anything electrical.  That didn’t stop Mother sometimes taking the chill off the bathroom in the winter (only on the very coldest of nights, mind – she wasn’t made of money!) with a metal-bodied single-bar electric fire placed on the floor a good 5ft away from me in the bath, its lead snaking under the door and into the 2-pin socket just inside my bedroom.  Mother wan’t daft, so I never have worked out whether she was simply confident that 7 year-old me had enough sense not to splash water onto that electric fire when I got out the bath, or whether some pressing issue might have been resolved by my early demise.

Whatever, I grew up with a healthy respect for mains electricity, and have done perhaps more than my fair share of DIY home electrics.  I’ve also worked for several years in the assembly of electrical and electronic products, but I reckon that’s enough background for you to decide how much notice to take of what follows.

What’s prompted this post is an email I got from one of our readers asking how she should earth her Singer 201K.  Specifically, the question was why, when the original 2-core lead has at some point been replaced by a 3-core one with a 3-pin mains plug on one end of it, is the earth wire not connected at the machine end?  This lady kindly sent a rather good picture of what she found when she undid the Singer connector …

Copy of vintage Singer motor lead connector

Given that there are three contacts in that connector and only the outer two are wired up, it’s entirely reasonable to suppose that the earth wire should go to the middle one.  After all, that’s what you’ll find if you open up the plug on your kettle or whatever.  But this is a Singer sewing machine that’s at least 60 years old.  Not only were things done rather differently back then, but that machine connector’s also a bit out the ordinary in that there’s only one mains cable going to it.  And the reason for that is that this particular plug goes into a 201 with a knee-lever controller.  If it plugged into a machine with the usual foot-pedal controller, the wiring would be more like this …

picture of wiring of vintage Singer connector

See the red wire going to that centre terminal?  That’s a good clue that it’s not an earth connection.  In fact, the centre connection of these old Singer plugs goes to one side of the motor, and connecting an earth wire to that would not be a good idea, because you would in effect be connecting the live pin of your mains plug to the earth pin of it via the sewing machine motor.

So how, you ask, do you then earth an old Singer electric?  The short answer is that you don’t.  You could do, but unless your foot-pedal and mains leads are permanently wired in as on the 185 and the final variant 99’s, the necessary wiring would look a mess and be a PITA if you wanted to unplug the leads from the machine.

OK then – how to avoid death by vintage Singer?  In my opinion, you need to ensure first of all that when you’re using the machine, you’re plugged into house wiring which has been professionally checked within the last 10 years and has a consumer unit fitted with a good RCD.  If that’s meaningless, see here

You also need to inspect both the mains lead to the machine and the lead from the foot pedal for any signs of cuts or wear in the outer covering, and while you’re at it, take a good look at any visible wiring on the machine itself.  If it looks a bit dodgy, it probably is, and you need to get it sorted.  Similarly, if the wiring going into your machine plug looks something like this, that also wants attending to …

Picture of bad wiring to vintage Singer machine connector

And finally, you can perhaps bear in mind that until Singer started flogging machines with three-pin plugs on the end of the mains leads (towards the end of the 1960’s ?) very few domestic electric sewing machines were earthed, but even fewer users of them were electrocuted.

That’s it for this first part, but there’s more to come on this subject …

Top picture © Colette Granville, used by kind permission

PART TWO can be found here and PART THREE here

How to remove a vintage Singer from its base and how to replace it – single-handed

Standard

Before we get stuck in, let me say that there is an alternative way of removing and replacing a head in a wooden base, but you need more of a toolkit to do it that way and you could screw up the finish round the hinge bodies on the base.  Besides, this way’s not complicated, it just seems that way when you explain it.

First off you need to slacken the chromed thumbscrew on the base so you can move the little catch thingy out the way and swing the head back on its hinges.  Do be careful though, because the head is heavy and if it’s loose on the hinges, it might not move quite how you expect it to.  If you’re a bit worried about this, put some kind of padding on the table behind the base such as a folded towel, and at least then if it flicks over onto its back, you’re unlikely to bend anything.  Or dink the table.

If you’re confident, all you need is something of such a height that you can lay the head down on it and all will be held at a convenient angle for you to furtle about under the bed.  For this lovely 99K which followed us home from Dartford yesterday, a couple of Elsie’s old books was just right (since you asked, the 1931 Womans Own Book of the Home and The Complete Illustrated Household Encyclopaedia) …

Picture of underneath Singer 99K sewing machine

The next step is to locate the two grub screws (for that is what a small bolt without a head like this is called) which lock, or at least should lock, the machine securely to the two hinge pins.  Note for pedants – yes, I do know that a grub screw is actually a set screw and not a bolt.  Not everybody knows what a set screw is though, so just chill, dude.

As I was saying, you need to unscrew the two grub screws, if indeed they are not already unscrewed.  Or missing …
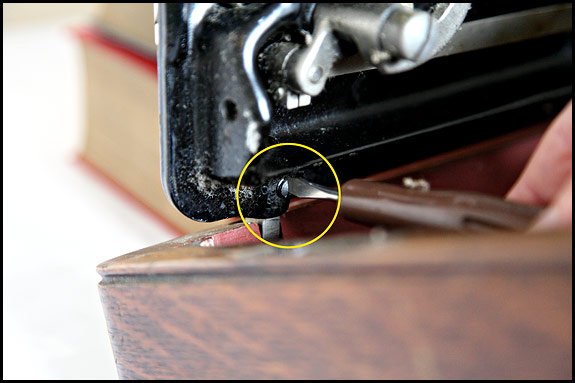
Picture of removal of left grub screw from Singer 99 machine bed

Picture of removal of right grub screw from Singer 99 machine bed

You don’t need to take those screws out, only unscrew them enough so that you can slide the head off two two hinge pins, but if you over-do the unscrewing and they fall out, it’s no biggie because they will (should) just drop into the machine base.  Whatever, you can now try lifting the head off the hinges, remembering that you need to take the weight and lift the thing up and towards you at the same time.  This is the point at which you wish you’d planned ahead and worked out where you were going to put the head down once it’s out the base, but such is life.
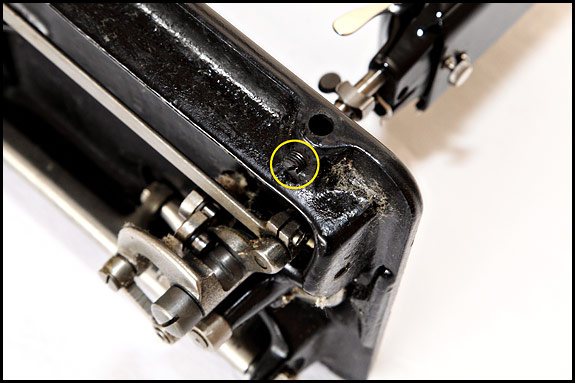
Rear view of Singer 99K mounting point

There’s your grub screw unscrewed almost to the point of falling out, and you can see above it the hole into which the hinge goes.

Picture of wooden base of vintage Singer sewing machine

That screwdriver, by the way, is the Singer one which was supplied with some machines, and if you have one of those, you have the ideal thing to do with your grub screws.  The blade’s the right size, it’s just the right length, and you can get a good grip on it.  Anyhow, having put the head down somewhere sensible, you can now fully appreciate all the little fluff bunnies in the bottom of the base and also ponder on quite how all those pins ended up there.

Now, if you lift those two hinge parts up, you’ll almost certainly find that they fall down again.  They won’t often stand up on their own, which could make it really awkward to replace the head in the base without some obliging soul helping you out, because you need to slide both pins into the holes at much the same time.  It can be done single-handed, but there’s a definite knack to it.  There is though a sneaky way round the problem, for which you need one of those nice red rubber bands which kindly post persons sometimes drop outside your front door on those occasions when they do actually favour you with a delivery …
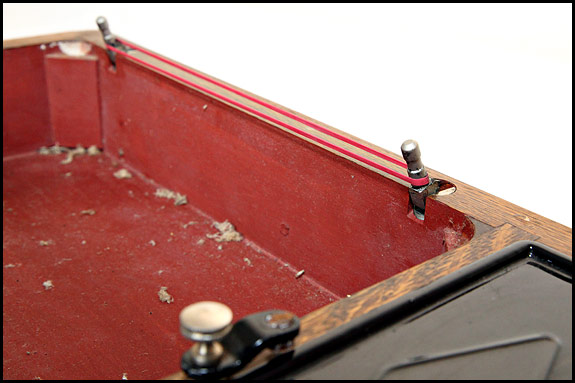
Picture of vintage Singer wooden base

OK, it doesn’t have to be red, but if it is, it goes nicely with that cheap paint they used inside the bases. Whatever the colour, now your hinges will stay like that while you carefully line them up with the holes in the back of the base, then let the head down all the way on the pins.  And if you forgot to do so, it’s at this point that you wish you’d remembered to check whether the two grub screws are in place, screwed in just a turn or two …

All you have to do now is lower the head down carefully until the front of it’s just above the top of the wooden base, then pull it towards you a bit (like 1/4 inch or so) so it rests there rather than dropping down into its final position.  You can then cut the rubber band and swing the head up and back again, letting it drop down all the way onto the hinges, then hold it there while you tighten up the two grub screws.
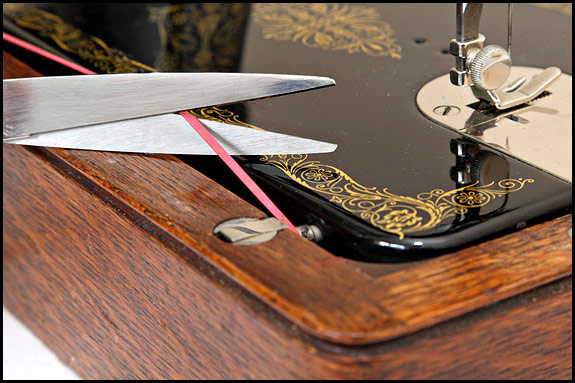
Picture of Singer sewing machine head and base reassembly

And that’s it!  It can be a bit nerve-racking the first time you do it single-handed, particularly if the machine’s a heavy old cast iron 201, but hopefully now you know what’s involved, you can at least see that it’s possible.  Having said that though, I’m the first to admit that another pair of hands makes things so much easier …


The knot in the plug

Standard

Picture of Vintage Singer motor plug

In case you don’t recognise it, that’s a vintage Singer motor plug of the most common type, shown here without the two screws which hold it together.  In most installations there are two leads connected to one of these – one to the mains plug and one to the foot pedal, and it’s those cut-off leads you see sticking out the back here.

When you consider that all of these plugs are well over 60 years old and many of them are still on the end of the original cables, it’s hardly surprising that most are in a bit of a state inside.  Actually, some of them are downright scary, but that’s something for another blog post.

This one wasn’t too bad as these things go, but I’m in awe of whoever had the patience to knit this little lot with the old rubber-covered wires in such a confined space …

Photo of inside of vintage Singer sewing machine motor plug

Picture of wiring in vintage Singer motor plug

It’s bad enough rewiring one of these plugs with modern cable which is both thinner and more flexible, but to do it with two fat old rubber-covered cables that needed forcing through the hole in the plug body to start with must have been a real PITA.  And in case you’re wondering, the purpose of the knot is to act as strain-relief i.e. to stop the leads pulling out when No 1 child runs past the end of your table at high speed and trips over the mains lead that you’d just told him for the third time to be careful of.

While I’m having an explain here, if you’ve never used a vintage Singer electric, you might be bemused to know that the motor socket lives more or less under the handwheel, and that plug goes into it in such a way that the two leads come out the top of it, not, as you might reasonably expect, out the bottom.  Yes, that does mean that the leads can rub against the handwheel as it rotates at a fair old rate of knots, particularly if the motor bracket’s at the top limit of its adjustment (ie the motor’s as high up as you can get it).  I too think that’s very silly, but apparently the reason they did it like that is so the leads didn’t get in the way of you removing the lid of the storage compartment.

Or so they say.  I’m more inclined to thinking they just screwed up, simple as that, and took far too long to replace that plug with the one which has a cable going in each side rather than two on the top.  It’s a big improvement is that, and it’s actually a bit easier to rewire, for which people like me are truly thankful.

Singer 201K Mk2 for sale

Standard

I listed a nice 201 on the Singers for sale page yesterday, and here’s a few more snaps of it.  This one’s a 1957 201K23, and it’s in a plastic base and case which really doesn’t do it justice …

picture of plastic case for sewing machine

Picture of Singer 201K23 with plastic case and base

Picture of Singer 201K23 sewing machine

Picture of Singer 201K Mk2 sewing machine

The reason for the plastic base and case is that this machine came to us in a cabinet which was fit only for scrapping, we simply don’t have a spare wooden base and case we can put it in, and even if we did, we’d have to put the price up more than we’d want to cover that.  So it’s in a useable base, and the lid’s OK for keeping the dust off even though the catches on it aren’t up to much.  It will however fit straight into the wooden base and case of a 15 or a 66 if you have one you can swap, or alternatively it’ll fit into a treadle base or cabinet.  Come to think of it, we’d be delighted to sell it already installed in one!

As to the machine itself, this one’s a good ‘un, and and as far as I can see all that’s stopping me rating the cosmetic condition as exceptional is a couple of very small dinks in the finish of the bed and a little bit of staining at the very bottom of the column, behind the bobbin spool pin and winding tensioner.  Mechanically it’s in very fine shape indeed, and it sews a lovely straight stitch both forwards and backwards.

The motor’s a really good one as is the foot pedal, it’s got a working Singerlight of the correct type, and the mains leads are new.  We’d like them to be the proper shiny brown oval-section cable but that’s only available from a repro wiring place in the States at a truly outrageous price, so the mains leads on this are round and semi-matt black like we use on black machines.  The motor plug’s brown though!

If you’re in the market for a 201, you won’t need me to tell you how good these things are, and you’ll also know that underneath that aluminium body, a Mk2 is exactly the same mechanically as its classic-shaped cast-iron predecessor.

How to open a Singer sewing machine case lid without the key – and how not to

Standard

Some people call them domed lids, and on the internets you’ll sometimes see them called doomed lids, but what we’re on about here are properly called bentwood case lids.  Specifically, Singer bentwood lids and how to open one without the key.  And if you’re thinking that surely any fule kno how, I can assure you that they don’t.

So, somebody’s inherited that old sewing machine of Grannie’s, and quite naturally they want to have a look at it now they’ve got it home.  But oh dear there is no key, so how will they get in it?  Enter the Man About The House, who takes stock of the situation, and in entirely typical fashion says “Leave it to me” as he reaches for his toolbox.  Naturally he can’t find in it the small chisel he had in mind for the job, but a Stanley knife and a screwdriver will do the business no problem …

damage - wrong way to open locked singer bentwood case

Having hacked away enough 70-year old polished oak to reveal what’s what, it’s immediately apparent to our hero how it all works and what’s called for, which is a small hacksaw blade with which to saw through the tongue of the lock, et voilà!  With a bit of jiggling, the lid lifts off …

picture of damaged lock on singer bentwood case

Of course the lock is now useless and the base of the machine is damaged in such a way that it would take a skilled cabinetmaker to restore it, but hey, you can’t win ’em all.   The idea was to get the lid off, and the lid is now off.  Sorted!

picture of damaged base of singer sewing machine

What a shame our hero didn’t try the obvious …

photo showing how to open a singer sewing machine case lid

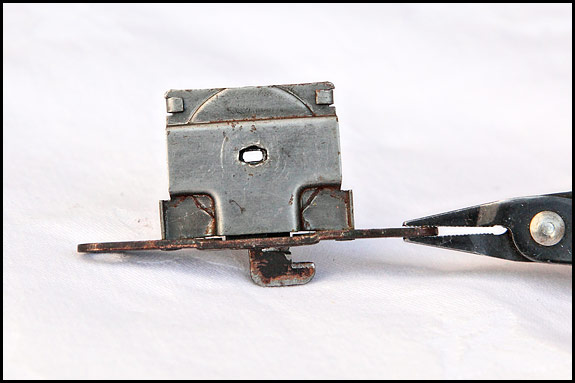
OK, what you need to know is that the locks on most Singer bentwood case lids are much of a muchness.  The keyhole in the lids we’re on about is round as shown above as opposed to keyhole-shaped, and if you take the lock out by undoing those two screws seen in the second picture, it looks something like this …

picture of lock from singer bentwood lid

That oblong hole that you can see through in the middle of the lock is the hole into which the end of the key fits, and it’s actually in a part which is sandwiched inside the lock casing.  On some of these locks the hole in that outer casing will be a bit smaller than this one, on some a bit bigger and on others it’ll be chewed up, but it makes no difference as far as we’re concerned here.  Also, the (rusty) sticky-outy bit at the bottom shown above is only one of the two that should be there, because matey sawed the other one off this particular lock.

There should be one of those danglers facing each way.   When the lock’s locked, they hook under the ends of the slot in the metal plate in the end of the base, and that’s what locks your case lid.  When you unlock it, the two sticky-outy bits move back towards each other, so the hooks clear the end of the slot and you can lift the lid up.  It’s about as simple as it could get, but it works extremely well.

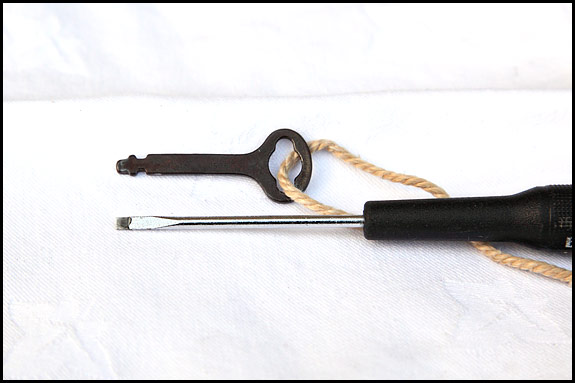
picture of key for singer bentwood case lid

Now, there’s no prizes for spotting the similarity here between the proper Singer key and the small screwdriver which most owners of Singers in bentwood cases use instead.  Yes indeed, all you need to open one is a flat-bladed screwdriver like that with a tip that’s about 3mm wide, and having armed yourself with one of those, the correct procedure is as follows:-

Look into the keyhole (using a  torch if necessary) to get an idea of the size of the slot and see which way it’s aligned.

Poke your screwdriver into it.  If there’s no way you can feel it locating in that slot, try a screwdriver that’s a bit narrower.

Once you’re fairly sure your screwdriver’s in the slot, turn it clockwise.  It will probably be harder to turn than you were expecting it to be.

If you’re sure your screwdriver’s engaged properly but the lock won’t turn clockwise, try turning it the other way.

If still no luck, show somebody else this blog post and let them have a go.

If all else fails, apply a few drops of thin oil (or better still penetrating oil) and try turning one way then the other several times as the oil soaks in.

If you’re still stuck, come back and add a comment under this post and we’ll see what we can do to help!

Singer 201K for sale

Standard

Picture of 1949 Singer 201K sewing machine

Rear view of Singer 201K sewing machine made in 1949

This is a rather nice 1949 Singer 201K hand-crank and it’s the latest machine to go on the “Singers for sale” page.  It’s also missing its bottom spool pin in these pictures ‘cos I forgot to replace it before I took them, but there you go …

Anyhow, having got that embarrassment out of the way, let me say that it’s customary for those flogging a 201, particularly on Ebay, to tout it as a “semi-industrial” machine.  It’s also the done thing to point out how many thicknesses of denim, leather, rhinoceros hide, chain mail or whatever a 201 will “sail through”, but it’s a lovely evening here and I don’t want to spoil it by going off on one about that just now.  Suffice it to say that not so very long ago, it seemed to be only 201s that were hyped up like that.  Now 99’s and 185’s are, regularly, so it’s surely only a matter of time before both the Barbie and the Hello Kitty sewing machines are rated “semi-industrial” too.

The reality of the 201 is that it’s a beautifully-engineered machine which is so well made it’s amazing that Singer could ever sell the things at a profit.  It’s also generally held to be the best domestic sewing machine Singer ever made, it’s true that with the right needle and the right thread it’ll sew pretty much anything you can get under the presser foot, and it was certainly designed to take a lot of use.  But not eight hours a day five days a week use.  For that you still need an industrial machine, and they tend to be bigger, heavier, uglier and a great deal more expensive.

Put simply, if the 201 was a carpet, it’d be rated Heavy Domestic.

So, given that it’s “only” a straight-stitch machine like the 15 or the 66, you can be forgiven for wondering what the big deal is.  Well, to anyone with a precision engineering background who works on sewing machines (e.g. me), the big deal is the all-metal, all-gear drive and a rotary hook.  To most people who use one, the big deal is that they run beautifully, they sew a lovely stitch, they have same-stitch-length reverse, and you can drop the feed dogs on them.

I’ll do a separate post sometime about why the rotary hook of a 201 is an improvement on the reciprocating hook of a 66.  However, die-hard fans of the 15 will already be muttering that what matters more is whether your bobbin’s horizontal or vertical, so for now I’ll just say that I do understand their argument about the 90 degree bend in the thread path, but speaking as an engineer, rotary motion beats reciprocating motion any day.  So there.

The all-metal all-gear drive thing’s a no-brainer though.  “All-metal” is good because metal gears don’t shred like horrible plastic ones can and do.  And as to the all-gear drive, the handwheel of a 15, a 66 or a 99 moves your needle, your feed and your bobbin via an ingenious system of levers, cranks and cams.  On a 201 it’s all done by shafts and gears, which is probably more efficient and is certainly far more elegant from the design point of view.

So it’s all good as far as I’m concerned, whether your 201 be the original Mk1 cast iron one or the later more modern-looking aluminium-bodied Mk2.  Elsie likes ’em too, which explains the presence of the Mk1 in the 7-drawer treadle base in the front room and the Mk2 in the No46 treadle cabinet in The Sewing Room, which in fact she’s using as I type this.  Doing something with a Swiss zigzagger, since you asked.  Which might shortly be for sale …