The Singer 201K – which is which?

Standard

We got a query yesterday from Vicky, who asked what the “23” indicates when somebody describes a machine as a 201K23, so I thought I’d answer that here in case it’ll help anybody else.

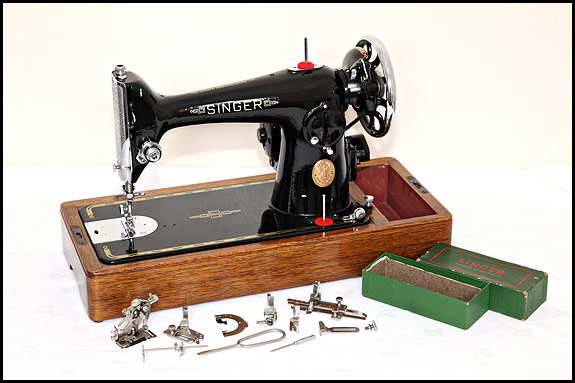
First off we need to establish that the K stands for Kilbowie, which was the factory in which the machine was made.  Next, we need to understand that a 201 is either an early type like this one

Picture of Singer 201K sewing machine with attachments

or a later type like these two seen here without their bases

Black and brown Singer 201KMk2 sewing machines

The early type is usually referred to as a Mark 1 and the later type as a Mark 2, and that’s good enough for most folks, most of the time.  Where it gets interesting is when you take into account that both types were made in several variants, so here we go with the definitive explanation of Singer 201 model numbers …

201-1 is an early type treadle machine

201-2 is an early type electric with the so-called “potted” motor which drives direct rather than by a belt from the motor to the handwheel (rare in the UK)

201-3 is an early type electric with the usual UK-market separate motor and drive belt

201-4 is an early type hand-crank machine

The later type follows the same pattern except there’s a -2 suffix before the type number and it was never made with the potted motor, so for the Mark 2 machines it goes …

201-21 is a later type treadle machine

201-23 is a later type electric machine

201-24 is a later type handcrank machine

Strictly speaking, the “K” doesn’t form part of the model designation but it tends to replace the hyphen in common usage, so we get “201K4” to describe a Mk1 hand-crank, “201K23” to describe the Mk2 electric that Vicky refers to, and so on.  And don’t worry if that does your head in – I still check with my Little Black Book if I need to be certain about any of them!

The Famous Buttonhole Worker

Standard

Picture of Famous Buttonhole Worker with box and instructions

I have no idea at all why The Famous Buttonhole Worker was famous, nor do I know exactly when this fine example of it first saw the light of day.  I can though tell you that it was made by the Lenox Manufacturing Company of Catasauqua, Pennsylvania, and very nicely made too if you ask me.

This one is the latest addition to our collection of buttonholers and as yet we don’t really know much more about it than you do, apart from the fact that the instructions are jolly good.  It must have been a great relief to many to open them and read that “no special skill is required to use the Famous Buttonhole Worker”.

The design of it obviously has a lot in common with the later Singer non-template buttonholers as shown on our Accessories page, and well golly gosh there’s actually an exploded diagram of it in the 1938 Singer Fashion Aids parts book, where it’s referred to as the “Buttonholer 121704”.  But it says neither “Famous” nor “Singer” on the one in the book, which is a bit strange really considering how Singer usually made sure they had the firm’s name on any product they sold.  Perhaps the illustrator just forgot to draw it.

Be that as it may, what you see above is what we got.  What we didn’t get with ours is the little wooden-handled knife with the interchangeable blades for cutting your buttonhole once you’d Famoused it, but we’re not bothered because it seems that the knife wasn’t always included, and anyhow we’re not anal about such things.

So … we know that the FBW begat the Singer Buttonholer 121704, which begat the Singer Buttonhole Attachment 86662 (the black one with the wing nuts), which begat the Singer Buttonhole Attachment 86718 (the cream one with the red knobs), and there the begatting stopped.  At least I think it stopped.  But maybe it didn’t, because I’m certain I’ve seen this device, or something remarkably like it, on the internets recently billed as a Y.S.Star industrial buttonholer!

Whatever, there’s supposed to be another example of the Famous Buttonhole Worker on its way to us this week from the US of A, so no doubt there’ll be more about it in due course.  Maybe a video of Elsie test-driving the thing, and maybe even one for sale …

Singer 201K for sale

Standard

Picture of 1949 Singer 201K sewing machine

Rear view of Singer 201K sewing machine made in 1949

This is a rather nice 1949 Singer 201K hand-crank and it’s the latest machine to go on the “Singers for sale” page.  It’s also missing its bottom spool pin in these pictures ‘cos I forgot to replace it before I took them, but there you go …

Anyhow, having got that embarrassment out of the way, let me say that it’s customary for those flogging a 201, particularly on Ebay, to tout it as a “semi-industrial” machine.  It’s also the done thing to point out how many thicknesses of denim, leather, rhinoceros hide, chain mail or whatever a 201 will “sail through”, but it’s a lovely evening here and I don’t want to spoil it by going off on one about that just now.  Suffice it to say that not so very long ago, it seemed to be only 201s that were hyped up like that.  Now 99’s and 185’s are, regularly, so it’s surely only a matter of time before both the Barbie and the Hello Kitty sewing machines are rated “semi-industrial” too.

The reality of the 201 is that it’s a beautifully-engineered machine which is so well made it’s amazing that Singer could ever sell the things at a profit.  It’s also generally held to be the best domestic sewing machine Singer ever made, it’s true that with the right needle and the right thread it’ll sew pretty much anything you can get under the presser foot, and it was certainly designed to take a lot of use.  But not eight hours a day five days a week use.  For that you still need an industrial machine, and they tend to be bigger, heavier, uglier and a great deal more expensive.

Put simply, if the 201 was a carpet, it’d be rated Heavy Domestic.

So, given that it’s “only” a straight-stitch machine like the 15 or the 66, you can be forgiven for wondering what the big deal is.  Well, to anyone with a precision engineering background who works on sewing machines (e.g. me), the big deal is the all-metal, all-gear drive and a rotary hook.  To most people who use one, the big deal is that they run beautifully, they sew a lovely stitch, they have same-stitch-length reverse, and you can drop the feed dogs on them.

I’ll do a separate post sometime about why the rotary hook of a 201 is an improvement on the reciprocating hook of a 66.  However, die-hard fans of the 15 will already be muttering that what matters more is whether your bobbin’s horizontal or vertical, so for now I’ll just say that I do understand their argument about the 90 degree bend in the thread path, but speaking as an engineer, rotary motion beats reciprocating motion any day.  So there.

The all-metal all-gear drive thing’s a no-brainer though.  “All-metal” is good because metal gears don’t shred like horrible plastic ones can and do.  And as to the all-gear drive, the handwheel of a 15, a 66 or a 99 moves your needle, your feed and your bobbin via an ingenious system of levers, cranks and cams.  On a 201 it’s all done by shafts and gears, which is probably more efficient and is certainly far more elegant from the design point of view.

So it’s all good as far as I’m concerned, whether your 201 be the original Mk1 cast iron one or the later more modern-looking aluminium-bodied Mk2.  Elsie likes ’em too, which explains the presence of the Mk1 in the 7-drawer treadle base in the front room and the Mk2 in the No46 treadle cabinet in The Sewing Room, which in fact she’s using as I type this.  Doing something with a Swiss zigzagger, since you asked.  Which might shortly be for sale …

Michaelmas Day and the birth of a Singer sewing machine

Standard

So Michaelmas Day has been and gone.  We didn’t have a pig to kill, but hurrah we did manage to get all the hens into lay by then, so we still haven’t found out what happens if you don’t.  It’s probably as well.

Actually it’s a bit silly saying that we got them into lay, because of course they did it all by themselves.  It was a bit touch and go with Dyllis though, but she finally got it together with two days to spare.  She’s very much her own hen is Dyllis.  A strange bird indeed.

Anyhow.

Here’s a link to a film which you might like to take a look at.  It’s a pity we can’t see all 70 minutes of it anywhere, and it would have been nice to see the bit we can see at the proper speed, but even so we found these clips fascinating.  We’re still wondering how many sets of decals that girl used to put on per shift, and how long it took her to get up to speed.

And in case you’re wondering, “c/u” in the text on that page is close-up, and “gvs” is general views.

Have a nice weekend, folks.

How we pack a sewing machine for courier delivery

Standard

It’s a shame I didn’t think to take a few snaps of a machine we bought off Ebay last year from a bloke in Scotland.  The seller assured me that he knew how to pack it, and what’s more had loads of bubble wrap, so it should get here safely and I needn’t worry.  But of course it didn’t.  The short story is that he’d wrapped a few bits of bubble wrap round the column and the arm, popped it into the suitcase-type case, wrapped that with one thickness of bubbles then basically just wrapped a carton round it.  And he was a bit mean with the parcel tape too.

The nett result was a split wooden base and some nasty dinks in the finish of the machine itself.  The split base was down to the parcel having ended up on its back in transit, which caused the head to pull the retaining catch out and try parting itself from the base on the side away from the hinges.  And the dinks were caused by the metal tray which held the tin of attachments against the top of the case being pulled out on impact, leaving a heavy metal box free to rattle about against the machine.  Writing “fragile” in small lower case letters with a blue biro in a couple of places on the brown cardboard outer had obviously not helped at all …

Here’s how we do it, but first off a statement of the obvious.  Old sewing machines are heavy.  They are in fact very heavy indeed.  A 28 or a 99 in a suitcase-case type weighs 15kg.  A MkI 201 in the same type of case weighs 21kg.  And if you’ve never picked one up so you’re struggling to imagine how heavy 21kg might be, think bag of cement.  Or bag of coal.  Anyhow, they’re heavy.  But alas, heavy doesn’t mean they can’t be damaged in transit …

Picture of sewing machine being packed for sending by courier

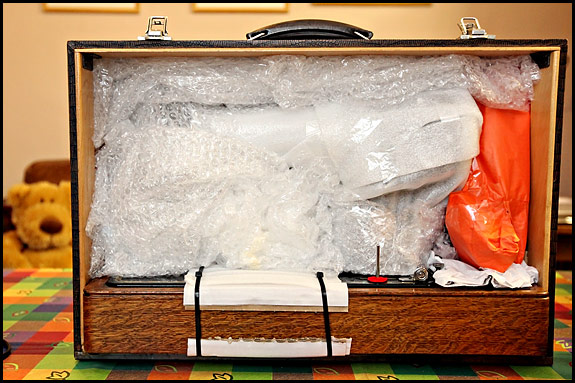
Here we see the start of the process.  That’s a 201K MkI in that case and as you can see, Elsie’s started wrapping everything above the machine bed in bubble wrap and recycled plastic foam packing sheet.  The bed is tied down to the wooden base with those heavy-duty black nylon cable ties, tightened down onto thick card packing so they don’t dig into and mark the woodwork.

Picture of a vintage sewing machine being packed for parcel carrier

At the stage shown above, all the space behind the upper part of the machine is packed out tight with whatever we have available, be it secondhand bubblewrap, plastic foam, bits of expanded polystyrene sheet or even crumpled up brown paper.  Anything, in fact, except polystyrene packing beans, which are no use whatsoever for this application.

That orange on the right is the foot pedal and wiring, padded out then wrapped in several layers of packing tissue until it fits snugly between the column and the side of the case.  Having got that in, we then lay the case on its back and check carefully that the machine doesn’t try to settle down if we push on it. If it does, we stuff more packing behind it until it doesn’t.

Picture of vintage sewing machine being packed

And that’s about as much packing as we could get in before the bit which is a real faff.  Once we get to this stage, Elsie spends ages trying the lid on, taking it off, putting a bit more packing in, trying the lid again and so on, until we’re as sure as we can be that nothing’s likely to move inside the case unless it hits the ground at a bad angle when dropped from a considerable height.

Once the lid’s on, we can’t rely on the catches to keep it shut, so the case is tied shut with polypropylene binder twine going both ways round it.  We then wrap the whole thing up with several layers of bubble wrap, a process which involves an enormous roll of bubble wrap and both of us on hands and knees on the kitchen floor.  It must be quite entertaining to watch.

After that comes a carton, and this is where the expanded polystyrene beans come into their own.  The case sits in the carton on a couple of inches of beans, then the space all round and on top of the case is packed tight with beans before I get to play with the parcel tape gun.  After that comes the addressing, and, for what little good it does, the ritual “FRAGILE” and “THIS WAY UP” marking in upper case with a fat felt tip marker.

We’re not done yet, though.  The last step is to get more binder twine and tie up the outer carton both ways, before crafting two thick twine hand holds on top of it.  And before you start thinking how considerate it is of us to do that for the greater comfort of the poor blokes who will be handling this great weight, let me tell you it’s no such thing.  It’s just another thing we can do to increase the odds on the carton remaining right way up for at least most of its time in transit.

So that’s how we do it.  And having just written this post, we’ve now sold a machine which is going down to Cornwall by courier on Monday, so I’ll try and remember to take some snaps of that one being packed from start to finish …

Free food

Standard

I mentioned in a previous post that we’d got just under 15kg of lovely damsons this year from a tree in town which obligingly overhangs the footway and in which nobody else seems to take any interest at all.

Well, there’s an old apple tree on a sort of grassy no-mans-land up the lane from us, and we’ve just picked 17kg of really scrummy apples off it.  That’s way down from the 48kg it gave us last year, but we’re not complaining.  We haven’t a clue what variety they are, but they’re cookers, they’re not Bramleys, and they make very tasty apple crumbles indeed.  Best of all though, they make the finest dried apple rings ever.  Far better than using eating apples!

Picture of apples in the basket of a Workcycles FR8

In the same week as the free apples, we also harvested this year’s free walnuts from under the tree by the side of the road out of town.  Only just over 2kg this year, which sort of half-fills a supermarket plastic bag, and no, you don’t eat them straight off the tree …

Picture of walnuts as harvested

The first thing you do is scrub them in water to get the hairs off.  If you don’t do that, they rot.  Having got them wet through, you then of course need to dry them, for which the ideal equipment is an old garden chair and one of the racks out the apple store …

Picture of walnuts drying in sun

Once they’re dry, the book says you pack ’em in a mixture of salt and coconut fibre, sawdust, wood shavings or bulb fibre, then put them in your cellar and they might keep until May.  We unfortunately are cellarless, so we just put them under the stairs in an old bread crock, packed in the woodchips we use for littering the chickens.  They’re ready for eating in November, and they’re delicious!

picture of walnuts stored in woodchips

Incidentally, Elsie’s Bible of home preserving is that old Womens Institute standby “Home Preservation of Fruit and Vegetables” by the Min of Ag, Fish and Food, published by HMSO in 1971.  Because it’s getting a bit dog-eared, I got us a new copy from Amazon last week.  It’s the 1989 edition, which incidentally in my opinion is a very poor bit of book production indeed compared to the earlier versions, and it’s fascinating to see how some things have changed.  Storing your walnuts in the traditional manner is out.  Apparently nowadays one pickles ones walnuts instead.  Why one might want to do that, I can’t imagine.

Anyhow, that’s the free damsons in, and the free apples and the free walnuts.  I think that just leaves the free chestnuts still to go this year, but when Elsie rode past the tree last week it was still not ready.  Maybe next week …

The Singer Buttonholer Attachment 86718

Standard

Picture of vintage Singer Buttonhole Attachment 86718

Another picture of Singer Buttonhole Attachment 86718

Picture of Singer Buttonholer 86718

I just added a Singer Buttonhole Attachment 86718 to the goodies for sale on the Accessories page, which until last week was called the Attachments page.  Hey, that’s progress for you!

This is one of the two vintage Singer non-template buttonholers i.e. the type on which the length, bight and spacing of your buttonhole is set by means of adjustments rather than by changing templates.  OK, you can’t do keyhole buttonholes with a non-template buttonholer, but if your buttonholer doesn’t use templates, that’s one less thing to disappear down a black hole at the back of a drawer as soon as you look the other way.

Like many of these vintage attachments, it seems a bit clunky and agricultural when you first start playing with one, but you soon realise how versatile the thing is – and it certainly makes a lovely buttonhole, particularly if you keep sewing and go round twice.

Here’s a brief video of this one on test on Elsie’s 201K Mk2 treadle machine earlier today …

The identification of vintage Singer sewing machines

Standard

Or how to tell t’other from which, as they used to say in Lancashire.  They might still do, actually, but I digress …

If you’re on the phone to somebody who’s put a for sale ad in the local rag which just says “Old Singer sewing machine for sale” or something equally informative, you obviously need to know a bit more about what exactly it is that they found in the attic when they moved in and now think might be Worth A Few Quid.  If you’re lucky, they might have put a picture in the advert.  And if you’re really lucky, it might not be a lot worse than this specially-taken rubbish snap.

Rubbish snap of old Singer sewing machine

Before we go any further, though,  A Word Of Warning.  On a very hot and incredibly humid summer afternoon, I once drove for well over two hours through horrendous traffic to buy a Red Head.  That’s a rare-in-the-UK Singer with distinctive decals which I think are OTT but Elsie thinks are lovely.  I’d talked about it on the phone to the person selling it, and I was fairly sure of its condition.  We’d agreed a price.  When I got there, I was ushered into the kitchen and shown the machine.  It was a clapped out and very ordinary early 66 with the most boring decals Singer ever used, and those in a very poor state.

“Hang on” says I.  “This isn’t the machine in the photo in the advert.”

“No, but does that matter?  They’re all much the same.”

“Are you serious?” says I. “You don’t have the machine you advertised?”

“Well I couldn’t find my camera so I used a picture I found on the internet.  I can’t see it makes that much difference.”

There’s not a lot you can say to that, so I just bid her a cheery “Die soon” and drove over two hours home to Elsie and a large glass of Merlot.  The moral of this story is

ALWAYS ask the advertiser if the picture in the advert is a picture of the actual machine for sale

So, getting at last to the point of today’s epistle, I’ve evolved a standard way of extracting the information necessary to identify a machine on the phone, and it seems to work.  Believe me though the process can be a bit like pushing jelly uphill with a fork at times, particularly if the advertiser’s getting on a bit and doesn’t hear so well, or their attention is split between me, their sewing machine, the television and what sounds like a shedful of kids running amok.

But whatever.  What follows only works for the common domestic Singer machines produced in the UK between around 1900 and the mid-1960’s, and it only enables you to identify the basic type.  If you need to know whether the article in question is a 15-88 or a 15-91, for example, this is not going to help you one bit.  But if you want to know if what they’re selling is a 127 or a 201, or even if you just want to know what Grandmother’s old Singer is, stick with this and with any luck you’ll soon be able to tell.

The person on the other end of the phone needs to be looking at the machine in question as if they’re using it, that is to say with the big wheel end to their right and the end with the needle to their left and no, that’s not patronising.  Always remember that whoever’s looking at it might be completely clueless!  Besides, check out a few snaps of sewing machines for sale and be amazed by how many have been photographed just like that picture above.  So, here we go – but first Another Warning …

You cannot identify a machine by what it says on the cover of its instruction book

Even when the owner swears blind it’s the original one which came with the machine when Mum bought it off Auntie Marjorie in 1953.  I don’t know how anybody’s supposed to actually know stuff like that, but I do know that you quite often find that the owner of a 27 or whatever is totally convinced it’s a 99 simply because there’s a 99 instruction book in the compartment in the base.  Anyhow, here we go …

1.  If you look at the vertical column of the machine, just above the bed (the flat metal base), there’s a round-ish metal Singer badge.   Is there a small rectangular metal plate with two or three numbers and one letter on it just below that badge?  If there is, the number on that plate is the model number and your problem is solved.  If there isn’t, read on.

2.  If the tension adjustment knob (the one with those discs and the springy thing behind it) is on the metal plate on the very end of the machine and it faces left, the machine is a Model 15.  If however the tension adjustment knob is mounted straight onto the black metal of the machine and faces the user, it isn’t a 15 so we need to dig a bit deeper.

3.  It will either be an early machine of the “vibrating shuttle” type which takes a long thin bobbin, or a later machine which takes a round bobbin, so look at the left-hand side of the machine bed.  If it has a small round plate under the needle and two rectangular plates which run from front to back and meet up in the middle, it’s a vibrating shuttle machine.  If instead it has a D-shaped plate under where the needle is and a more-or-less square chromed plate at the left-hand end of the bed, it’s a round-bobbin machine.

4.  If you’ve established that it’s a vibrating shuttle machine, measure how long the bed is.  If it’s getting on for 15 inches, you have either a 27 or a 127.  If it’s nearer to 12 inches, you have a 28 or a 128.

5.  If the bobbin winder thingy on the right is about 2 inches above the bed, it’s either a 27 or a 28.  If the bobbin winder’s higher up, roughly in line with the middle of the handwheel, it’s probably a 127 or a 128.  So for example a long bed machine with a low bobbin winder is a 27, and a short bed machine with a high bobbin winder is a 128.  OK?

(The bobbin winder position isn’t conclusive, simply because there were some transitional models made and some 27’s and 28’s have had their low-level winders replaced by a “high-level” one at some point in their life.  However, if the machine’s got the higher-up bobbin winder and there’s a round metal button on the shuttle carrier which ejects the shuttle when you press it, you almost certainly have either a 127 or a 128.)

6.  That takes care of the vibrating-shuttle machines.  Moving on now to the later round-bobbin machines, if it looks “old fashioned”, it’s all metal, it’s black and it’s not a 15, it’s almost certainly going to be a 66, a 99 or a 201.  Does the spool pin on top of the machine upon which you plonk your reel of thread go into a chromed steel plate about 2 inches long with rounded ends?  If so, it’s a 201.  Specifically, it’s what’s referred to as either a 201 Mk1 or an “early type” 201.

7.  If the machine is black and there’s no chromed plate under the spool pin, is the bed of the machine about 12 inches long?  If so, it’s a 99, which is perhaps the vintage machine most commonly seen nowadays still in reasonable condition.

8.  If the bed’s about 12 inches long but the machine is beige/brown and the oval Singer badge is on the same rectangular metal plate as the stitch length adjustment lever, it’s either a 185 which is OK because that’s basically a tarted-up 99, or it’s a later 275/285 which is basically naff.  The quick way to tell them apart is that if both the stitch length adjuster knob and the lever which raises the presser foot are plastic, it’s a horrible 275/285.

9.  If the bed’s about 15 inches long, there’s no chromed plate under the spool pin on top of the machine and there’s no small plate with a model number on below the metal Singer badge, you have a 66.  That’s the big sister of the 99.

10.  If the machine looks fairly modern, the top of it’s more or less flat, there’s no chromed metal plate with rounded ends under the spool pin but it still says “201K” under the Singer badge, it’s the later type 201 which is usually referred to as the Mk2.

If you’re still scratching your head, odds on it’s a later machine or an industrial, or possibly a 19th Century one.  Most of those will be outside our territory, but by all means send us an email at sidandelsie @ btinternet.com without those spaces if you’re stuck and we’ll see if we can help you solve the mystery.