Category Archives: Vintage Singer sewing machines

Vintage Singer advertising – cont’d again

Standard

Elsie and I had our lunch sat in the sunshine in the garden today, which is a bit bizarre for March 1st. We even took our jumpers off, which doesn’t generally happen until April.

In view of that, and of the fact that tomorrow’s Friday and I’m in a silly mood anyhow, here’s another blast from the past, this time from 1971.  Hmmm … $60 off a new Touch ‘n’ Tangle, eh?

That must have set hearts racing.

And here’s another little gem pour le weekend.  Next week we’ll get ourselves back to more serious stuff, so get ready to take notes …

Vintage Singer advertising – cont’d

Standard

The first time Elsie and I saw that, we were spellbound.  You just don’t see acting like that nowadays.  Well, actually you might do, but with us not having a television set I wouldn’t really know.

In view of the wise-guy commentary, we’re assuming that they were playing it for laughs, in which case this must be the acting equivalent of the virtuoso pianist deliberately playing out of time and out of key.

Whatever, it’s not the only example …

Now, seeing as how that first one’s No.2 and the one with the cat’s No.6, where do we find the others?


Another lovely Singer 201K for sale

Standard

I’ve just put this gorgeous 201K23 on the Singers for Sale page.  I know some people think the black Mk2’s look a bit intimidating compared to the more homely brown/beige ones, but personally I still prefer them.  Maybe that’s a bloke thing, I don’t know.

Whatever, this one’s in really  lovely condition and it sews a treat – and quietly too, because it’s now got a particularly smooth-running motor.  It’s also got the late-type machine plug as well as the male socket with the “split” pins, and that is without doubt the best combination to have.  As always with our electrics, the foot controller’s been checked over, the Singerlight’s been stripped and rewired, and the mains cables are new.

The suitcase-type case it’s in is a far nicer one than most, and it comes with an extension table as well as a full set of attachments.

Here’s another snap of it …

The vintage Singer Foot Pedal, Button Controller, Sewing Motor Controller, whatever – more about it

Standard

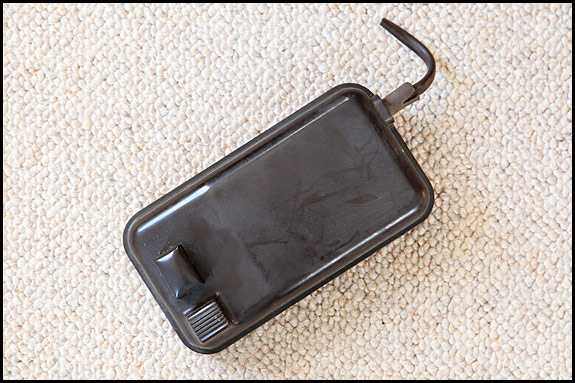
Picture of vintage Singer foot pedal

We’d better start with a reminder that these things work with mains electricity, so if you’re not totally confident about doing whatever needs doing , be good and leave it to somebody who is.

Having said that, old Singer button controllers of this type are pretty much straightforward.  The basic principle is that pushing down on the button pivots a lever which pulls on a screw, which is connected to a primitive but effective variable carbon resistance.  That’s so arranged that as the screw is pulled, the resistance decreases, effectively reaching zero just before the button is hard down, thereby allowing all the current through to the motor so it can go full steam ahead.

Before we go any further though, I ought to point out that the 110 volt US-market one uses a different resistor unit to the 150-250 volt European one, so the two are not interchangeable.  You’ll also find that although the design of the casing didn’t change over the years, the internal linkage did.  They do all work the same, but there are detail mechanical differences .

OK, let’s take a look inside.  To do that, we need to open the case, and obviously we start by unscrewing and removing the self-tapping screw in the middle of each of the four rubber feet.  Those rubber feet, by the way, did tend to harden and snap off over the years, so don’t be surprised if your unit has one or more missing.  Yes, new ones are available, but the last time I looked, a set of 4 was well over £10.

In theory, the top now lifts vertically off the base, but in practice, more often than not it doesn’t because it’s firmly stuck.  If cursing it doesn’t help, perhaps the safest way forward is to place the unit on the table and then carefully insert the tip of a flat-bladed screwdriver between the top of the the cable sleeve and the underside of the cutaway in the moulding that’s pressing down on it.  Assuming that you’re right-handed, hold the screwdriver there with your right hand, and with your left hand, reach under the button end of the case so that your fingertips are along the bottom edge of the top moulding.  Place your left thumb on the button, and press hard down on that whilst at the same time pulling up on the bottom edge of the top moulding with your left fingertips, while at the same time carefully waggling the screwdriver with your right hand.  With any luck, the pressure you’re applying at both ends will break the stiction, the top will come off … and the button will fall onto the floor.

Don’t worry, that all sounds far more complicated than it is.  If those instructions don’t make any kind of sense, despite me having tested them out on Elsie, just have another read through while holding the controller and have a dry run before you undo the screws on the bottom.

So, having got the top off and picked the button up off the floor, what lays before you will look something like this …

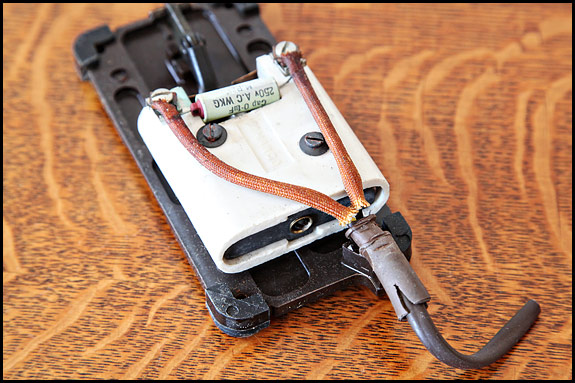
The T-shaped thing at bottom left is what the button sits on, and the white is the porcelain insulation which contains the variable resistance.  Coming down from the top of the picture are the two cores of the mains cable, running inside lengths of heat-resistant sleeving to terminate at those screw terminals .  From the back, it looks like this …

Note the cylindrical queerthing with the writing on which is connected across the two terminals.  That’s a capacitor which was fitted to prevent interference on AM radio and ancient TV sets.  If and when it fails, it usually does so by shorting out, and you’ll know if that’s happened because you will have no control over your machine’s motor speed.  It’ll run flat out as soon as you switch on.  All you need do you to rectify that situation is remove the capacitor, chuck it out, and put your speed controller back together again.  Nowadays, the capacitor is surplus.  It serves no purpose at all.

If you’re re-wiring the unit, take care to ensure that the wires are going to be neither tight nor unduly slack when you put the top back on, and do make sure you remembered the heat-resistant sleeving.  If the original sleeving is unusable, your best bet for a couple of new bits is probably an auto electrician or a TV/radio repair place.  If the rubber/plastic cable entry sleeve’s gone the way of most (like this one has), it needs replacing with something or other so that when the case goes back together, the cable is clamped so it has effective strain relief.  In the absence of anything else, winding electrical tape round the cable works if you keep it neat – and keep checking that you haven’t made it too fat to fit the slot in the case top moulding.

Incidentally, the best way to put the top back on is to poke the button up through it the right way round (top sloping down towards the end), and hold the top of the button whilst jiggling the top of the case down into place.  As long as you keep the button vertical, it’ll drop straight over the lever thingy inside as you push the top down.

There are adjustments you can make to set one of these things up properly, but suffice it to say that if you’re competent to make those adjustments, it’ll be obvious how you do them.

The controller which hides in the base of a knee-lever machine is essentially the same dog with different spots but it’s a pig to work on, and there is a variant called the Sewing Motor Controller 194386 which was used in “convertible” treadle bases.  Maybe that’s something for another post sometime …

A Singer UK leaflet from 1939

Standard

Maybe, but perhaps not a potted-motor 201 like her on this front cover’s using.  Lovely machine, but not the easiest of things to find a replacement motor for nowadays if you have an urgent need of one – unlike your common or garden 201 with the ubiquitous bolt-on motor and drive belt.

Whatever, that’s the front cover of this rather rare Singer flyer from 1939, the general theme of which seems to be Do Your Bit for the war effort by buying a new Singer sewing machine.  The copy on the inside of the leaflet spreads across three pages, which rules out reproducing it on here big enough for you to read the text, so it’s here instead.

It’s worth a read is that … “In these days of shorter shopping hours, inconvenient travelling and rising cost of ready-made goods, a Singer Sewing Machine is a safeguard for every home and a “right hand man” for every busy woman”.  And that was over 70 years ago!  I love the suggestion that you write or call at your local Singer shop and “have a representative demonstrate a machine – tell you all about different models, prices, free trial and free tuition”.  How very nice that must have been, even if the interest on the HP was a bit steep.

Incidentally, is it only me who thinks that her on the cover looks like she’s about to nod off?

Here’s the back …

“Spare a few minutes for the Singer representative when he calls.  He is bound to interest you”.  Indeed, and what a grand excuse for a pot of Earl Grey and a macaroon.

Now tell me dear reader, when was the last time you opened your front door and the chap standing there raised his hat to you?

The Singer Sewing Motor Controller and how to use it properly

Standard

And just so we’re clear what I’m on about, it’s this thing, as opposed to the earlier or later all-metal ones, or indeed the more modern “clamshell” types …

Picture of Vintage Singer sewing motor controller 194585

That is your common or garden Singer Sewing Motor Controller 194585 if it’s black, 194589 if it’s light brown/café au lait, and 196469 if it’s dark brown, and believe it or not some people get bent out of shape if, like most folk do, you call it a foot pedal.  Foot controller is tolerated (just), as is button controller, but definitely not foot pedal.  Presumably that’s because it isn’t a pedal like on a piano.  Or on a bicyle, come to that.

They should get a life.  OK, let’s move on to the proper way in which you use one of these things, because whilst it might be obvious to you, it’s certainly not obvious to everybody.  So, you put it on the floor with the lead going away from you, you put your heel on the carpet, and you put the ball of your foot over the two sticky-up bits at the front.  The right-hand one of those is your footrest.  It doesn’t move.  The left-hand one does move, and is what does the business when you press down on it.

What confuses people is how you press down on that left-hand “button”.  What you do not do is swing your foot off the footrest onto the button and then press it down.  What you do instead is keep your heel on the floor and keep the ball of your foot over both wossnames, then tilt your foot to the left in order to depress the go-faster button enough for the machine to do your bidding.  The sole of your shoe stays in contact with the footrest.

If you’ve never tried it, that’s going to seem a really weird way of pressing down on a button, but it very quickly becomes a natural action – and with a bit of practice you can get very fine control indeed.

So, why is it designed like that?  Simple – it’s to stop you sitting there with your foot resting on the go faster button, and without realising what you’re doing, depressing it slightly.  And why might that matter?  Because when your foot’s clear of that button, there’s no current flowing to the motor and nothing happens.  However, if you press down just a bit, most of the current which would otherwise get to the motor is converted into heat inside the controller, which of course gets warm.  Keep that up long enough, and the controller will get hot, which is not good.

Enough pressure to start the motor is OK, because as you press down more, more current is allowed through to the motor (so it can start then speed up) and less current is converted into heat.  When your foot’s hard down, all the current is (or rather should be) going straight to the motor.

Or to put it another way, if you were to bypass the controller, the motor would run flat out.  What slows the motor down is the controller converting some of the current into heat, and the more you slow the motor down (by easing your foot up on the button) the more the innards of the controller heat up.  It’s that heating which is the potential problem .   So the way it works is …

Foot off completely – no current flow, no heating up, no problem.

Foot just slightly pressed down – maximum amount of current converted to heat in controller, so controller heats up. Minimum amount of current goes to motor, but not enough to start it turning.

More pressure – more current goes to motor, which runs faster, so less heat build-up in controller.

Foot hard down – all current goes to motor, which runs flat out.  No heat build-up.

If you’ve got that clear in your head, it’s probably occurred to you that when you’re doing something involving multiple long seams sewn at slow to moderate speeds, your foot controller is going to get hot.  It’s designed to cope with that, but it’s still a good idea to let it have a breather every now and then.

If you use it properly (ball of foot always on the footrest) and you let it cool down whenever you get concerned about how hot it’s got, the foot controller’s actually pretty much bulletproof.  They can go wonky though, so we’ll have a look at what’s inside one and get a bit technical about it in another post before much longer.

Buttonholers, zigaggers, foot controllers and a Lotus treadle

Standard

Just in case you rarely venture onto the Bits ‘n’ Bobs page, here’s a quick update so you know what you’re missing.

Seeing as how in the last week we’ve sent a Singer USA 160985 zigzagger (that’s the big black one with the four red cams) to Birmingham, one of the big Ruby buttonholers to Canada and a Singer 160506 buttonholer to Germany, we’ve been toiling by night even as by day to replace them with more goodies for your consideration.

I’ve just listed a good Singer 161157 zigzagger, which is the third and final version of the one which started out as the 160985, another big Ruby in very fine condition, and another one of Elsie’s favourite buttonholer, the 160506.

There’s also a nice Singer 485910 buttonholer which is perhaps more common in the US than it is over here, a particularly good example of a Precision Built Button Holer B-3 in a nice tin (and unusually, this one’s complete with all its bits), as well as a bit of a rarity called the Zick Zack Kuli Rändelapparat.

Rounding off the new listings is the standard vintage Singer button-type foot controller.  Hoorah! I finally remembered to mention that we can usually do you a nice one of these at a sensible price, and maybe even offer a choice of black or brown.  Actually, now I come to think of it, maybe I ought to do a post about them on the home page  before long?

On the Singers for Sale page we’ve added this gorgeous 1920 Lotus 66K treadle, which Elsie was all for keeping because it’s a lot prettier than the 1909 one in her harmonium (or, if you prefer, her later drawing room cabinet) …

Picture of 1920 Singer Lotus decal 66K treadle

In the end though, and unusually for us, common sense has prevailed.  The Lotus which is in Elsie’s harmonium’s been in it for 102 years now so it really ought to stay here, and there’s no way that Elsie’s going to part with her favourite cabinet.  Besides, as far as we can tell, this Lotus has always been in this base, so they ought to stay together too.  And besides again, Elsie finally admitted the other night that perhaps (just perhaps) I was right after all, and we really do not have the space for her to add yet another machine to her collection.

I did intend to update you with the latest developments on the bicycle front but that needs pictures, which will have to wait until the snow and ice has gone from the lane.  So more on our bikes anon …

The names of vintage Singer decals

Standard

All is now revealed on this new page on the ISMACS site!

As Mr Langdon (whose work that is) says, only some of those names are the real Singer deal. Most are the common everyday names,  but in some cases it’s been necessary to come up with a name where none was known.  And if “Roses and mescaline?” isn’t truly inspired, I don’t know what is.

Whatever, here’s a current YouTube favourite …

Have a good weekend, folks.

Which way round does the bobbin go in a vintage Singer?

Standard

If it’s a long bobbin for a Vibrating Shuttle machine, it’s easy – you hold the shuttle with the pointed end down, and the bobbin drops into the top of it with the thread coming off from left to right across the front.   If the thread’s coming off from the back of the bobbin, that’s wrong.  It needs to be left to right, on your side.

Yes, I know a picture would have been a great help there, but I forgot to take one.  At this time of year I have to wait for a bit of sunshine in which to take a halfway-decent snap, and more often than not as soon as we get the slightest hint of a blue sky, Elsie drags me into the garden to be her assistant/labourer and by the time I get back inside, put the kettle on and remember there’s a picture I need to take, the sun’s gone in.

Anyhow …

If it’s a round bobbin machine, it depends on what model it is, and if you’re thinking to yourself “does it matter which way round I put the bobbin in?”, the answer is oh yes it does.

Now obviously this isn’t a problem if you only ever use one type of vintage Singer, because you’ll have read the book of words for it and know perfectly well which way round the bobbin goes in it.  But what if you’ve just scrounged the lovely old 66K that Mrs Thing next door but one was about to take to the dump along with her weekly accumulation of empty gin bottles and copies of the Daily Mail and you can’t wait to see if it works?  Or your friend Sally of the School Gate Gang’s got an old Singer which won’t sew properly and she’s asked if you’ll have a look at it for her if there’s coffee and cupcakes involved?  Maybe you have a 99 and a 201 and every now and then you have a brainfart about the bobbins?  Whatever, here’s how you tell which way round the bobbin goes in a pre-mid-1960’s Singer (and for all I know about the later machines, in one of them too).

Check out the bobbin case, which is the proper name for that bit of your machine into which you drop your bobbin.  If you look round the sides of the hole into which your bobbin goes, you will see a diagonal slot in it, like this …
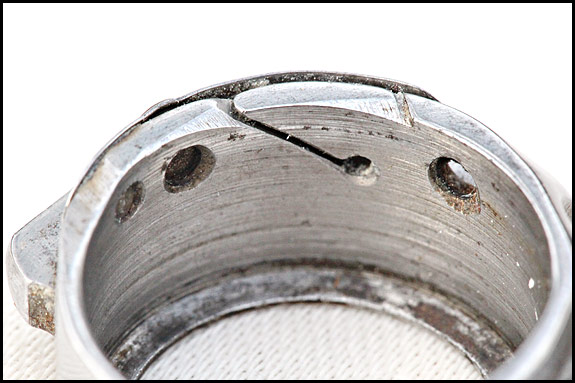
Detail photo of Singer 99 bobbin case

That’s a 66/99 bobbin case (they’re identical), and as you can see, the slot exits the case to the left, or to put it another way, anti-clockwise.
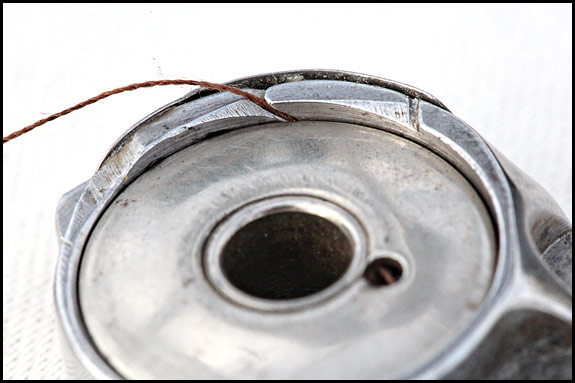
Picture of bobbin in Singer 99 bobbin carrier

And there’s that same bobbin case photographed from the same angle, now with a bobbin in it the right way round i.e. with the thread coming off it anti-clockwise.  Yep, the thread comes off the bobbin the same way that the slot exits the case.

Having got the bobbin in, your next step of course is to pull the thread to the right so it runs under the tension spring and into the notch, then pull it across the top of the bobbin and close your slide plate.

When you do that, you’re actually making sure that the thread leaves the bobbin through the hole at the bottom of the slot, then under the tension spring in exactly the right way for the spring to apply constant tension.  Pulling on the thread pulls it down the slope of the slot, and ensures that it stays in the hole as it feeds off the bobbin.

If your bobbin is in the wrong way round, pulling on the thread doesn’t necessarily slide it down the slot into the hole, so you may well get inconsistent bottom tension.
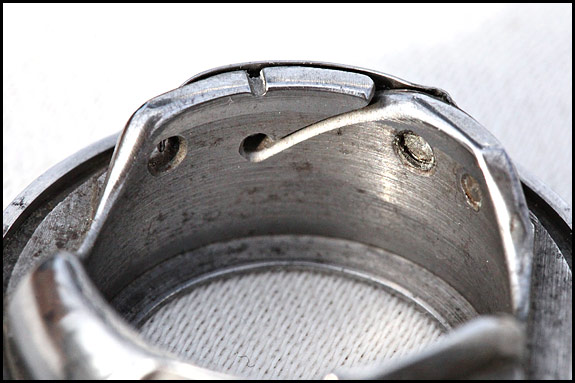
Detail of Singer 201 bobbin carrier

Now here we have the bobbin case out of a 201, and as you can see, the slot faces the other way i.e. it exits the case to the right, or clockwise.  So which way does the thread need to leave the bobbin on a 201?

Detail photo of thread leaving Singer 201 bobbin

Yep, that’s right.   Clockwise.  OK, I completely forgot to photograph a 15 bobbin case, but you can take it from me that it has a slot in it which provides exactly the same clue as to which way round the bobbin goes.

And that’s it.  All you need to do is take a look at the slot in the side wall of the bobbin case, and that tells you which way your thread needs to leave the bobbin …

Picture of Singer 66/99 and 201 bobbin carriers

66/99 on the left, slot exits anti-clockwise therefore thread comes off the bobbin anti-clock.  201 on the right, slot exits clockwise, so your thread comes off clockwise too, like this …
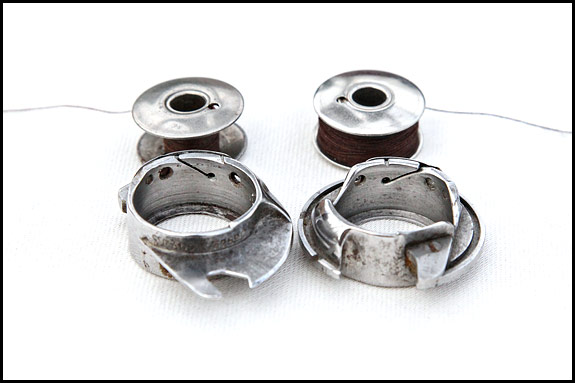
Picture of Singer 66/99 and 201 bobbin carriers and bobbins

Finally, just in case it hasn’t occurred to you, if you take this information together with what I’ve rabbitted on about in earlier posts, you now know how to put both the needle and the bobbin in any vintage Singer the right way round, as well as which way to thread the needle – and all this without an instruction book.

And by the way, if you’re still tut-tutting about these grotty old bobbin carriers, you should have seen the state of them before Elsie insisted on getting the thick of the muck off …

The press stud

Standard

Picture of area behind faceplate of Singer 99K

Well, we’ve seen worse fluff than this behind a 99’s faceplate, but we’ve never before found a press stud in there when we started cleaning one out.

I think they’re called poppers or snap fasteners in other parts of the world, but whatever they’re called, I doubt they’re often found inside sewing machines.  The arrow’s pointing at half of this one, by the way.  The other half was deeper inside, behind the needle bar.

That has got to be a bored child, hasn’t it?