Category Archives: Vintage Singer sewing machines

Vintage Singer UK brochure featuring her with the frock – part two

Standard

OK, here’s the rest of that wonderful Singer brochure featuring Ann Droid and her stripey frock, and thanks to Alison we now know that this was almost certainly published in 1951.  Our copy’s somewhat faded in places 60 years on, which is why these scans aren’t all that brilliant …

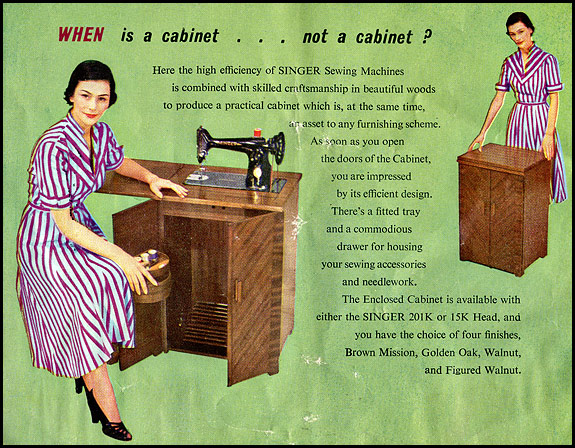
“Do you prefer cabinetwork of contemporary design?” indeed!  As far as we’re concerned, the best thing about these Cabinets, which we always thought were Tables, is the fact that the legs are readily detachable.  That’s a real boon when the machine you just brought home is in one of these things and you can’t quite bring yourself to take the table down to the dump recycling centre once you’ve taken the head out of it, so the only place left for it is in the attic alongside the other two.

Having said that, Elsie’s determined to get one of them down from the roof soon and take it with us next time we do a boot sale – unless of course by publishing this post I manage to whip up a demand for them that we’ll be pleased to meet.  Which I very much doubt, but I live in hope.

Be that as it may, we’ve now got to the middle of the brochure, and because of the way the centre pages are laid out as a double page spread, it just doesn’t work scanned as two separate pages.  I’ve had to link to it here so off you go now for a squint at that.

As you can see there, we’ve moved onto treadle machines, and the choice of head is simple – would Madam prefer a 15 or a 201?  According to the printed text, the choice of base was equally straightforward – pick one of three variants of the “modern” (i.e. wooden legs) treadle base – 3-drawer, 2-drawer or 1-drawer.

So far so good.  However, the notes added by the salesman (with his fountain pen, of course) muddy the waters somewhat.  Judging by his sketch, he seems to have been offering a 7-drawer with wooden legs, to which his note “NEW £46” seems to refer, and that’s interesting because neither Elsie nor I can recall ever seeing such a thing.  He’s also made a note of a “drop head with iron stand” at £20, which must surely have been old stock because the printed text actually states that the iron legs “have been superceded” by the wooden ones.

His note at the bottom right-hand says “Dressmakers model table top with cover £15”, and I’m not sure what to make of that because “Dressmaker” in this context was usually Singer staff talk for a 201.  Even more puzzling, the top right-hand note says “modern style folding head with 7 drawers £28”, which would seem to relate to that base with the four extra drawers drawn in.  But if it does, what’s with that “NEW £46” above it?

If anybody can shed any light on those notes and/or the pricing, do please let us know, but before we leave the treadles I’ll just clear up one thing.  There was never a 99 treadle.  If you do see one, it’s not kosher.  It’s a DIY job.

OK … now we come to another double page spread, but this one does work as two halves …

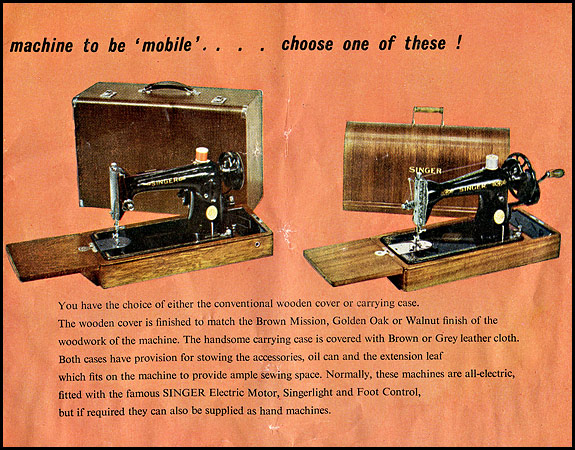
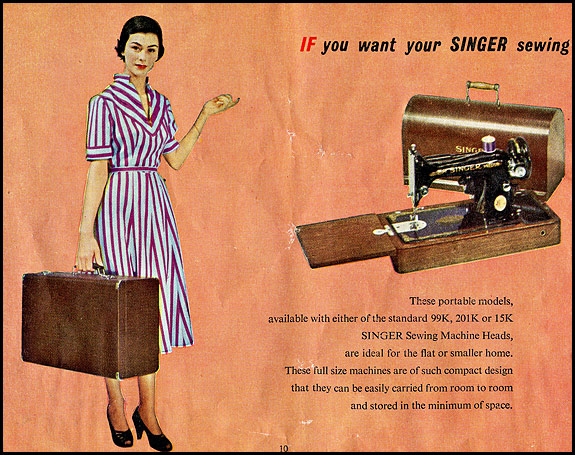
Interesting that one of these “full size machines” is the 99K, which is of course a three-quarter size machine!  And how about the claim that they “can be easily carried from room to room”?  A hand-cranked 99 in its case weighs 14.5kg (32lb) and an electric 201’s heavier still at 20.5kg (45lb), which strikes me as a fair old weight for anyone to easily carry from room to room.

And look, there’s that “Brown Mission” again!  If that’s not a daft name for the colour of a wood finish, I don’t know what is.  And was the suitcase-type case really available in grey leather cloth?   If it was, did it look as uninspiring as it sounds?

Whatever, note that the text on the page above says “Normally, these machines are all-electric, fitted with the famous Singer electric motor, Singerlight and Foot Control”, yet the 201 illustrated is a knee-lever machine!

Personally I’m convinced that this brochure is 1951, but here’s your proof that it’s definitely pre-1954.  If it was any later, Stripey would be wanting to show you her new 222, not the 221 shown here.  And at this point I’d better explain for those of you who aren’t Featherweight Fans (or even Pheatherweight Phans) that a Featherweight is either a 221 or a 222.

The 221 was introduced in the mid-1930’s, and Singer eventually made over 1,000,000 of the things.  Then in 1954 they brought out the 222, which is just a 221 with a free-arm and feed dog drop, but they only made 100,000 or so of those, which is presumably why they’re sometimes advertised as “rare”.

Incidentally, many of its devotees think the 222 was the first domestic machine with a free-arm, but they are wrong.  The Elna Grasshopper was the first, by a good 10 years.  But I digress.

I just love the suggestion that a 221 is “easily carried wherever you go – from room to room – on a long trip – or just for an afternoon’s sewing at a friend’s house.”  An afternoon’s sewing at a friend’s house?  Who is the woman kidding?  Or is that code for “so easy to cart about with you to show off to your friends and make them really jealous”?  Whatever, Featherweights are undoubtedly cute and they certainly have a huge following with quilters in the States, but for our money they’re over-rated.  There.  I said it.

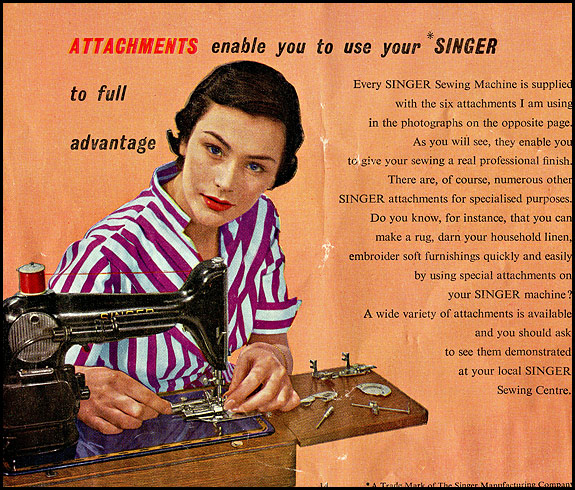
Lovely use of Proper English there, and interesting to think that 60 years ago that wouldn’t have been thought in the least patronising.  Or boring.  Back then, Singer were still on top of their game.  They were the absolute masters at marketing domestic sewing machines, and there’s not the slightest hint anywhere in this brochure of the rot which was soon to set in

Oh look – she’s doing that sincere expression again, bless her.

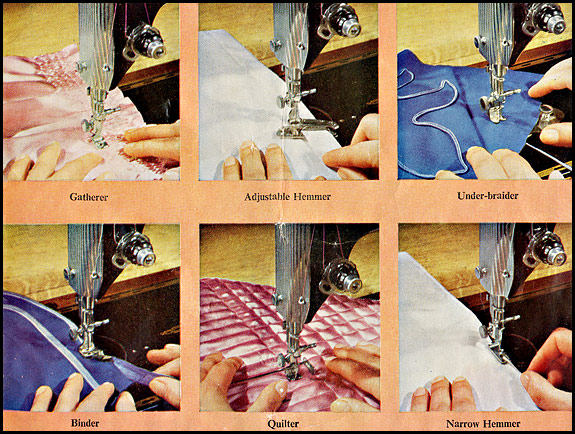
Now, there’s a couple of matters arising from those pictures of the six attachments that were supplied with new machines in 1951 (or thereabouts).  One is that, surprisingly, by this time the ruffler was not one of the standard attachments.  And the other is the quilter.  I really do wish they’d called it what it is i.e. a quilting guide.  So many people seem to think that “the quilter” is some awesome attachment which does something really clever, when all it actually does is allow you, within certain limits, to sew parallel to and at a fixed distance from the last line of stitching in your quilt.

And finally we turn to the outside back cover …

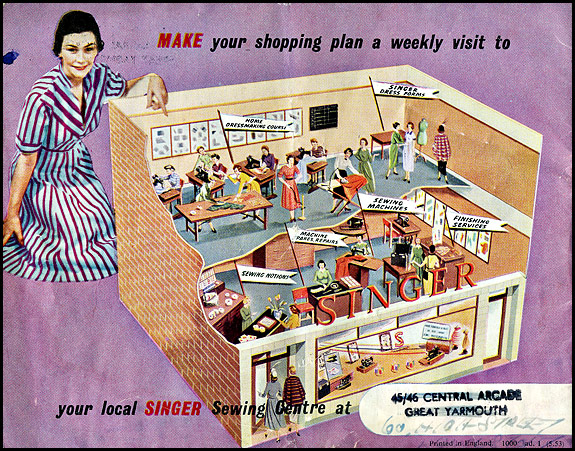
with its cutaway of Mission Control.  Which raises an interesting question – when did Singer shops in the UK finally stop offering the dressmaking courses, and for that matter the finishing service?  If you happen to know, we’d love to hear from you.

Going off at a tangent now, when I first saw Stripey’s frock it immediately reminded me of a silly idea that Kodak UK came up with in the mid-1960’s. They thought it would be fun (or whatever) to have the women who worked in the shops which shifted the most Kodak films wearing very loud blue and white stripey frocks with a yellow Kodak badge on the left breast during the summer film-buying season.

At the time, my mother was one of those women, and I have this vivid recollection of her coming home from work one day with this large brown paper parcel in the wicker basket on the front of her bike.  She was not happy.  It was very nice of Kodak to give her two cloth badges, a pattern and more than enough material for two dresses, but if nothing else, when did they suppose she was going to find the time to make them?

If I remember rightly, she eventually got a neighbour to knock one up, tried it on, decided she wasn’t going to look like a deckchair for Kodak or anyone else, and that was the end of that …

A remarkable machine plug modification

Standard

Some time ago, we bought in a 201 for parts and as usual, one of the first things I did with it was to cut the motor plug off the lead.  I was about to chuck it in the appropriate spares bin when I noticed that it had been modified …

See that black lump between the two screw heads, and the square thing sticking out above it in the picture?

Well, once I’d removed the two screws and pulled the queerthing up so it photographed clearly, that’s what it looked like!

That’s it from the other side, and yes, it is indeed on the end of a couple of earth wires.

So, somebody has first of all laboriously made that little widget from steel strip.  They’ve then opened up the cable entry hole in the Bakelite plug body so it will take two three-core cables instead of the usual two twin-core ones.  Having stripped all six wires at the right length for four of them to connect to the three contacts inside the plug body, they’ve then pushed the two earth wires back outside and soldered them to the widget.

After that, all they had to do was find a couple of skinny bolts longer than the original ones with which to fasten the two halves of the plug body together (and that in itself is no mean feat), then put a dab of black paint on the solder to make it all look prettier.  Et voilà – an earthed machine plug.

But what, you ask, does it earth to?  Well, given that the socket on the machine into which the plug plugs is made of Bakelite, the answer is the that it earths to the only thing it can do – the screw which holds the socket onto the motor mounting bracket!

Comme ça …

That’s the best snap I could manage, but hopefully you’ll see that as the plug in the foreground is pushed into the socket in the background, the tag on the widget slides under and against the head of that fixing screw.

Now, if only it had occurred to me, I could have put the meter across that little lot and seen just how good that earth actually was in view of the number and nature of the contacting surfaces between the earth pin of the 13amp plug on the end of the mains lead and the body of the 201 itself.  But it didn’t.  Occur to me, that is.  So I didn’t.  Meter it.

Presumably our hero connected both earth wires because the one that didn’t go to the mains plug went to a metal-bodied foot controller rather than the usual vintage Singer Bakelite one, but who knows.

Whatever, as far as I can see, this is the only way you can earth (or more accurately “earth”) a classic vintage Singer electric and retain the original motor plug and socket.  Quite why anybody would want to embark on this task in the first place is way beyond my understanding, but if I wore a hat, I’d certainly take it off to whoever had the patience and the determination to complete it.

“I am a typical Singer girl”

Standard

No you’re not, dear.  You’re Ann Droid, a figment of somebody’s fevered imagination, and you freak me out with your weird expressions, your wooden poses and your eyebrows.  Can’t say I’m a big fan of the frock either, but never mind.

Unfortunately we can’t date this brochure with any accuracy, but I think you’ll agree it has to be 1950’s.  Early 1960’s at the very latest?  Whatever, that very much of-its-time earnest expression coupled with the very properly-worded question on the cover sets the tone for the entire contents, as we shall see …

Good old-fashioned proper English, but obviously written by a chap who always wore his jacket in the office and still wore shirts with long tails and a separate collar.  Arm-bands too, probably.  Horn-rimmed glasses for sure, and always addressed as Mister Jones.   Same seat on the bus into the office every morning, and not much longer to go before his gold watch and his pension.

But wait – what’s that snappy slogan going on there at the end of that block of text?  “Where there’s sewing there’s SINGER and where there’s SINGER there’s service” indeed.  Wow.  Personally I think they should have kicked that idea round the block a few more times before going firm on it, but at least they made the effort to get a bit lively.

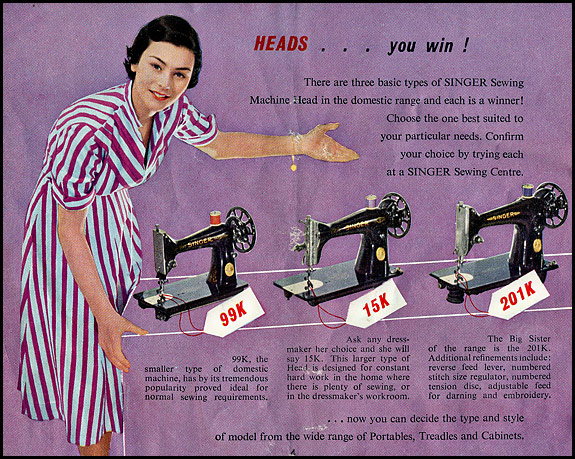
And finally we get down to the nitty-gritty.  We learn that the 99K is “the smaller type of domestic machine” and has “proved ideal for normal sewing requirements”.  Gosh, and to think that 50 or 60 years later the very same 99K is regularly touted on Ebay as a “heavy duty semi-industrial” machine.  Maybe they improved with age?

Interesting that the 15K’s “designed for constant hard work in the home … or in the dressmaker’s workroom”, but the best they can say about the 201, which is nowadays considered to be the real workhorse, is that it does tricks by way of reverse and drop feed.

Ooooh look!  The Queen Anne table, as often seen in those Eastbourne living rooms with the the patterned carpet, the Dralon three-piece suite with matching pouffe, the Bontempi organ in the corner and the framed print of Tretchikoff’s “The Chinese Girl” still on the wall above the electric coal-effect fire.

I love the bit about it being “a pleasing piece of furniture with many other uses” when the machine’s folded down and the top closed.  Beyond standing a couple of framed snaps of the grandchildren and/or an arrangement of dried flowers upon it, I wonder what those “many other uses” actually amounted to.

But now we’re talking!  The good old Enclosed Cabinet No.51, which I hadn’t realised was actually available in four finishes, one of which was “Brown Mission”.  Don’t ask us.  We haven’t a clue either.

Whatever the veneer, we like the 51 we do, because it’s eminently practical, it doesn’t take up much space, the treadle action’s nice on it, and it was available as a Convertible on which you can swop between treadle power and electric as the fancy takes you.

Elsie’s just read that last bit over my shoulder and says I shouldn’t big up the 51 cabinet any more in case people think I’m only saying how good it is because we have three spare ones in the house at present and wouldn’t mind seeing the back of a couple of them, but that’s not the case at all.  We really do like them.

Honest.

More deathless prose from Mister Jones and more of Ann Droid and her stripey frock to come when we do the remaining pages …

And now … clarification of “vintage Singer sewing books for sale!”

Standard

We’ve had three people asking if the Singer books we now have for sale on the “Bits and Bobs” page are originals or copies.

The question seems to have arisen because I originally wrote “We have a few spare copies of these books” and  “Clean and tidy copy” and so on.  I’ve just edited the listings, but I thought it best to make it clear that the books we have for sale are not copies.  They are originals.

We may have more than one copy of some titles, but all the copies we have are originals.

Not copies.

Some copies are in slightly better condition than other copies, but even the worst copy is in good condition, considering it’s not a copy.

They’re all original copies of the books.

They are what came off the printing press when they were first published in America

They are old.

We don’t do fake repro.

Wiring diagram for vintage Singers

Standard

I keep getting asked about wiring diagrams for vintage Singers, so here goes …

What follows relates to pretty much every standard domestic Singer electric sewing machine sold in the UK between 1930-ish and the mid-1960’s.  If your machine has a socket on it that takes a plug which looks something like these, we’re in business.

picture of vintage singer sewing machine plugs

Before we go any further, though, let me say yet again that there is no earth (ground) connection on these machines.  Yes it’s a three-pin plug and socket but no, one of them is not an earth connection.  There is no easy way of properly earthing a pre-1960’s domestic Singer, and in my opinion no earthly need to (hah!) as long as your consumer unit has an effective RCD.   If baffled by last bit, see here

If your machine takes those plugs, then the socket on it looks like this, although your pins might be solid rather than slotted like these are …

Picture of vintage Singer sewing machine motor socket

Obviously yours won’t be graced by those nice purple numbers, but we need them in the picture to show how the socket relates to the wiring diagram below.

Wiring diagram for vintage Singers

That’s the universal vintage Singer domestic wiring diagram in its simplest form, and you’re looking at it the same way as in that photo above.  Sorry about the watermark, but it took me ages to do that diagram in Photoshop, and if people are still going to steal the image, at least now they can do some advertising when they use it somewhere else.

In case it’s not obvious, “mtr” is motor,  “ctr” is controller – and yes, it really is that simple!  The practice might not be, but the principle certainly is.

Note that the connections are usually numbered on the back of the socket, but often they’re not on the plug, so do check that you have everything the right way round before connecting to the mains.

And that, dear reader, is as far as this explanation’s going, because if you can’t work out everything you need to from the above, it’s probably safer to leave your wiring to someone who can …

Les’s Longpods, the awful 285K – and our 100th post!

Standard

That’s Broad Bean “Les’s Longpod” on Monday of this week, that is – and those plants will grow up to produce loads of seriously scrummy broad beans, or if you’re in the US, fava or field beans.  They freeze well too.  It’s a variety we grow each year from saved seed, and it’s named after an old boy called Les, who gave us the seed when he gave up his allotment, on which he’d been growing it year in year out since the Siege of Kut.  (Since 1969, actually – Elsie)

Talking of times past, and seeing as how not many folks seem to use such things nowadays, I’d better explain that those beans are growing under some of our prized barn cloches.  We’ve got 49 of them, which means we’re the proud owners of 196 2ft x 1ft sheets of glass.  I know we bought 100 sheets from a glass merchant years ago, but I hadn’t realised until now that Elsie must have cut more than 96 of them since then from glass we’ve scrounged.

Barn cloches are a PITA to assemble every March and dismantle later in the summer, but we only reckon to break one sheet of glass a year in the process.  It’s worth the faffing about though, because they’re ever so much better than those plastic contraptions you see in garden centres.  They last for ages too – we bought some new wires a year or two back, but most of ours were well rusted when we acquired them 20-odd years ago.  We like barn cloches, we do.

It’s all happening in the greenhouse too.  That stuff in the pot is American Cress, which is one of those peculiar salad crops like Green In Snow and Mizuna which Elsie eats.  I of course play safe with the three different types of lettuce which are coming along nicely too. (More than three actually but he hasn’t realised that – Elsie)  In fact, we’ve stuff sprouting and coming up all over the place now.  We really ought to get our act together and get the spuds planted before much longer, but we’re still waiting for a delivery of spent mushroom compost for the top allotment, and that needs to go on before the spuds go in.  Still, Elsie’s got it all under control.  Apparently.

But hey, the veg is not the only thing that’s growing. Would you believe this is blog post number 100?  No, neither would I, but it is.  Even more surprising, I happened to look at the site stats the other evening and … 611 page views in the previous 24 hours!!??

What’s that about?

I don’t get it, but then I guess I don’t have to.

Anyhows … to celebrate our modest success in topping 600 page views in a day, here’s another of those wonderful old Singer commercials.  This one features, of all things, the truly dreadful 285K.  “Independent sewing experts” may well have given it “top value rating” at the time, but the truth is it’s a horrible machine which has since gone down in history as possibly the worst one Singer ever made …

Have a good weekend, folks.

Ebay – I suppose it had to happen …

Standard

My attention’s just been drawn to the above listing, which is item number 251020131277 now on Ebay.co.uk

Check out the picture, and then compare it with this one, which is on our Bits ‘n’ Bobs page and is of the Vanguard buttonholer which we have for sale …

Notice the white scuff marks on the box?

At least they didn’t pinch all the text too – only the bit which says “with feed cover plate and screw plus original instructions complete with original sample buttonhole stapled to them” …

(Thanks for the email Carol!)

Another 201K for sale (nearly) and our new bikes.

Standard

Picture of Kalkhoff Agattu Ltd Edition electric bicycle

That’s Elsie’s new bike, that is, with her on it allotment-bound.  It’s a Kalkhoff Agattu pedelec, which is a rather expensive but very high quality German electrically-assisted bicycle.   I’ve got one the same now, only mine’s got my scruffy old half-dead black panniers on it rather than those posh blue ones of Elsie’s.  And in case you’re wondering, the answers to the questions we get asked most often about them are …

Round here we can do 30-35 miles before the batteries need recharging (which uses about 9p-worth of electric), but I’m sure we’d do well over 50 if we moved to the Fens.

The battery’s got a theoretical life of over 1000 charge/discharge cycles, and it’s guaranteed two years (as is the bike).

The motor drives the chain, not the wheels, so it too benefits from the 8-speed hub gears.

The motor supplies one of three levels of assistance – half as much effort as the rider’s putting in, the same, or twice as much – and that’s all worked out automatically by the electronics.

Yes, they are legal in the UK .  They’re bicycles, not electric mopeds, and no, you don’t have to wear a magic hat whilst riding one.

Yes, they are supremely comfortable, and yes the frame is aluminium so no, it won’t rust,.

Yes, the brakes are indeed hydraulic, and no, the lights work off the dynamo on the front wheel, not off the battery.

And no, riding down hills doesn’t charge the battery.

Let’s just say that they’re jolly good, and we now seem to be more or less back on track for The Giving Up Of The Motor Car, about which more in due course.  That’s obviously going to have an effect on our ability to buy-in machines for resale after we’ve fettled them, which leads me nicely on to the subject of 201K’s for sale.

Last Sunday, I was literally a couple of hours away from listing another Mk1 201 on the Singers for Sale page when we got an enquiry from a gent asking did we have one.  Yes we did, it was exactly what he wanted, and it left here yesterday bound for Norfolk.   And no sooner had it left than we got another email from a lady in London town asking … have we by any chance got a nice Mk2 201 for sale?  Yes we have, or to be more precise will have once we’ve given it The Treatment, so at least we know what we’re going to be doing next!

Now, and I kid you not, no sooner had I sorted that out and Elsie was gone in the bath than in comes another email asking – do we have a long waiting list for 201’s?  To which it was tempting to reply “No, but at this rate we very soon will have!”.  But I didn’t, so it looks like we now have two more 201’s pretty much accounted for even before we’ve started work on them.

So, where is this all leading?  To a waiting list, dear reader.  That’s where.  At least for the time being, if you’re after a nice 201K, the way forward is to drop us an email and tell us what exactly you’re in need of.  Specifically, it’s helpful if we know your preference for Mk1 or Mk2 (the difference between them being only looks and 4.5Kg), and how important cosmetic condition is to you assuming that the machine’s 100% mechanically.  It’s also handy to know how bothered you are about the type and condition of its base and case.

Right, I’m off to get the kettle on and then amend the Singers for Sale page accordingly …

The handwheel and the stop motion on a vintage Singer – part two

Standard

Following on from the last post, we’ll now look at how to replace the handwheel, or if you like the balance wheel, which is a process that can make no sense at all if you don’t understand what’s what.

Before we get stuck in though, I need to stress that what follows applies only to the classic Singers with the big chromed knob in the middle of the handwheel.  You’re on your own with anything more modern.

Right … assuming that you’ve had the handwheel off for whatever reason, put a couple of drops of sewing machine oil on the end of the shaft before you slip it back on and give the wheel a spin to spread the oil.  And now for the interesting bit.  You need to put the stop motion clamp washer back where it came from, and it can go back on four different ways – two with the projections on its inside facing into the shaft …

And two with them facing outwards …

So which is the right one?  The answer is that it’s one of the bottom two i.e. it goes back on with the projections on the inside of the washer facing outwards.  But that obviously still leaves two possible ways to fit it, and here’s why you need to get it right …

As we said in part one of this epistle, the two projections on the inside of the washer locate it on the shaft, such that both shaft and washer always rotate together.  But it’s those three sticky-outy bits on the outside of the washer that we need to concern ourselves with now, and in engineer-speak, sticky-outy bits like that are called lugs.  That’s why in some parts of the country you hang your glasses on your lugs, and the orifice into which blokes insert their little finger before wiggling it theatrically is their lug ‘ole.  But I digress.

Let’s have another look at the stop motion clamp screw, and at that small screw in its head which you have to unscrew before you can take the clamp screw off.  That’s called the stop screw, by the way.  Now, if your nice shiny chromed knob is still like it was when you took it off, the underside of it will look like this …

And it probably won’t surprise you to find that if you screw the stop screw back in, like you will when you put this all back together, it’ll look like this …

Now you have to pretend really hard.  You know how you took your stop motion clamp screw off by unscrewing the stop screw, then unscrewing the stop motion clamp screw itself so that it came off and the clamp washer fell out?  Well, imagine that you could somehow magically remove both knob and washer without unscrewing anything, such that they came off in your hand together, exactly as they were on the machine.  If you could do that, they would look like this …

Except for one thing.  The washer would be the other way up.  For clarity, I’ve taken these close-ups with the washer reversed so that it sits against the head of the screw.

What you’re looking at there is the relative position of the stop screw and the washer when you’ve released the clutch in order to wind a bobbin.   Remember that when you do that, the washer stays put on the shaft?  Well, now you can see why when you de-clutch a vintage Singer, you can only unscrew the knob about a third of a turn.  Yep, the stop screw comes up against one of those three lugs, and that stops you unscrewing it any further.  That’s why it’s called the stop screw.

Now, when you’ve wound your bobbin and you want to revert to normal sewing, what you do is screw your stop motion clamp screw in, i.e. you rotate it clockwise.  You can be forgiven for now thinking “Ahah, so the stop screw hits another lug and stops me tightening it any further?” because that’s what it looks like in this next photo.  But that’s not actually the case.

In fact you tighten the knob until you’ve squashed everything together tight enough to squeeze up the slack and lock your handwheel to the shaft.  That’s what stops you rotating the stop motion clamp screw any further – not one of those lugs.  Everything needs to be clamped together by the stop motion clamp screw before you’ve turned it far enough forward for the stop screw to hit one of those three lugs like it has in the picture below.

Gosh.  At last we’ve arrived at how this all relates to which way round that washer (which, remember, is upside down in those two pictures) goes.

Hurrah!

To sum up the story so far, when we come to put everything back together, we need to meet two conditions.  Things need to be so arranged that when we slacken the stop motion clamp screw, we can turn it anti-clockwise far enough to release the pressure on the handwheel so it becomes free to rotate round the shaft, but not so far that we risk the washer getting out of position.  That’s the first condition.  The second is we need to ensure that when we tighten the stop motion clamp screw, everything squashes up enough to lock the handwheel to the shaft before that little lock screw hits a lug.

Unfortunately, those two conditions are only met with the washer one particular way round.  And which way round is that?  Who knows …

Fear not though, dear reader.  All is about to be made clear.

Hopefully …

First of all it helps if we can increase the odds on the washer staying put on the end of the shaft while we screw the stop motion clamp screw back in place.  The way I do that is to have the two slots in the end of the shaft horizontally opposed to each other, and if they’re not like that already, it’s just a case of putting a screwdriver across them like in the picture above and levering the shaft round to where we want it.

What we do then is put the washer on the end of the shaft with the inside projections facing outwards, we check that the little stop screw isn’t protruding through to the back of the stop motion clamp screw, then it’s just a case of carefully screwing that back onto the shaft.

Screw it in as if tightening the clutch for normal sewing, then try screwing in the little stop screw.  If it won’t go all the way in, don’t force it, because it’s telling you it’s not happy with the way things are aligned.  In that case, back out the stop screw, remove the stop motion clamp screw and try again with the washer rotated 180 degrees round the shaft.

If the stop screw will go all the way in, hold the handwheel and turn the knob clockwise as far as you can.  If that leaves you with a handwheel which is locked to the shaft, hold your breath and try unscrewing the knob as far as you can.  If the handwheel rotates freely when you can’t unscrew the knob any further, it’s your lucky day.  You got it right first time.  You’ve met both conditions.  Rejoice, put the kettle on and break out the stale shop-cake.

If the stop screw goes all the way in but something (it’s actually a lug on the washer) stops you tightening the knob before it’s screwed in far enough to lock the handwheel, you need to try again.

It’s a comfort to know that if everything worked properly before you took the handwheel off, it’s just a case of you getting that washer back on the right way and all will once again be sweetness and light.  You have a 50% chance of getting it right first time.

The handwheel on a vintage Singer and the stop motion – part one

Standard

Picture of Balance wheel of Singer 99K

According to the old Singer parts lists, that big spokey wheel on the end of your vintage Singer is the balance wheel.  According to most folks who use a vintage Singer it’s the handwheel, so it’s the handwheel as far as we’re concerned here, and we’ll be looking at its removal and replacement, with a bit of a detour on the way.

But why, pray, would anyone want to take the thing off?  Well, you could be taking a machine apart because it’s in a disgusting state and cleaning it will be so much easier if you take off some of its bits.  Or maybe you want to change the handwheel for a different one?  You’re bored and it might be more interesting than cleaning the oven?  Who knows.  Whatever the reason, people do take their handwheel off.  Oh yes. Then they put it back on, and the funs starts when they find that the clutch doesn’t work.

“The clutch?” I hear you say.  “What clutch?”

Well, the clutch is what lives behind that big chromed knob in the middle of your handwheel, and without the clutch your machine would be nowhere near as user-friendly as it is.  That chromed knob is what is properly called the stop motion clamp screw, and it’s called the stop motion clamp screw because that’s what it does.  It stops the motion and it clamps things together.

When you hold the handwheel and turn the stop motion clamp screw clockwise, as you do for normal use, it clamps the handwheel to the shaft onto which it’s fitted, so that when the handwheel turns, so does the shaft.  On the far end of that shaft is the linkage to your needle bar, which goes up and down as the handwheel turns.

That upping-and-downing is the motion, which you stop by unscrewing the stop motion clamp screw when you want to wind a bobbin.  Unscrewing it stops the motion at the far end of the machine, so that your handwheel can drive the bobbin winder round and round without also driving the needle up and down.

Most people call the stop motion clamp screw the clutch knob, because unscrewing it disconnects the drive in the same way that pressing your foot on the clutch pedal disconnects the drive to your car’s wheels.  Let’s take a look behind it …

picture of stop motion clamp screw on vintage Singer

To do that, you need to remove the stop motion clamp screw, and you do that by first unscrewing that small screw in it.  But don’t unscrew it too far, or it will fall out and roll under the table, you won’t find it, and next time you Hoover it’ll be gone forever.  Unscrewed about as far as in that picture is plenty far enough.  If you can now unscrew the knob, that’s what you do.  The thread on it’s about 6mm long, by the way.  If you can’t unscrew it all the way so that it comes off, back that little screw out another half turn and try again.

As you take the chromed knob off, one of two things will happen.  More often than not, a steel washer-type thing will fall out from behind it.  Sometimes though the washer stays in place, in which case what you see when you take the knob off looks a lot like this …

picture of stop motion clamp washer in place on Singer 99K

So how does it all work then?  Well, it’s one of those things which is a doddle to expain if you’re sitting next to me with a machine in front of us, but trying to explain it on the interweb is not so easy.  Fear not, though, gentle reader.  We’ll manage.  Make yourself another coffee, maybe even grab a biscuit if you’re not still on the diet, then take what follows one sentence at a time.

In the picture above, you’re looking at the end of the shaft which runs through the arm of  the machine.  Two projections on the inside of that washer engage with slots in the end of that shaft, so obviously when the shaft goes round, so does the washer.  And vice versa.  Note that the handwheel is fitted on the same shaft.  It doesn’t go round with it, though, because it’s not fixed to it.

If you gave that handwheel a spin, it would just rotate on the shaft, which would stay put, as would the washer (if you put a finger on it to stop it falling off the end).  Just to labour the point, there’s no connection here between the handwheel and the shaft, so turning the handwheel isn’t going to turn the shaft, which isn’t going to move your needle up and down.  As shown in that picture, the motion is stopped.  That’s how things are when you’re bobbin-winding.

Now, if you replace the stop motion clamp screw (the chromed knob) and tighten it up, you’re back to normal – rotation of the handwheel drives the shaft which drives your needlebar up and down (and your feeds dogs backwards and forwards). That happens because tightening up the stop motion clamp screw clamps the handwheel to the shaft, so that whatever’s turning your handwheel also turns the shaft, and you can start sewing.

And at this point, anybody really thinking about this is going to be wondering exactly how the clamping of handwheel to shaft comes about, because it certainly isn’t obvious.  Here’s how …

That’s an exaggerated cross-section through the clutch area, and this is a simplified explanation.  The purple’s the chromed knob, and the red’s the important bit – the stop motion clamp washer.  In the diagram, the knob is unscrewed as for bobbin winding i.e. the motion is stopped.  Nothing’s held tight against anything, so when the handwheel turns, it just spins round on the shaft, which stays put, as does the washer and the knob.  All that happens is that the handwheel turns on the shaft.  Nothing else moves.

As we saw earlier, the washer is connected to the shaft by those two projections which sit in slots in the end of the shaft, such that if the washer turns, the shaft must too.  Those two projections are so arranged that while the washer can’t rotate about the shaft, it can move along it, but only very slightly.

Now imagine that purple knob being shoved hard over to the left, so it closes up the tiny gaps between itself, the washer, the handwheel and that step in the shaft, and squashes everything tightly together.  Squash hard enough, and you have a handwheel which is clamped to the shaft.

In practice, your stop motion clamp screw does the squashing. Tighten it up, and handwheel, knob, washer and shaft effectively become one, so turning the handwheel turns the shaft which makes your needle go up and down. That’s what happens every time you change from bobbin-winding back to normal sewing, and the key to it all is that washer.

OK, that’s the theory and the practice of the clutch, and by now your head probably hurts.  Mine certainly does from trying to explain it, so we’ll knock off here and continue in part two …